Marvel Super Heroes Recipes
Links for most of the materials are provided as well. Use any of this info as a launching off point to compare process, materials, or prices to sling out your own MARVELOUS figs!
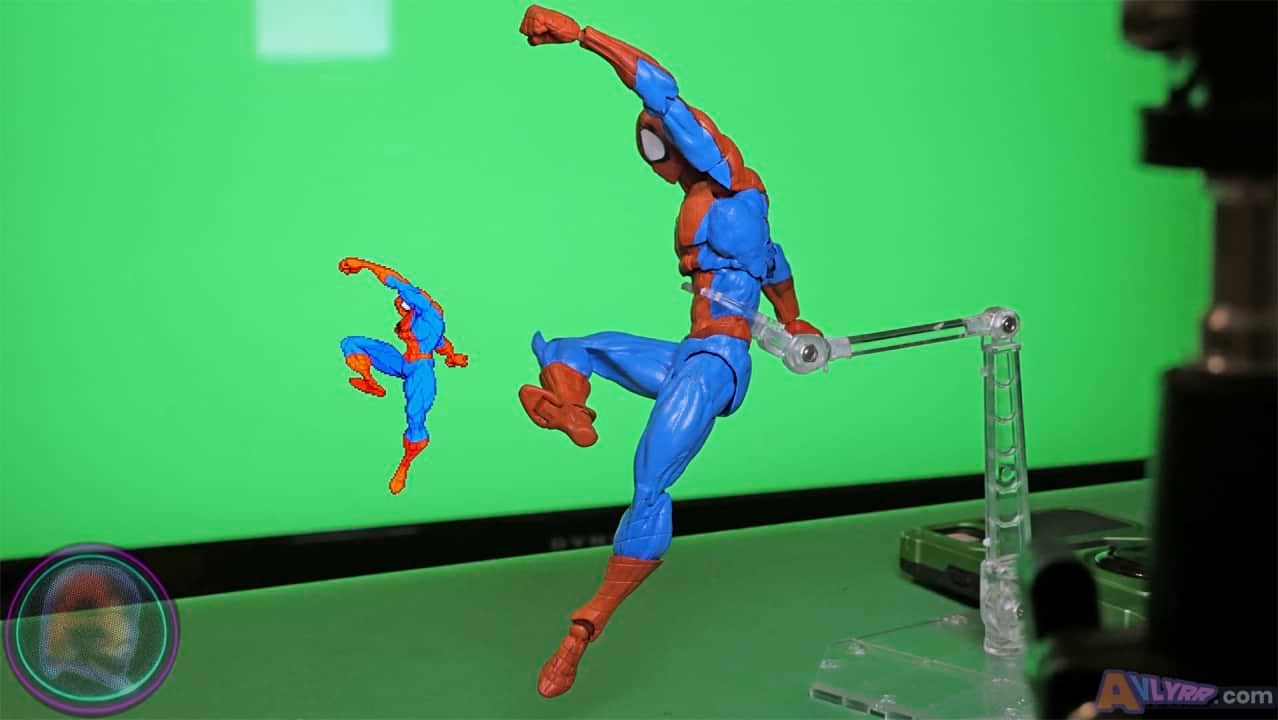
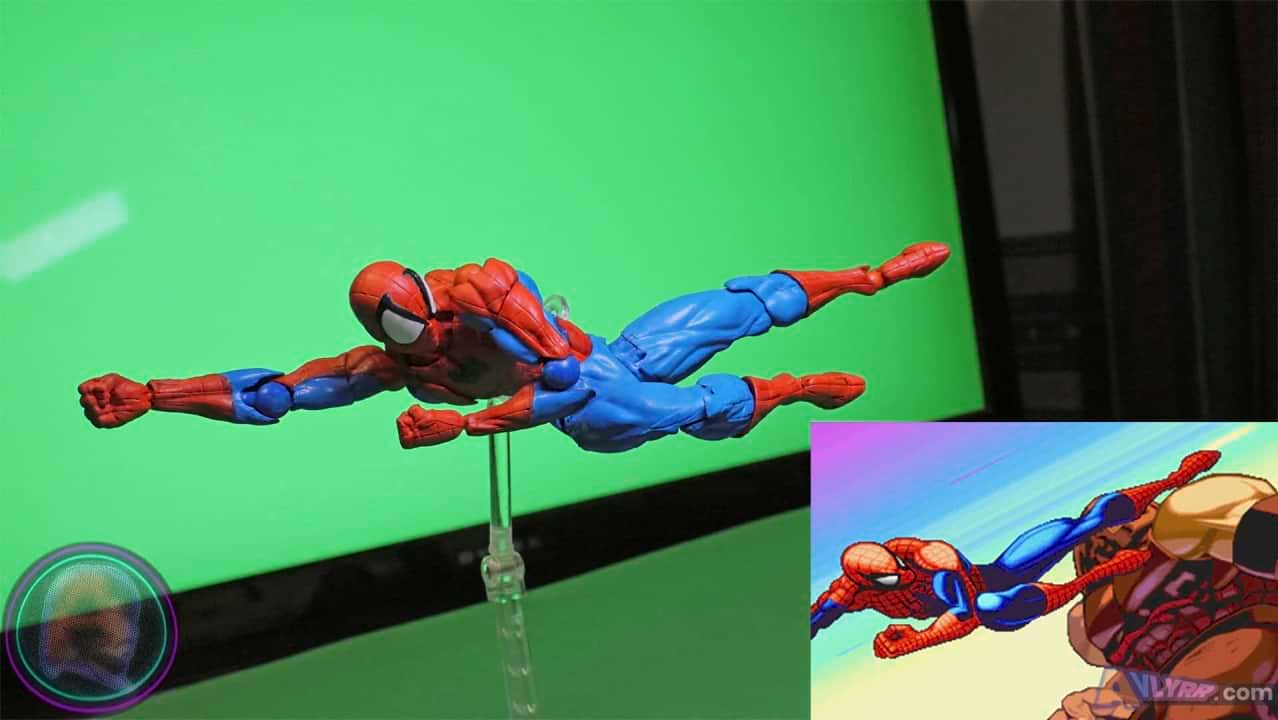
AMAZING🕸️SPIDER
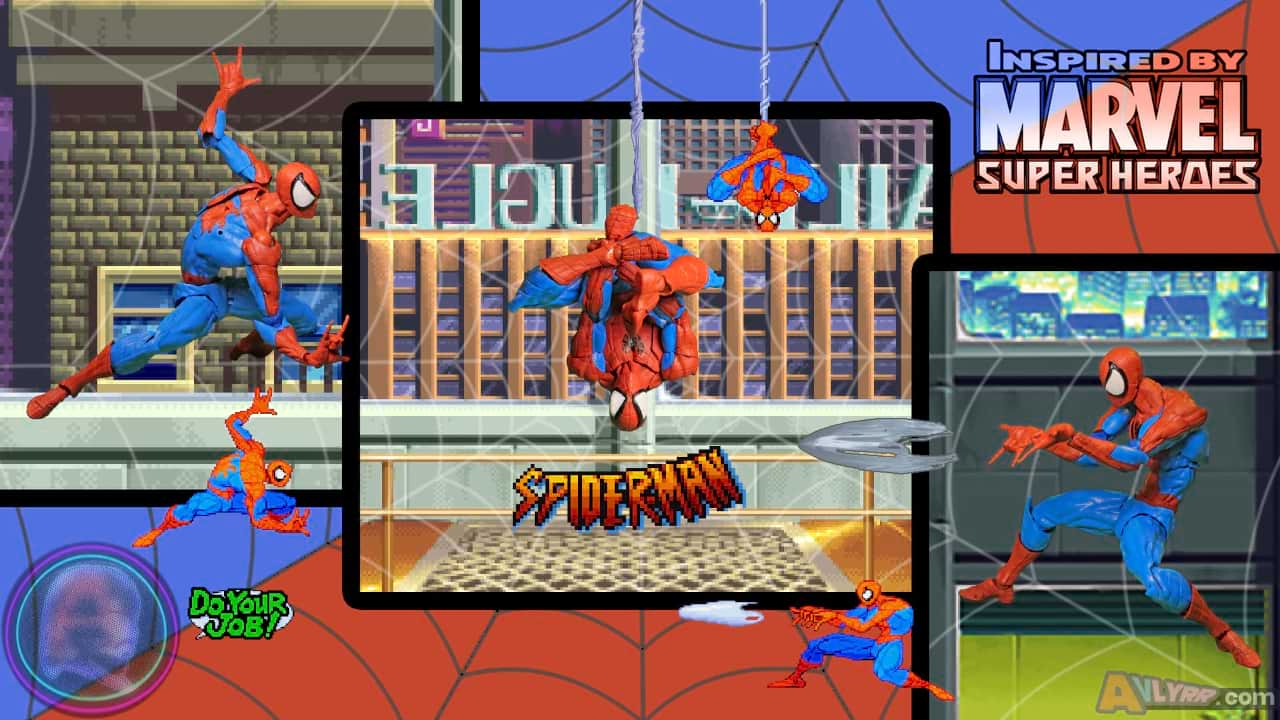
"Showtime!"
Process:
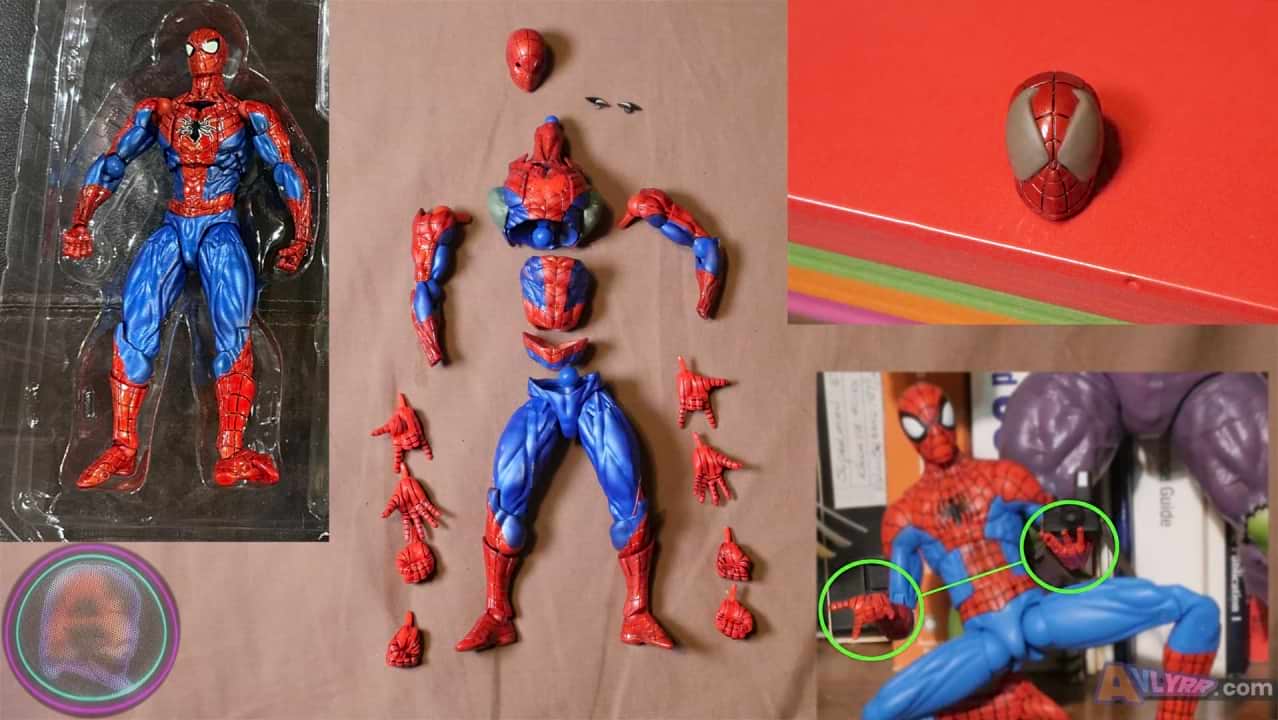
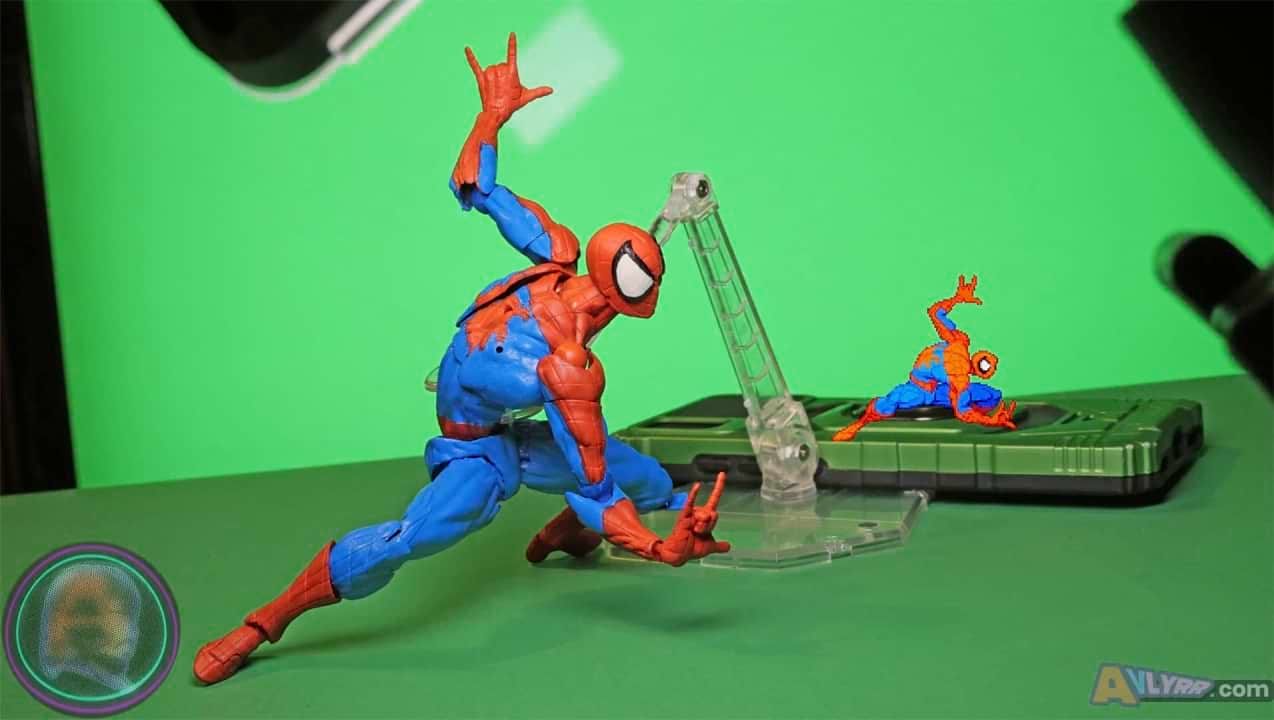
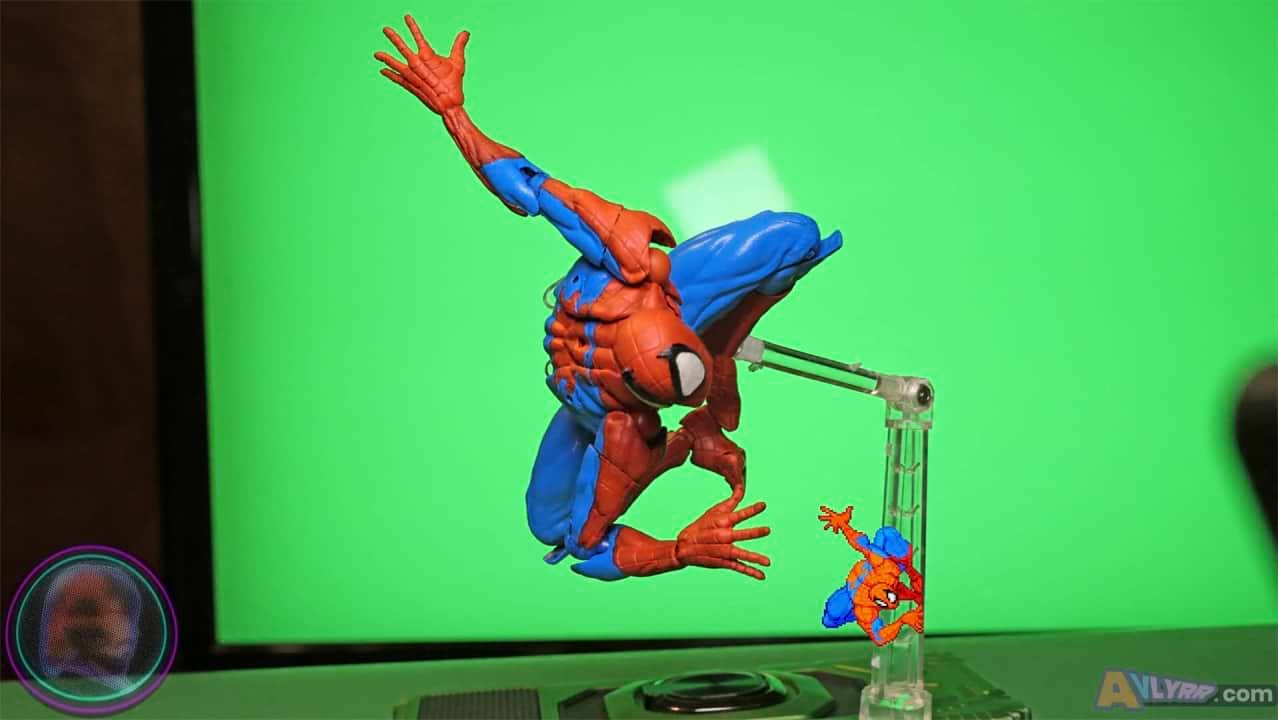
Kaiyodo Revoltech Amazing Yamaguchi Spider-Man Ver 2.0 as base and Marvel Diamond Select Disney Exclusive Spectacular Spider-Man for its hands. (Any 1/10 Spidey hands will probably work for their larger proportions.)
Trimmed all the pegs of the MS hands so they would fit in the AY’s holes.
Shaved off raised spider emblem on AY figure down to flat chest.
Sanded down entire figure.
Added Green Stuff sculpt on Spidey’s lats, under the arms, to give the figure a larger more defined V shape on the torso.
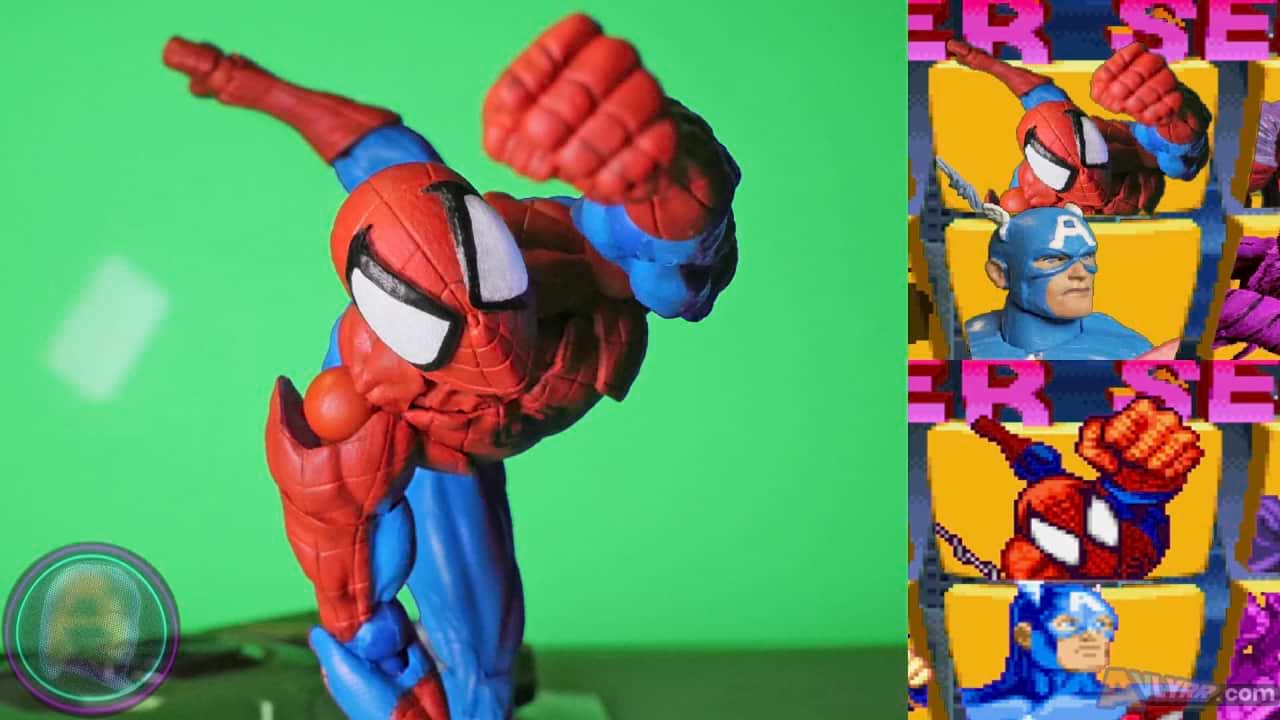
Put squinty smiling eye lenses in fig's head and using Aves sculpted larger eyes similar in shape to the sprite’s.
Painted the entire figure with 3 coats using the Capcom sprite as a reference on where red and blue lines run. (The red was mixed with more of an orange hue to match the sprite's color)
Painted lenses gloss white.
Using a black sharpie, drew the black outline around the white lenses.
Drew a small spider symbol on the chest.
Tools/Materials Used:
Brackets after the item are where they were originally purchased. This is in case you want to use anything I did and where they were found.
The initial cost as of 3/3/24 will be noted like this in USD for your consideration to weigh your options or so you can compare elswhere for better pricing.
Figure(s)
-Kaiyodo Revoltech Amazing Yamaguchi Spider-Man Ver 2.0 $80.42 (Be wary of knockoffs in the $20-$50 range.) and
-Marvel Diamond Select Disney Exclusive Spectacular Spider-Man for hands $52.57 (prices include tax and shipping) [eBay]
Tools
-Gordon Folding Lock-Back Utility Knife $5.44 [Harbor Freight]
-Sanding Sticks DGBRSM 30pcs Black 37mm $8.88 [Amazon]
-3M 150 sand paper $2.39 [Amazon]
-Transon Artist Paint Brushes Set of 12 $12.99 [Amazon]
-GJJC09B 1PC Painting Stand Base and 20PCS Alligator Clip Stick Set Modeling Tools for Airbrush Hobby Model Parts New $9.99 [Amazon] (This is used to hold painted parts while they dry)
-Honoson 5 Pieces Miniature Sculpting Tools Set Mini Stainless Steel Double-Headed Tool $11.99 [Amazon]
Materials
-The Army Painter Green Stuff $16.10 [Amazon]
-Aves Apoxie Sculpt - 2 Part Modeling Compound - 1/4 Pound, Natural $21.95 [Amazon]
-HFT Super Glue 3-pack $1.49 [Harbor Freight]
Paint
-Apple Barrel Primary Blue Satin ~$1 [Wal-Mart]
-Apple Barrel Tropical Blue Gloss $0.97 [Amazon]
-Apple Barrel White Gloss $0.97 [Wal-Mart]
-Apple Barrel White Satin $0.97 [Wal-Mart]
-Apple Barrel Candy Apple Satin $0.97 [Wal-Mart]
-Vallejo Clear Orange from set Vallejo Basic USA Acrylic Colors Paint Set, 17ml, Assorted Colors, 0.57 Fl Oz (Pack of 16)) $40.16 [Amazon] (can purchase cheaper individually).
Other
-Black Sharpie Fine Point for eye lens outline. $1.97 from a 2 pack [Wal-Mart]
-Black Felt Tip Sharpie for spider emblem. $5.87 from a 4 pack [Wal-Mart]
For Your Consideration:
A few extra modifications that you could do with yours to make this fig even more accurate:
-A variety of web effects, speech bubbles, and spider-sense as accessories.
-Consider attachments that can hide the ball joints/seams in some poses.
-Swappable eyes on the head for a few different expressions.
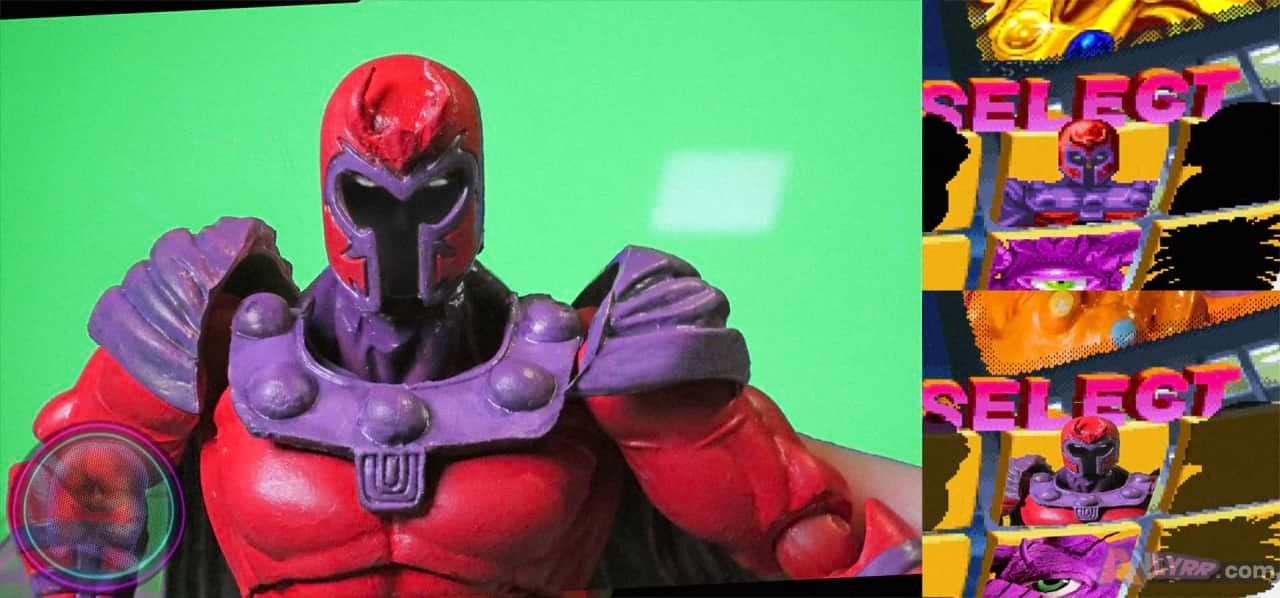
ANISOTROPIC🧲ANTI-VILLAIN
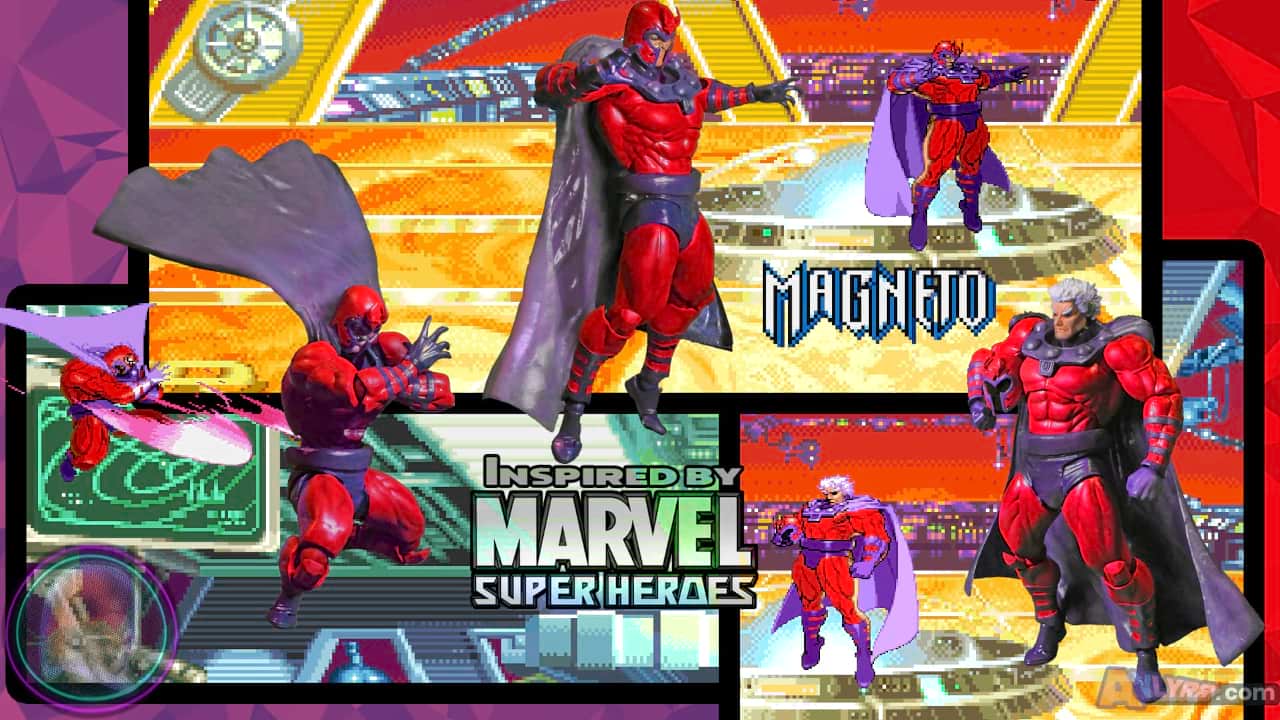
"Playtime is ENDED."
Process:
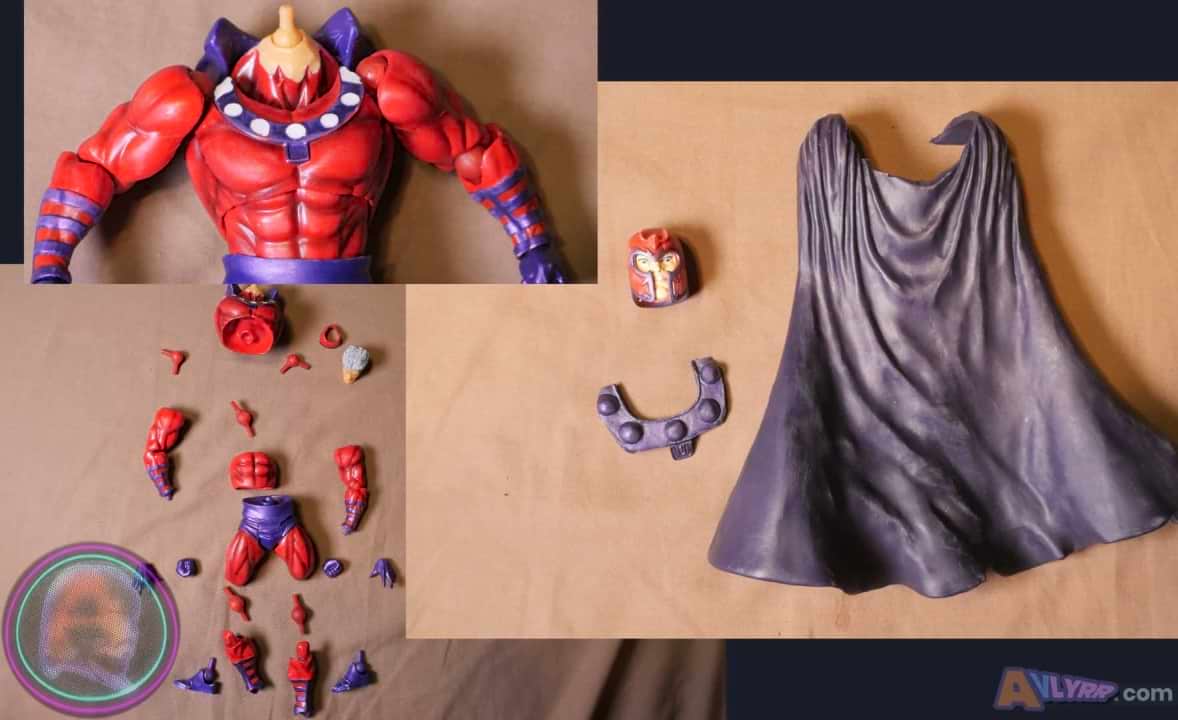
Took the helmeted head, rubber cape, and collar bone armor from the Marvel Select Magneto.
Ditched the Amazing Yamaguchi articulated cape and domed head.
Proceeded to shave the neck area of the AY Magneto so the MS head would fit and sit lower on it.
Added a dab of super glue inside the head's hole (that was left to dry unattached) so that it'd fit snugly on the peg. (You could alternately just add a little super glue or sculpt on the tip of the peg to let dry if you prefer that way instead. Just mind that the super glue doesn't drip into the neck joint.)
Cut off the plum colored nubs around AY's collar then sanded any residual bump-age down to level.
Removed the chunky back piece from AY. (It pulls right off with a little pressure. I'm sure you can make it even easier by heating that spot with a hair dryer if you want.)
Added a mini portion of sculpt to Magneto's helmet horns to make 'em longer and molded him a thicker (more rounded) belt.
Took the Yamaguchi fig apart before sanding and painting. (These Revoltech Yamaguchis are pretty easy to take apart. As always tho still be mindfully cautious when pulling it apart. Take your time and use a lil heat from a dryer or warm water if you want to play it safe.)
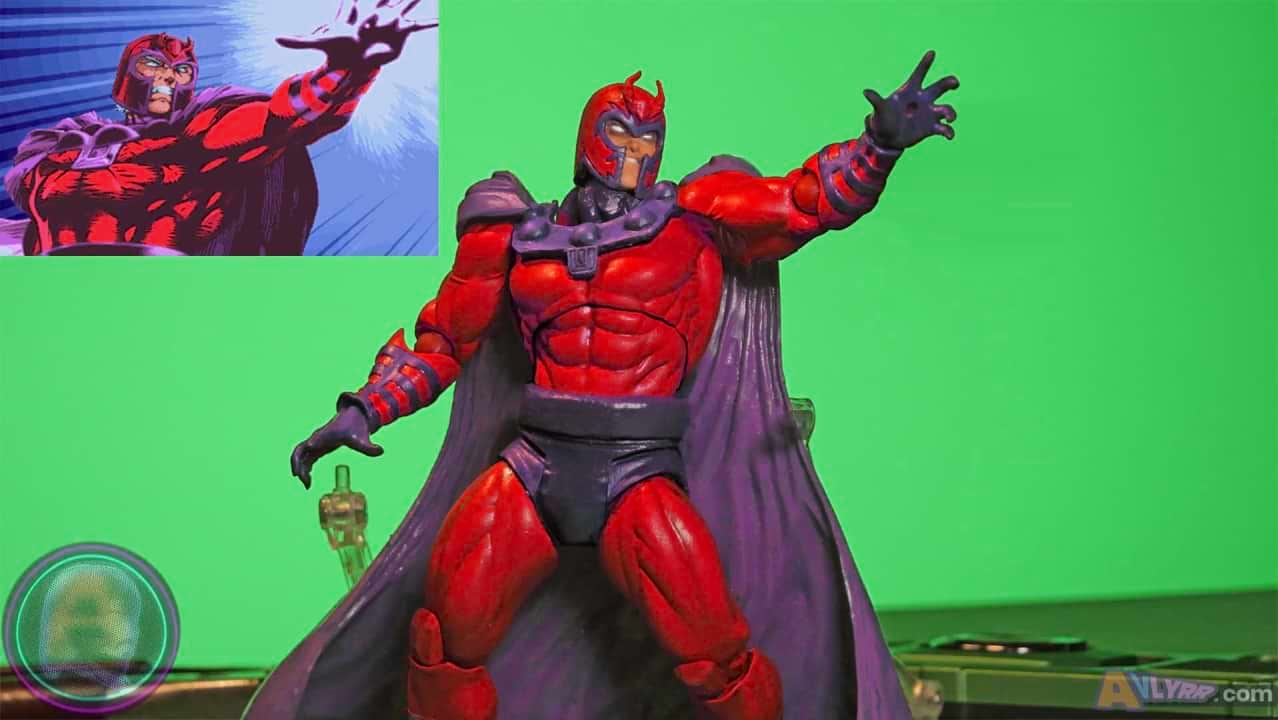
3 coats of paint on all of the pieces besides the cape and alt head.Super glued the MS chest horseshoe thing onto the painted fig. (Only used the front portion because it would have restricted the figures flexibility in the shoulder area especially with the rubber cape involved.)
Mixed a lighter purple paint and added some highlights around the fig.Used that same shade of purple to paint the cape, but made certain to make the inside just a hair darker. (3 coats on both sides)
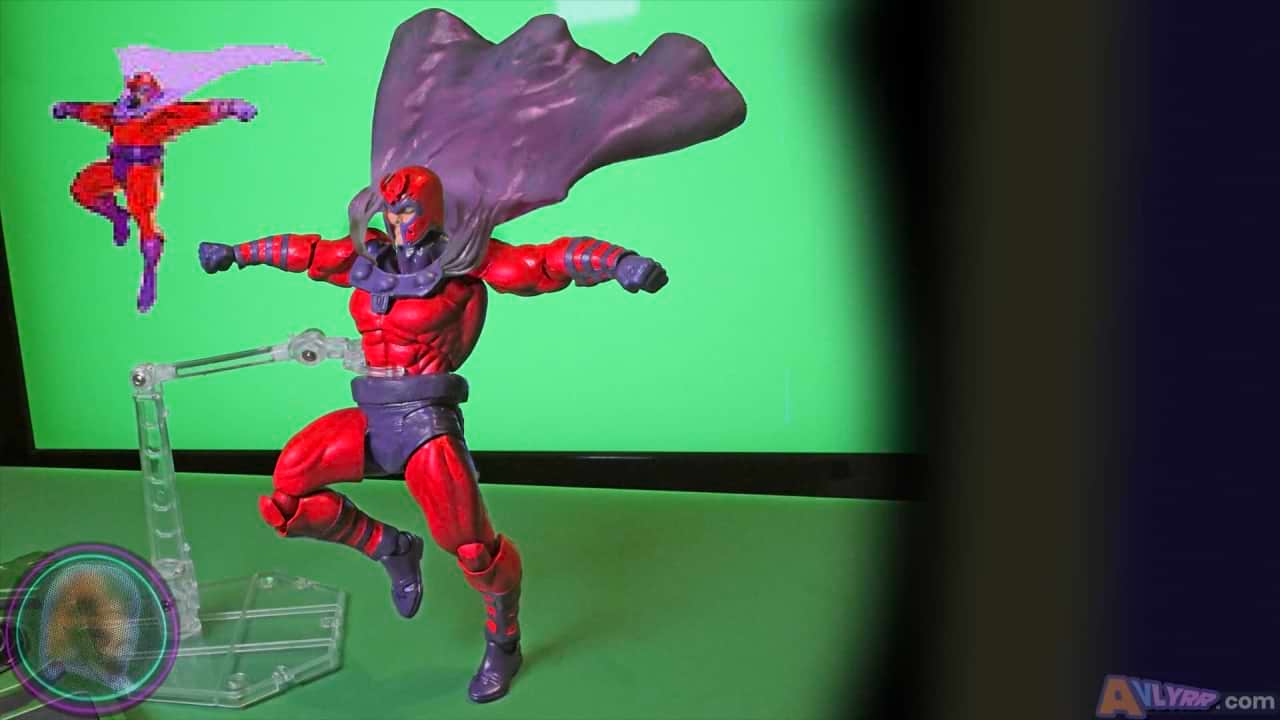
Ended up using some velcro to attach inside cape to the back of the body. (If you want to chance either creating or purchasing a wired cape for Mags that'll probably be your best bet overall.)
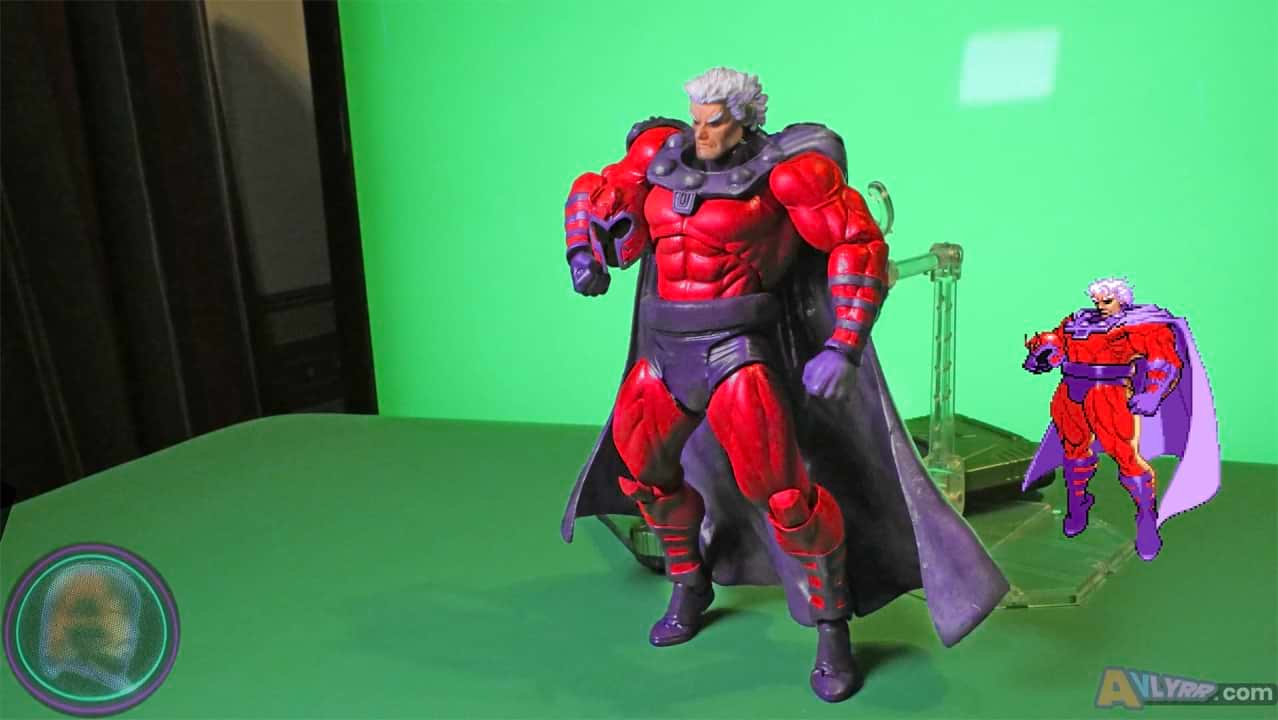
Took the alternate head from the AY fig and decided to sand down the hair height a smidge before painting.
Then using some black construction-like paper made 2 little pieces that could fit inside his helmet over his face to give him that silhouetted mask look. (One with white eyes and one without.)
Tools/Materials Used:
Brackets after the item are where they were originally purchased. This is in case you want to use anything I did and where they were found.
The initial cost as of 3/3/24 will be noted like this in USD for your consideration to weigh your options or so you can compare elswhere for better pricing.
Figure(s)
-Revoltech Amazing Yamaguchi Magneto No. 006 $66.44 [eBay] (Be wary of knockoffs in the $30 range) and
-Diamond Select Marvel Select Magneto $23.74 [eBay] (Tax and Shipping included in prices)
Tools
-Gordon Folding Lock-Back Utility Knife $5.44 [Harbor Freight]
-Sanding Sticks DGBRSM 30pcs Black 37mm $8.88 [Amazon]
-3M 150 sand paper $2.39 [Amazon]
-Transon Artist Paint Brushes Set of 12 $12.99 [Amazon]
-GJJC09B 1PC Painting Stand Base and 20PCS Alligator Clip Stick Set Modeling Tools for Airbrush Hobby Model Parts New $9.99 [Amazon] (This is used to hold painted parts while they dry)
-Honoson 5 Pieces Miniature Sculpting Tools Set Mini Stainless Steel Double-Headed Tool $11.99 [Amazon]
Materials
-Aves Apoxie Sculpt - 2 Part Modeling Compound - 1/4 Pound, Natural $21.95 [Amazon]
-HFT Super Glue 3-pack $1.49 [Harbor Freight]
-VELCRO Brand Sticky Back Hook and Loop Fasteners - 5/8", Pack of 20 Black Circle Coins $3.47 [Wal-Mart]
-Black Construction Paper ~$4 to $5 in a pack
Paint
-Apple Barrel Real Red Gloss $0.97 [Amazon]
-Apple Barrel Purple Velvet Gloss $4.99 [Amazon]
-Apple Barrel White Gloss $0.97 [Wal-Mart]
-Vallejo Model Color Flat Flesh and Vallejo Flat Brown for skin from set Vallejo Basic USA Acrylic Colors Paint Set, 17ml, Assorted Colors, 0.57 Fl Oz (Pack of 16)) $40.16 [Amazon] (can purchase cheaper individually)
Optional Paint Note: Would try to make brighter red mixing the Real Red Gloss above with varying drops of Apple Barrel Outrageous Orange Satin [Wal-Mart] and Apple Barrel Real Yellow Gloss. [Wal-Mart] But honestly it doesn't make THAT much difference. The Real Red works just fine and, with any fig, lighting it properly while you color it helps determine how it will show up on and off camera.
Other
-Black and Red Felt Tip Sharpies $5.87 from a 4 pack [Wal-Mart]
For Your Consideration:
A few extra modifications that you could do with yours to make this fig even more accurate:
-Sew or buy a wired cape.
-Create or buy effects to use as add-ons for his magnetic powers.
-Another alternate head for expression or hands would bring even more variety to your Magneto.
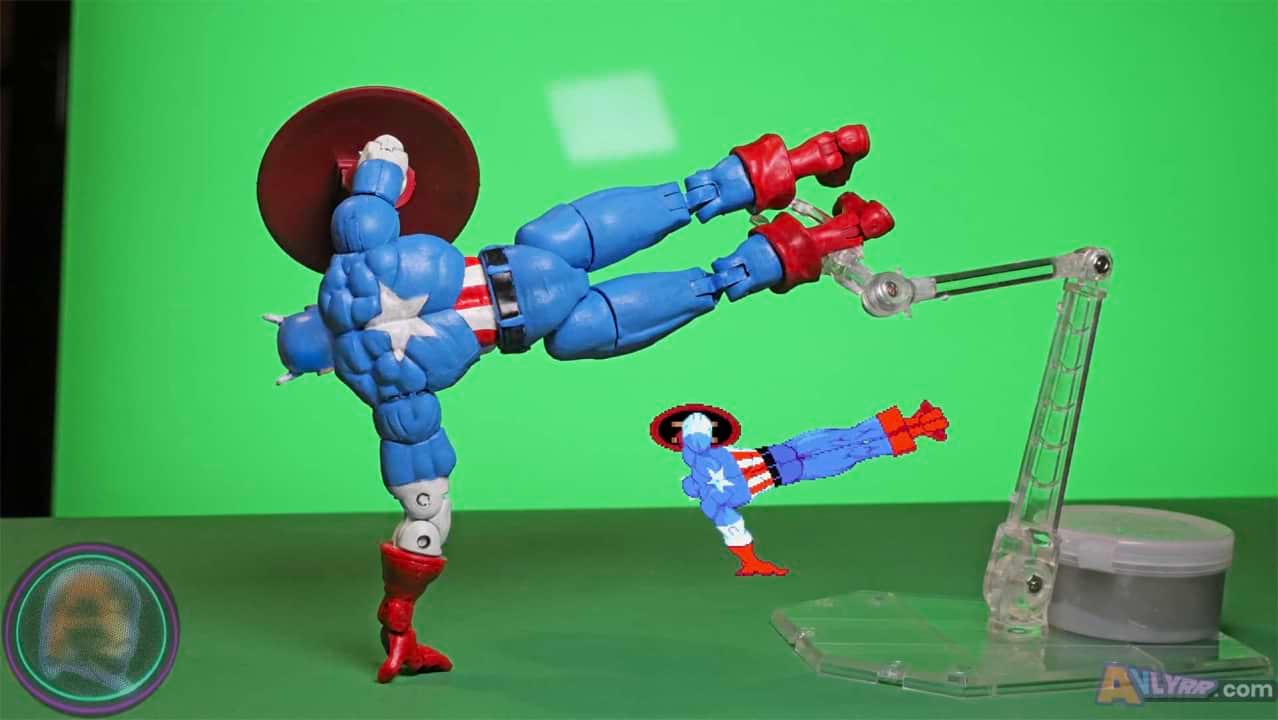
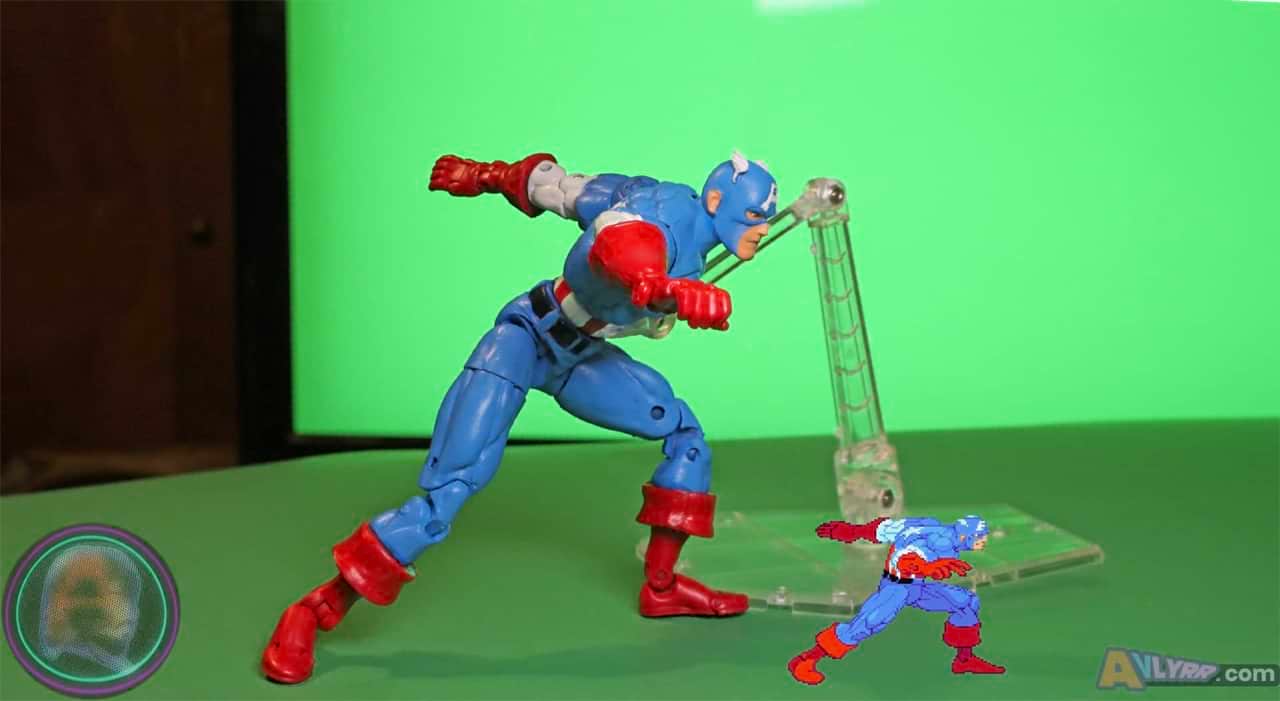
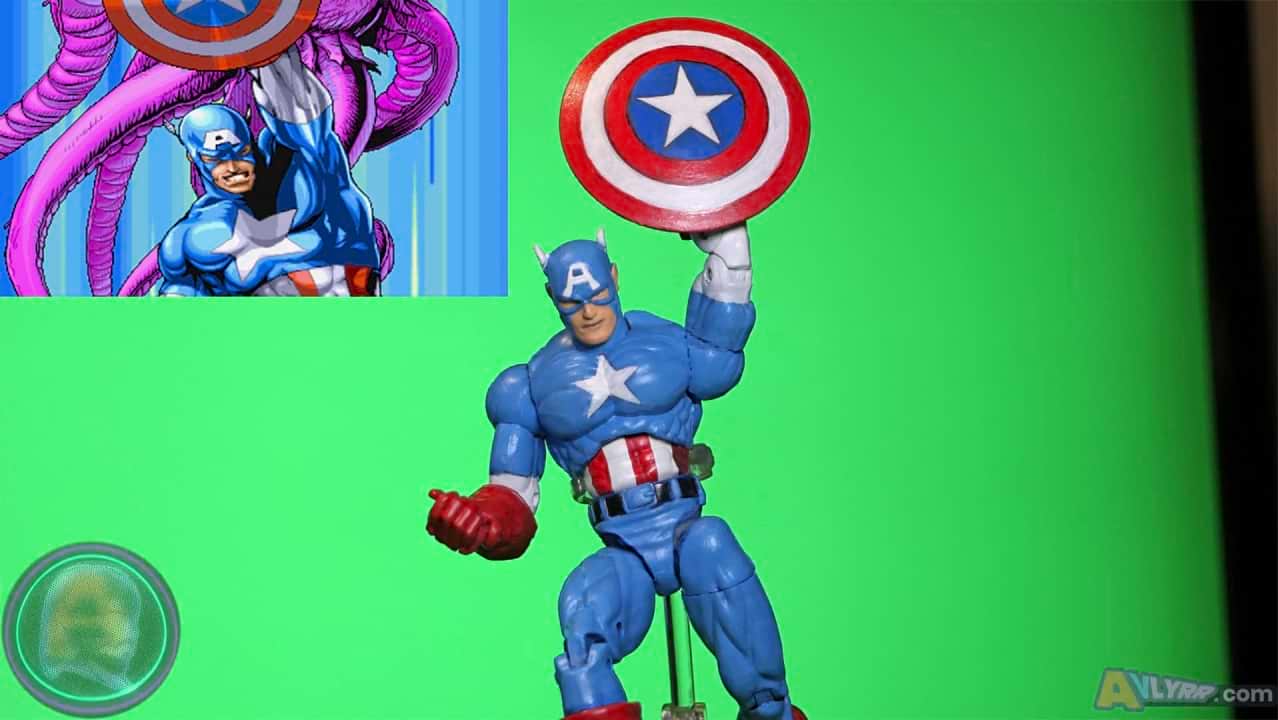
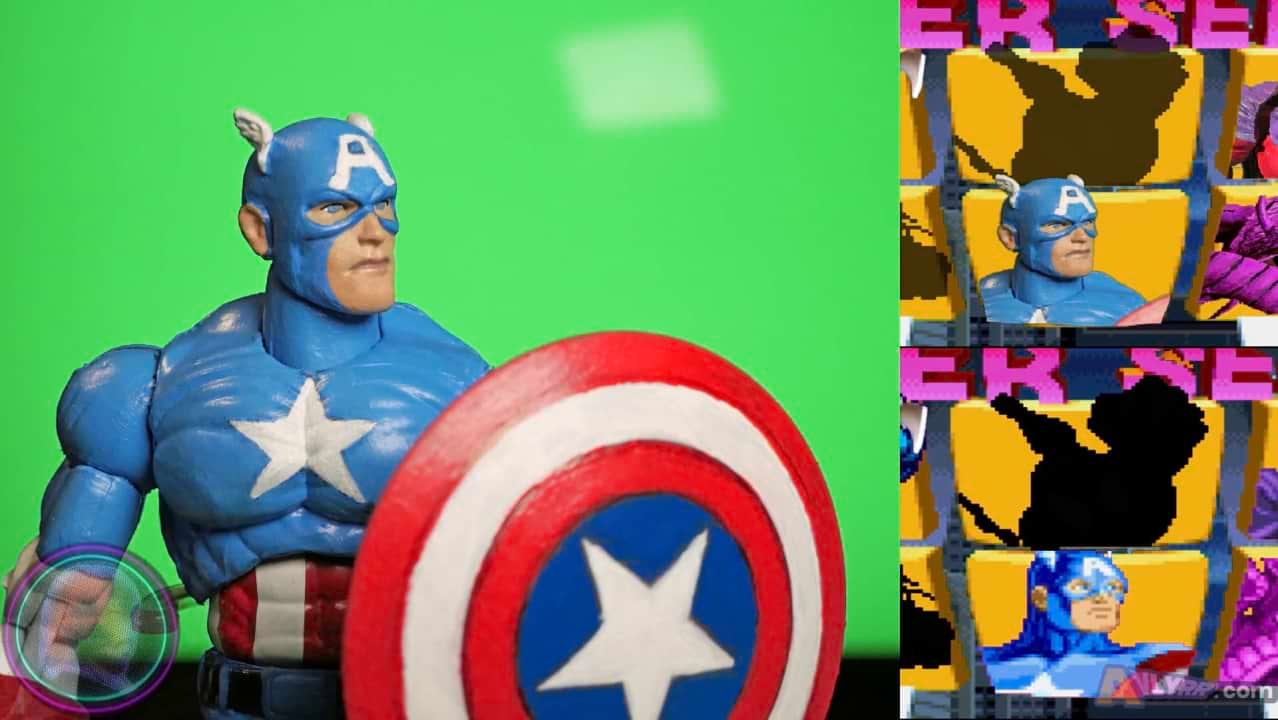
UNITED🦅PATRIOT(S)
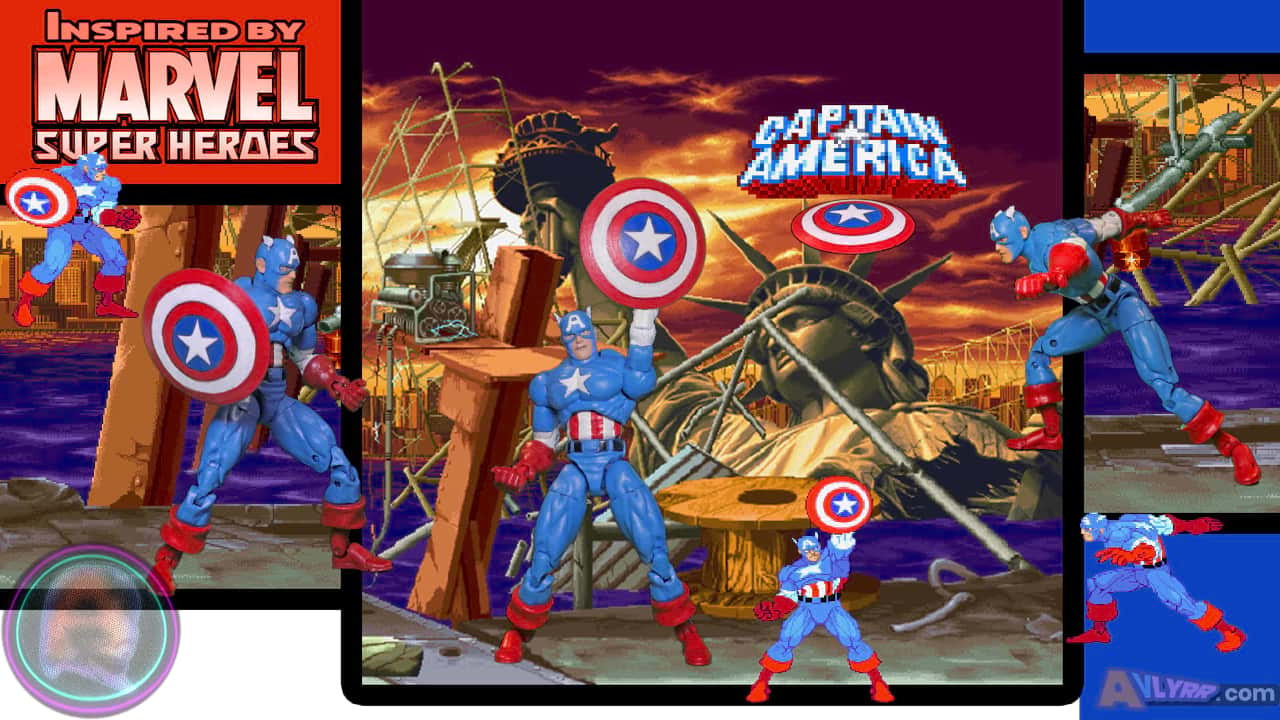
"Freedom prevails!"
Process:
Toybiz Series 1 Captain America and Marvel Legends Infinite Series Cap were used for base and parts.
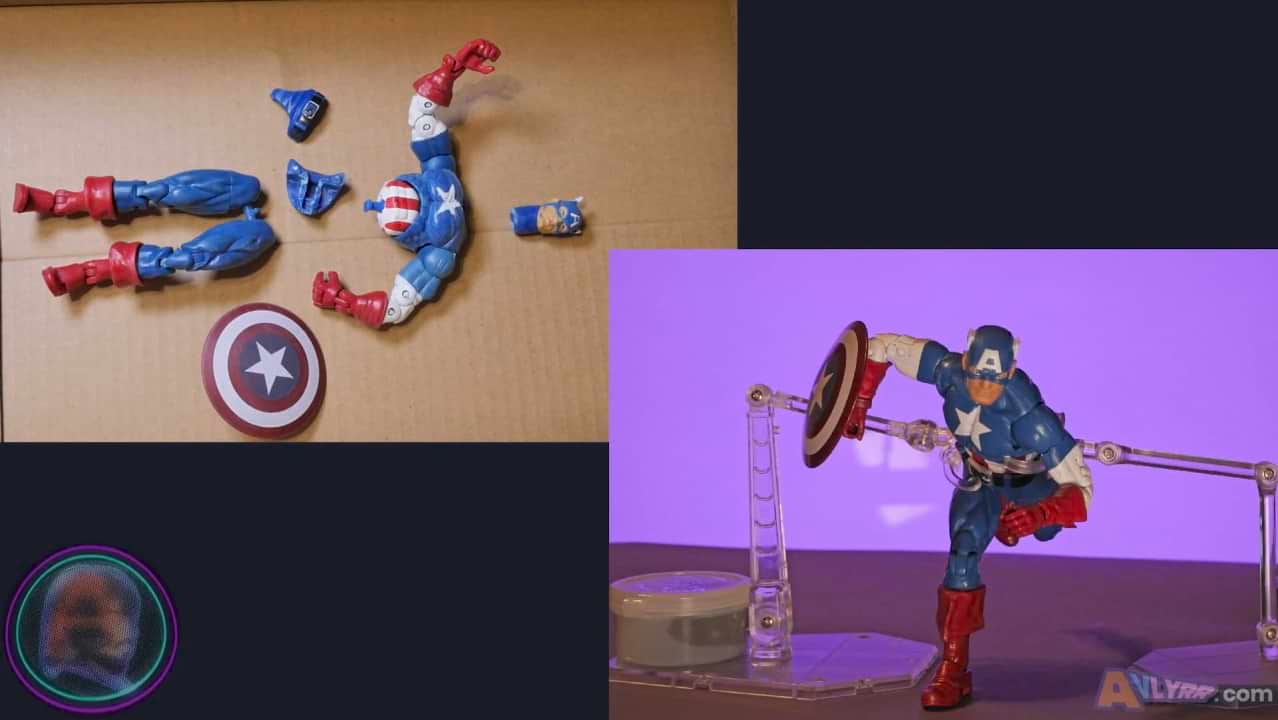
Cracked open both figures crotch areas. (Cut into seam along the sides.Ya might even drill, using a small bit, into the crotch.)
Removed the calf and feet portions from both figures thighs.
A little minor hole resizing with the hand drill on the lower portion of the upper thighs of Infinite Cap.
Added a little super glue to the calf and feet from the Toybiz upon connecting the pegs to the upper thighs of the Infinite Series Cap. (Make sure when adding super glue to joins to "fatten" that you work it back n forth to not let it seize up completely till it dries)
Shaved around the inside of the Toybiz Cap’s separated crotch. (To make sure the thicker upper thighs of the Infinite’s would fit inside later.)
Trimmed and sanded just the slightest bit of the top of Cap’s head to make it a little flatter.
Cut off a sliver at the top of each head wing.
Shaved the cuffs around his gloves and his boots to make them smoother.
Sanded everything down.
Added a little bit of sculpt to the back of his lats just to give him some more V.
Put just enough sculpt where the capital A was indented on his head. (To later paint the A shape closer to how the sprite's looked.)
Sanded the set sculpted areas down.
Went ahead and painted the loose parts of the figure with a base coat first.
After it all dried then attached the crotch of the Toybiz upper body to the Infinite series’ thighs with some super glue. (Again, mindful to not glue the joints inside and to work the legs back n forth a bit so as not to seize up)
Sculpted the crotch area and sanded it down smooth after it set. (If you need to make the thigh holes more snug, you can always use plastic shavings with a little bit of super glue to shove into it that you'll move until it sets.)
Painted everything the appropriate color for 2 more coats and some light touch-ups.Used markers to lightly follow the lines of the shield and then painted that as well.
Random note: It may be easier to create stencils to do the lines of the shield instead of free-handing it. This would be an extra step, but it would be worth it for uniformity.
Tools/Materials Used:
Brackets after the item are where they were originally purchased. This is in case you want to use anything I did and where they were found.
The initial cost as of 3/3/24 will be noted like this in USD for your consideration to weigh your options or so you can compare elswhere for better pricing.
Figure(s)
-Toybiz Marvel Legends Series 1 Captain America $16.63
[eBay]
-Marvel Legends Infinite Series Target Exclusive w/ shield $22.27 [eBay] (prices include tax and shipping)
Tools
-Gordon Folding Lock-Back Utility Knife $5.44 [Harbor Freight]
-Sanding Sticks DGBRSM 30pcs Black 37mm $8.88 [Amazon]
-3M 150 sand paper $2.39 [Amazon]
-Transon Artist Paint Brushes Set of 12 $12.99 [Amazon]
-GJJC09B 1PC Painting Stand Base and 20PCS Alligator Clip Stick Set Modeling Tools for Airbrush Hobby Model Parts New $9.99 [Amazon] (This is used to hold painted parts while they dry)
-Honoson 5 Pieces Miniature Sculpting Tools Set Mini Stainless Steel Double-Headed Tool $11.99 [Amazon]
-Rotary Tool, 4V Cordless Mini Rotary Multi-Tool Kit with 2 Variable Speed, 31pcs Accessories Kit for Carving, Engraving and Polishing $14.99 [Amazon]
Materials
-Aves Apoxie Sculpt - 2 Part Modeling Compound - 1/4 Pound, Natural $21.95 [Amazon]
-HFT Super Glue 3-pack $1.49 [Harbor Freight]
Paint
-Apple Barrel Primary Blue Satin ~$1 [Wal-Mart]
-Apple Barrel White Gloss $0.97 [Wal-Mart]
-Apple Barrel White Satin $0.97 [Wal-Mart]
-Apple Barrel Tropical Blue Gloss $0.97 [Amazon]
-Apple Barrel Real Red Gloss $0.97 [Amazon]
-Vallejo Model Color Flat Flesh from set Vallejo Basic USA Acrylic Colors Paint Set, 17ml, Assorted Colors, 0.57 Fl Oz (Pack of 16)) $40.16 [Amazon] (can purchase cheaper individually)
Other
-Blue and Red Felt Tip Sharpies $5.87 from a 4 pack [Wal-Mart]
For Your Consideration:
A few extra modifications that you could do with yours to make this fig even more accurate:
-Alternate hands for variety.
-Some alt heads to give him more expressions. (Yelling face, grit teeth, smile, etc.)
-A better painted shield with the brown straps underneath.
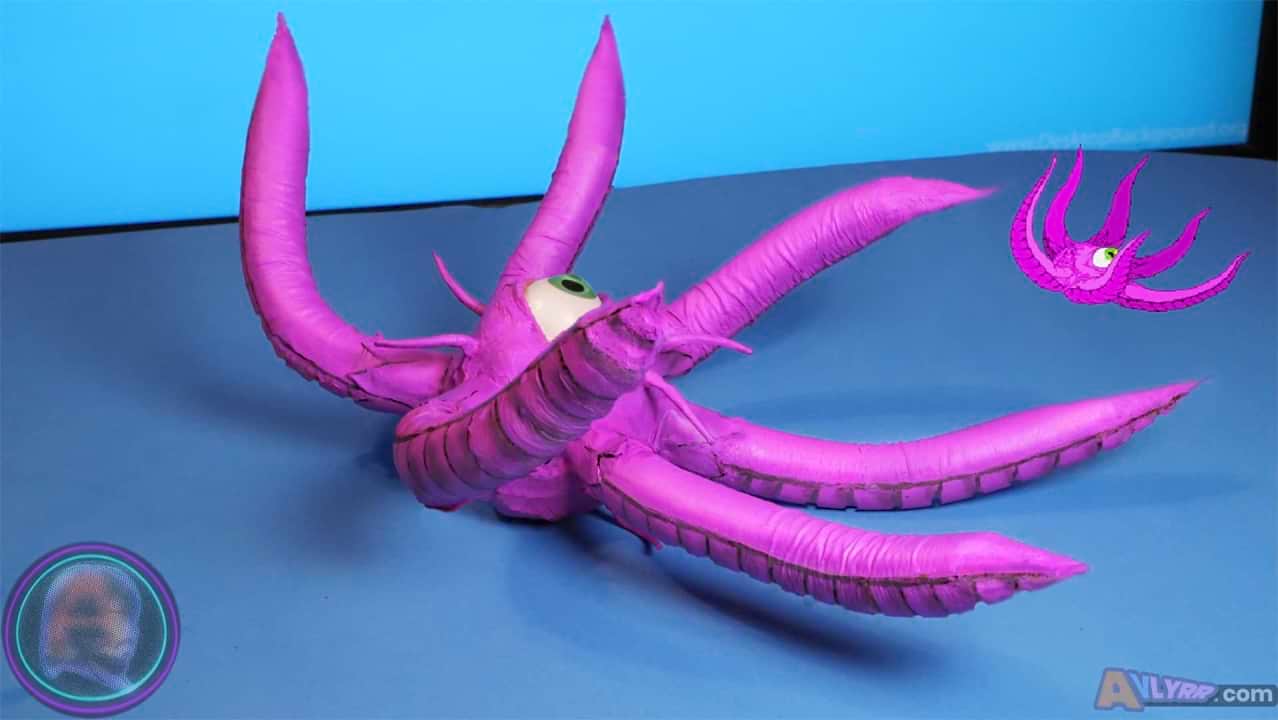
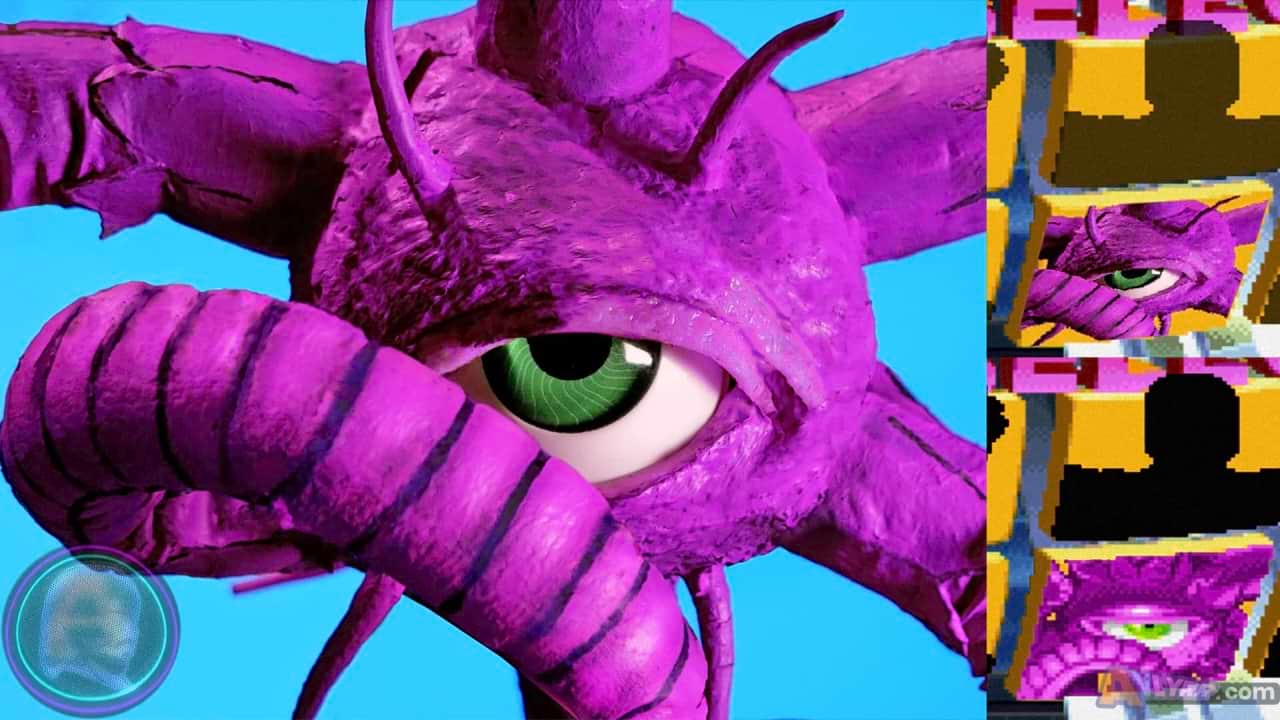
GORATH🐙GO
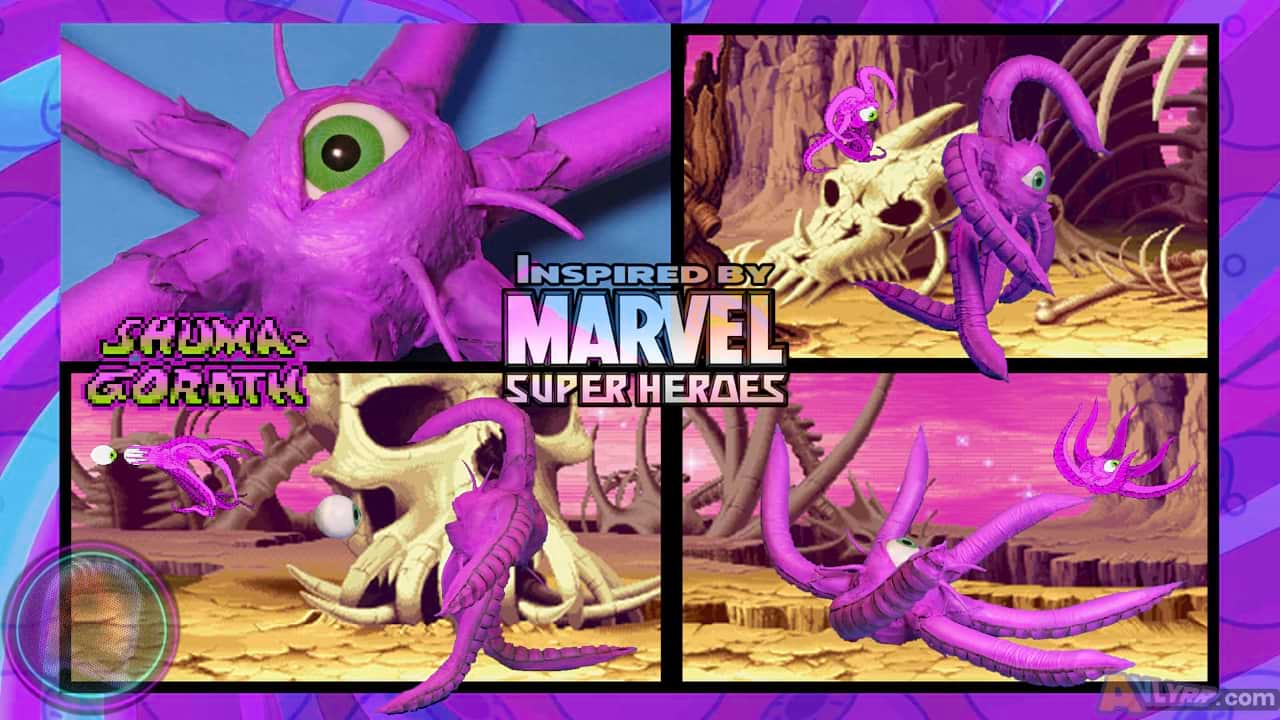
"All shall know the power and pain that is SHUMA-GORATH!"
Process:
The All Seeing Lemon used as the base.
Shaved it into a smaller more rounded shape. (Careful when cutting latex. It can be tricky.)
Took the pink bendable heat rollers and removed the plastic caps from both ends.
Shoved the wires out one side and bent them into an L shape at the tips to shove into the latex lemon.
Tested a coat of paint on it.
Shaved the ends of the rollers into points. (Careful not to shave too deep because the foam isn't very thick.)
Cut off 6 small legs from pink centipede toy and super glued them to base.
Cut black art tape into a hedge-like pattern then wrapped them around the base of each tentacle. (Consider doing this step before gluing the 6 centipede legs, so they're not in the way.)
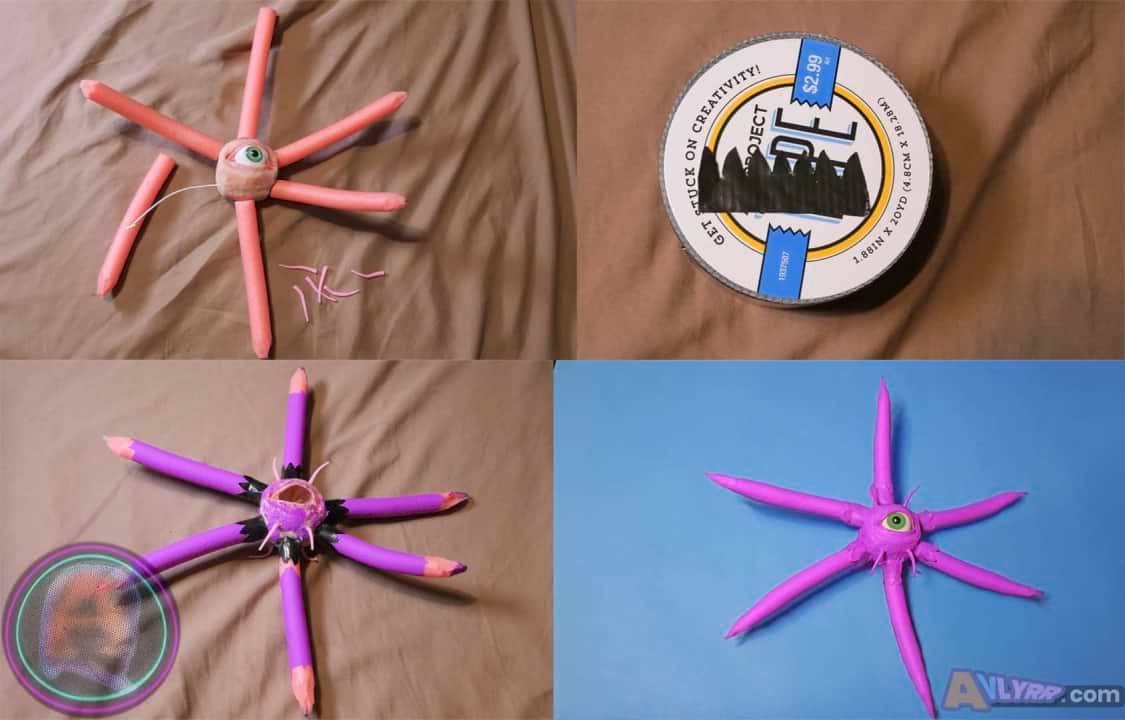
Painted the entire thing 3 times.
Used a marker to line the backside of each tentacle (Suggesting that you should honestly do this before painting.)
Using those lines as a guide, sanded over them so it gave the belly-side a segmented appearance. (Like a snake belly)
Touched up with paint and added lines back to the segments on tentacles.
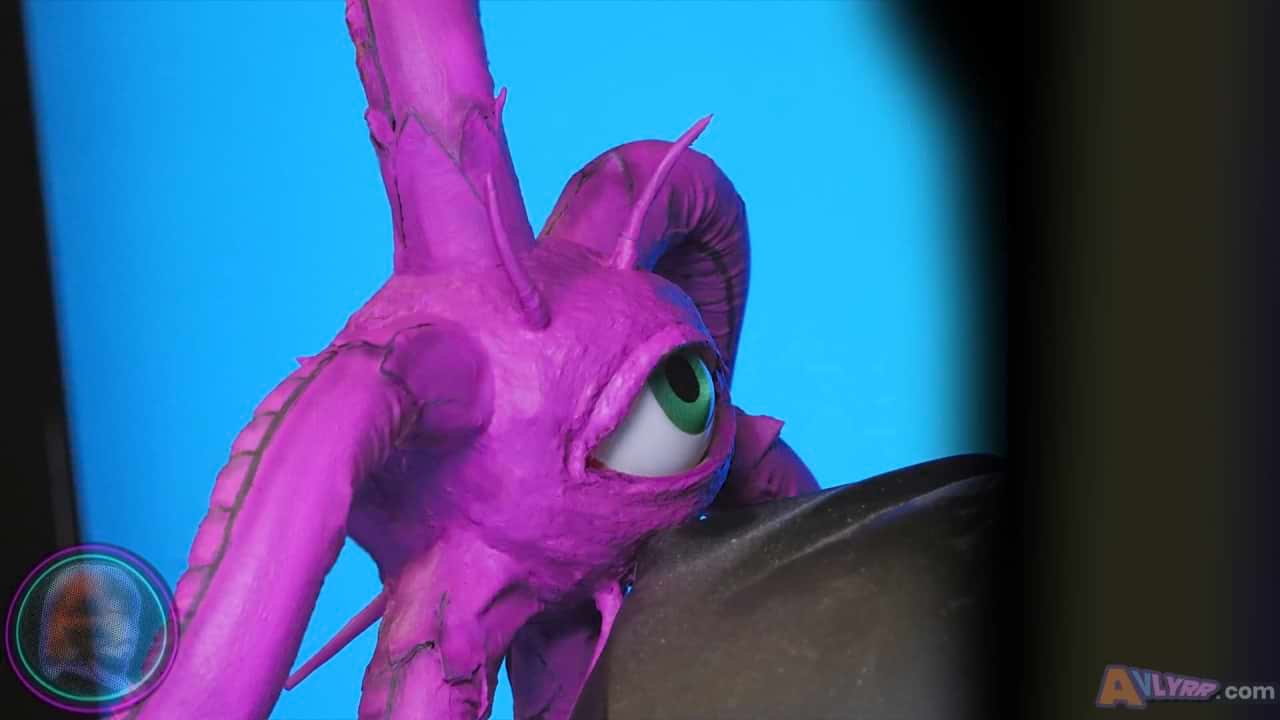
Shaded the figure with a little paint and some markers (With markers just kinda used a rubbing technique with the finger.)
Important Rando Note: You are definitely going to want to seal this figure eventually. Especially before you start handling it a lot and putting it into a bunch of poses. Even then there's no guarantee this will remain pristine for all time. There may have to be a revisit on this post if it ends up having to be preserved better. If you have any suggestions that you know of, then please, by all means, reach out and will add your suggestion under here with a link to you, so that others can benefit from your knowledge.
Tools/Materials Used:
Brackets after the item are where they were originally purchased. This is in case you want to use anything I did and where they were found.
The initial cost as of 3/3/24 will be noted like this in USD for your consideration to weigh your options or so you can compare elswhere for better pricing.
Figure
The All Seeing Lemon $33.12 [Etsy] (The seller this was originally purchased from is out of stock. Did see some on eBay before though and you might find some elsewhere online too. Amazon has a variant here. ALSO you may find a plastic eyeball separately and then get one of those round squishy stress-balls you can hollow out to make something similar. Just a thought.)
Tools
-Gordon Folding Lock-Back Utility Knife $5.44 [Harbor Freight]
-Sanding Sticks DGBRSM 30pcs Black 37mm $8.88 [Amazon]
-3M 150 sand paper $2.39 [Amazon]
-Pumice stone (Any will do for you as long as it's not too large or coarse)
-CraZArt Artist Brushes $8.88 [Amazon]
Materials
-Black Art Project Tape $2.99 [Hobby Lobby]
-HFT Super Glue 3-pack $1.49 [Harbor Freight]
-3+ Squishy Toy Jouet Spongieux Pink Centipede $1.25 [Dollar Tree] (Link to show you what they look like to find something similar)
-Hair Rollers Bigoudis Salon Quality 6 pink $1.25 [Dollar Tree] (They're 6 inches long and about 1/2 inch in diameter)
Paint
-Angelus Neon Paradise Purple Leather Paint $9.99 [Amazon]
-FolkArt 2896 Bright Pink Rose Vif Satin $1.47 [Wal-Mart]
(The Angelus Leather paint was holding pretty well by itself on the first test paint, but having to add the FolkArt acrylic to match the sprite color seemed to degrade it. At least in the way of it wanting to flake afterwards. Do yourself a favor and find a better quality paint that is already pre-mixed. Then get the proper clear sealant that still allows some flex.)
Other
-Black and Blue Felt Tip Sharpies $5.87 from a 4 pack [Wal-Mart] (Would sometimes put the marker on a finger then rub areas to shade them)
For Your Consideration:
A few extra modifications that you could do with yours to make this fig even more accurate:
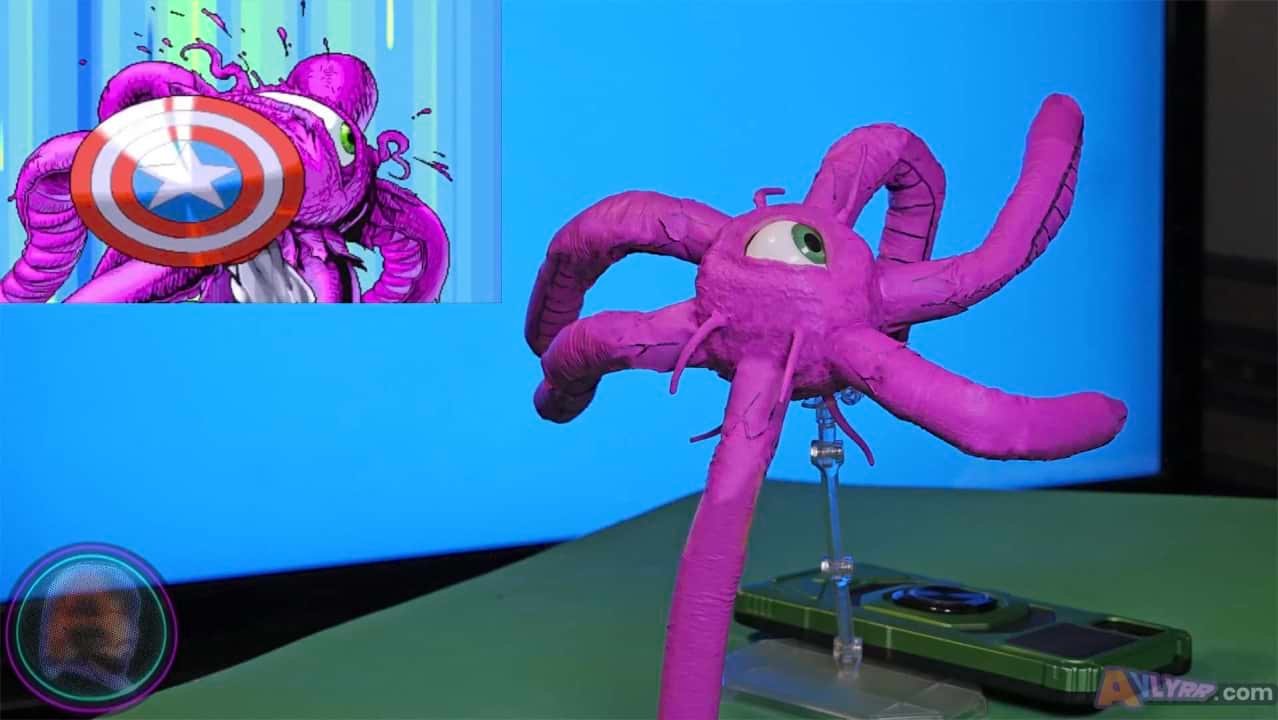
-There are SO many little extreme forms you could put a MSH Shuma-Gorrath in. Can make dedicated figure even for some of his crazy looking attacks.
-Find a tentacle base that you like better. In particular, ones that taper thinner towards the ends.
-Like others have before, you can give the figure a light up eyeball that you can take out its socket to turn on & off.
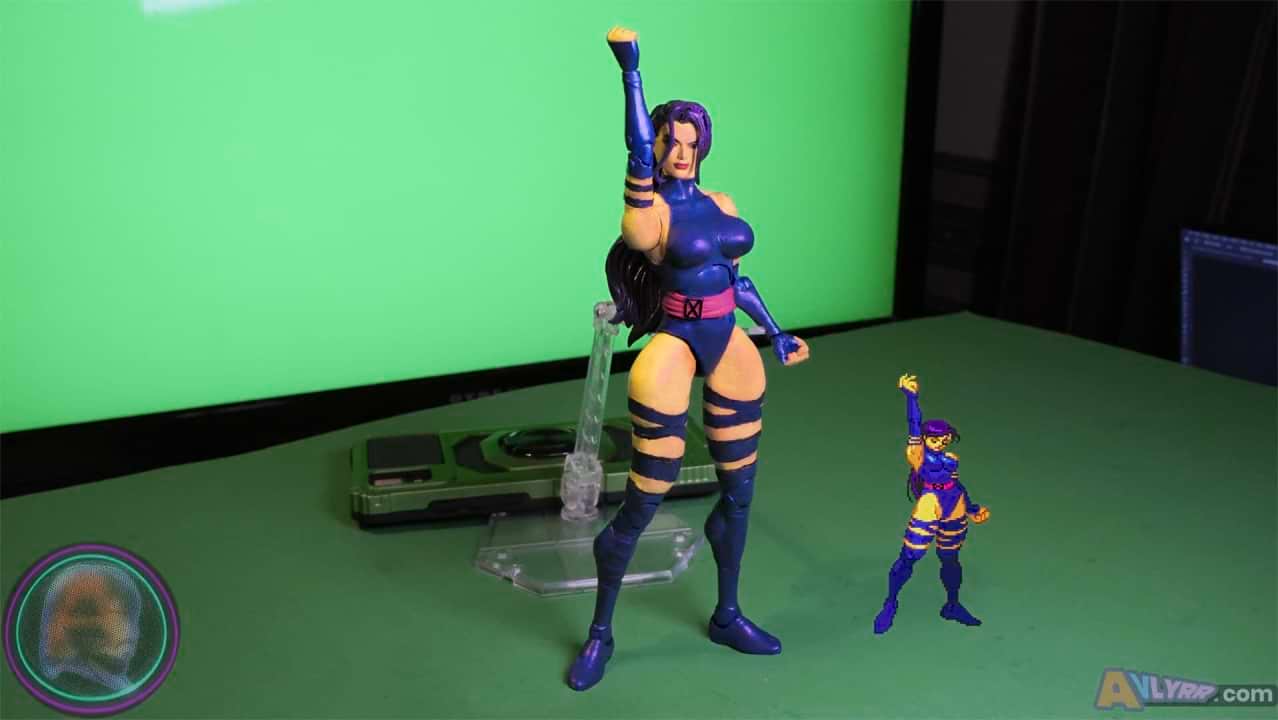
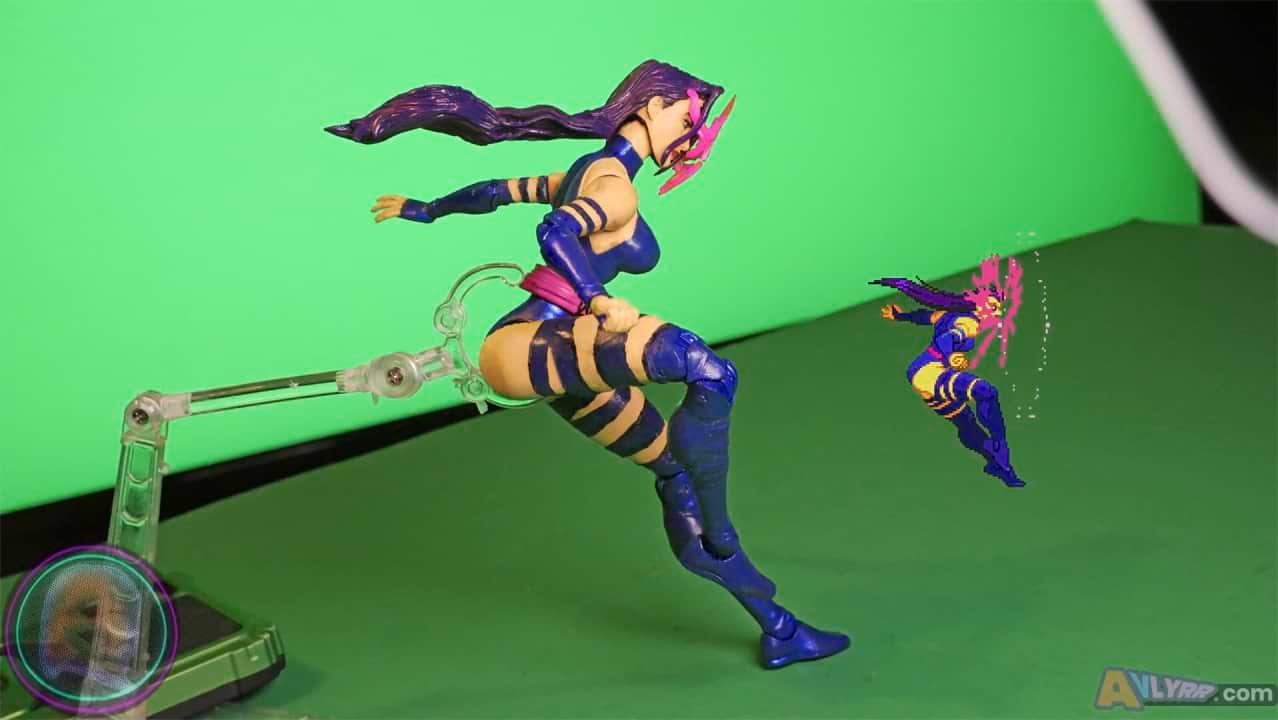
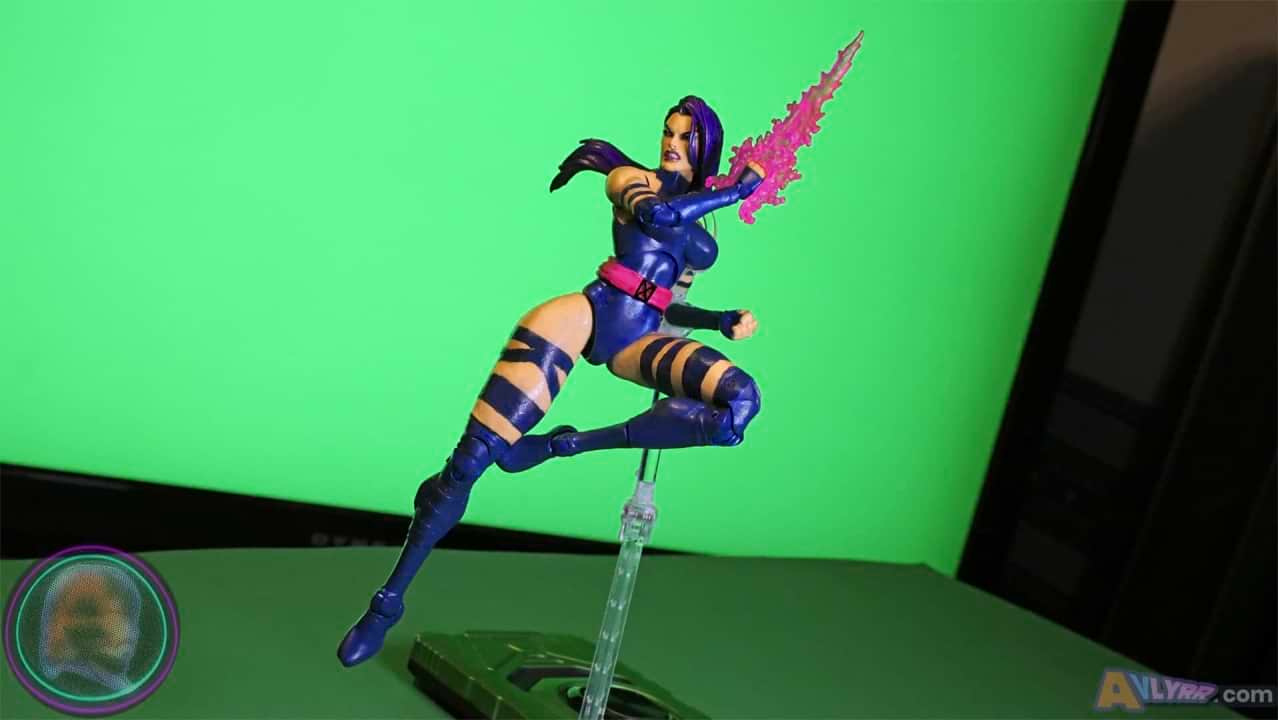
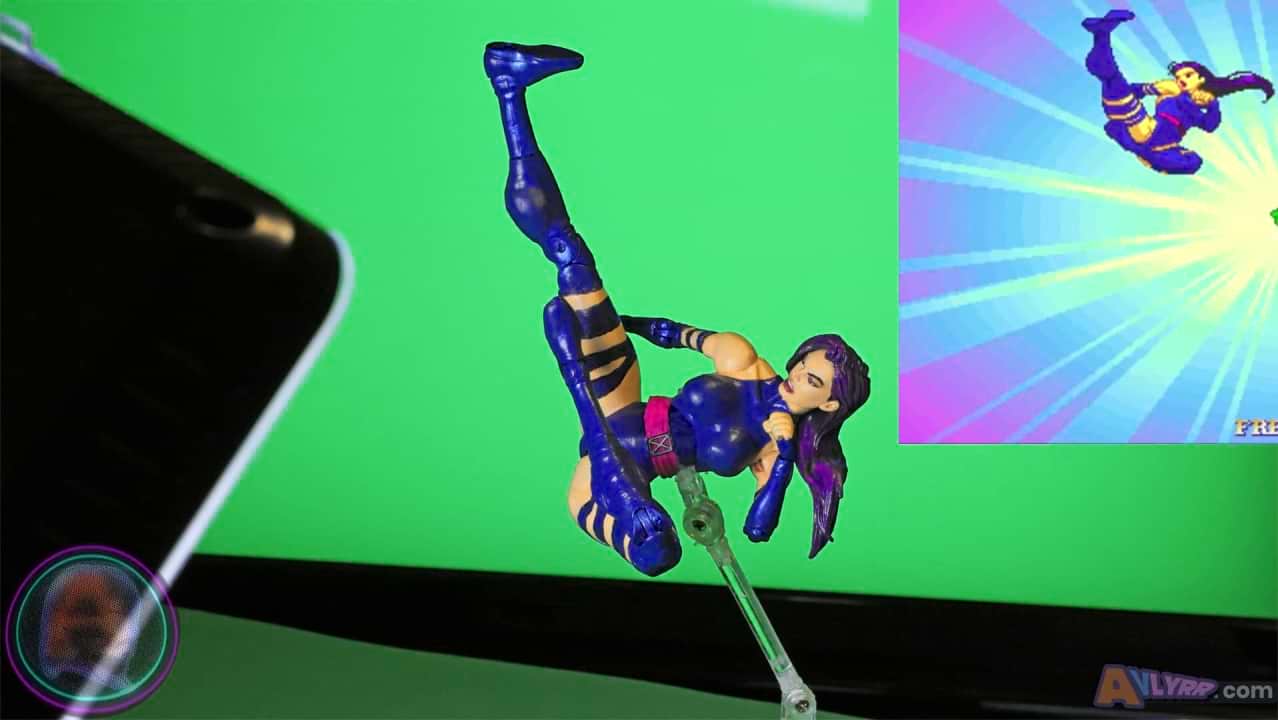
PSYCHIC🦋NINJA
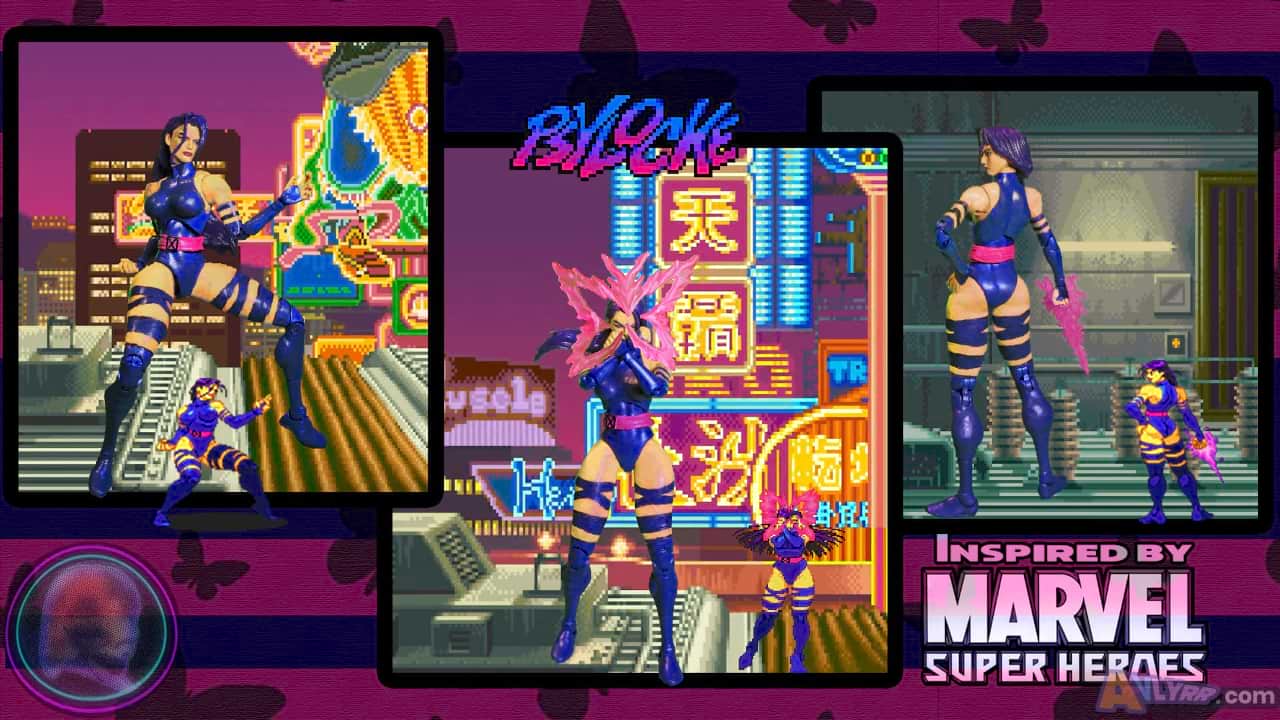
"Come on."
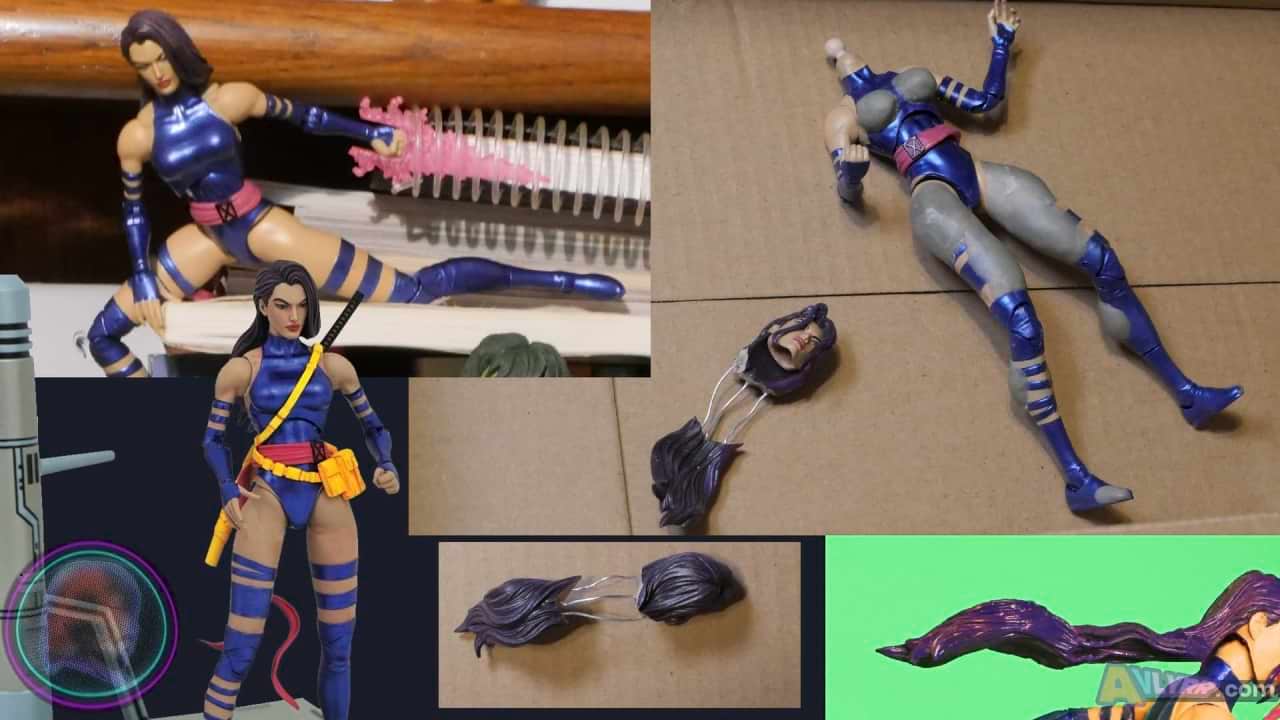
Process:
Took the Marvel Select Psylocke figure and sanded it down entirely.
Sanded the chins of each one (of the 2) heads down slightly.
Took off the long pieces of belt that streamed down and sanded that area smooth where it was connected at waist.
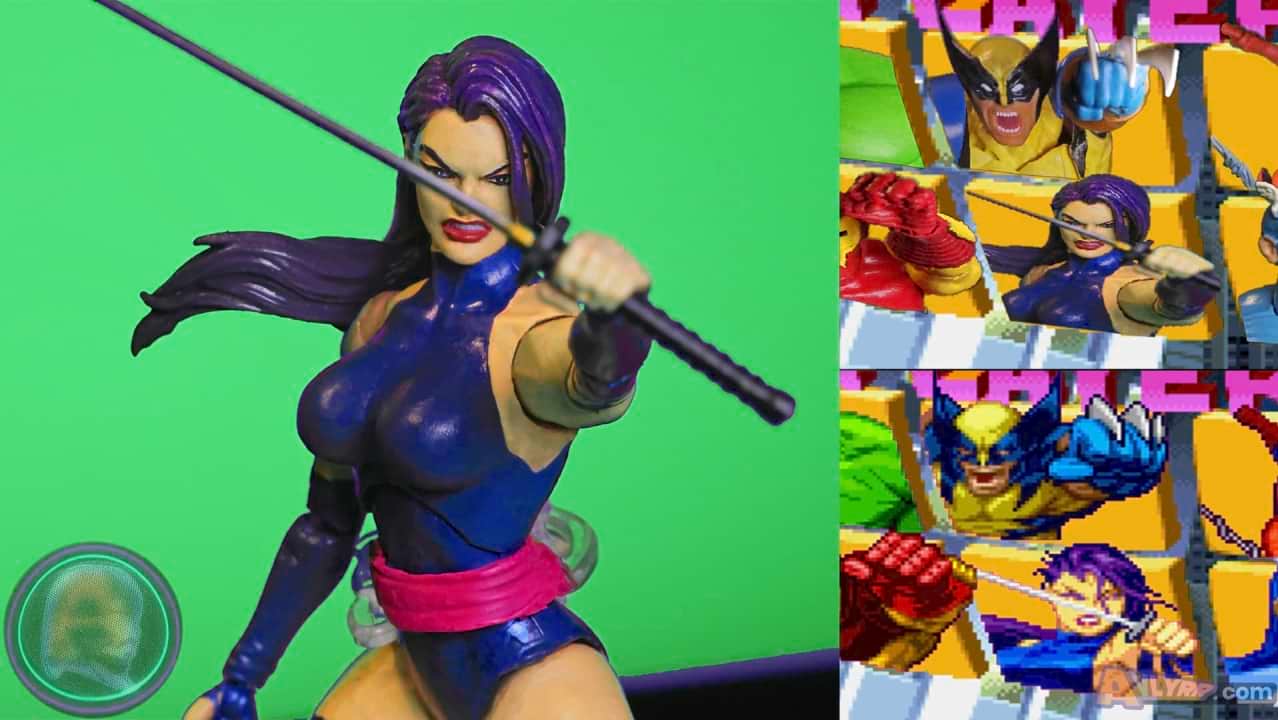
Cut the hair into a V on the head with the closed mouth expression. (See below for reference)
Trimmed back some of the hair by the left eye on that same head.
Just enough to indent a hole, lightly drilled into the separated sections of hair to eventually shove wire into. (3 in each)
Shoved aluminum wire in hair holes with a dab of super glue.
Sculpted some hair on head including adding a long strand down the right side of face.
After sculpt dried painted top of head's hair with 1 coat to see how it looked.
Using Aves, added sculpt to chest, thighs, calves, and feet.
Added a lil sculpt around each wire. (Also where it connects to hair)
Took purple foam sheet and cut into strips then super glued them between and on top of aluminum wires for hair.
Sanded the figure after all sculpt was set.
Painted everything the appropriate color including both heads and all of the alternate hands.
Drew bands around thighs using a felt tip sharpie to match a similar pattern to sprite's.
Painted the line spaces for the bands.
Using mostly neon pink paint, mixed with water, lightly repainted the translucent psychic effects to give a brighter hue.
Note: Even though the hair is meant to be moderately bendable, still use cautious pressure when doing so.
Tools/Materials Used:
Brackets after the item are where they were originally purchased. This is in case you want to use anything I did and where they were found.
The initial cost as of 3/3/24 will be noted like this in USD for your consideration to weigh your options or so you can compare elswhere for better pricing.
Figure
-Marvel Select Psylocke by Diamond Select $66.81 [eBay] (Tax and Shipping included in prices)
Tools
-Gordon Folding Lock-Back Utility Knife $5.44 [Harbor Freight]
-Sanding Sticks DGBRSM 30pcs Black 37mm $8.88 [Amazon]
-3M 150 sand paper $2.39 [Amazon]
-Transon Artist Paint Brushes Set of 12 $12.99 [Amazon]
-GJJC09B 1PC Painting Stand Base and 20PCS Alligator Clip Stick Set Modeling Tools for Airbrush Hobby Model Parts New $9.99 [Amazon] (This is used to hold painted parts while they dry)
-Honoson 5 Pieces Miniature Sculpting Tools Set Mini Stainless Steel Double-Headed Tool $11.99 [Amazon]
-Rotary Tool, 4V Cordless Mini Rotary Multi-Tool Kit with 2 Variable Speed, 31pcs Accessories Kit for Carving, Engraving and Polishing $14.99 [Amazon] (This is what was used to drill small holes in hair for wire)
Materials
-The Army Painter Green Stuff $16.10 [Amazon]
-Aves Apoxie Sculpt - 2 Part Modeling Compound - 1/4 Pound, Natural $21.95 [Amazon]
-HFT Super Glue 3-pack $1.49 [Harbor Freight]
-Hello Hobby Foam Sheets 50 ct. $5.97 [Wal-Mart]
-Artistic 20 Gauge Wire ~2.99 to $3.99 [Hobby Lobby]
Paint
-Apple Barrel Real Red Gloss $0.97 [Amazon]
-Apple Barrel White Gloss $0.97 [Wal-Mart]
-Apple Barrel Black Gloss $0.97 [Amazon]
-Apple Barrel Purple Velvet Gloss $4.99 [Amazon]
-Apple Barrel Real Blue Gloss $0.97 [Amazon]
-Apple Barrel Neon Pink $6.10 [Amazon] (Link provided for example. You can definitely find a hue close that's cheaper than this one)
-Apple Barrel Yellow Matte $0.58 [Wal-Mart]
-Vallejo Model Color Flat Flesh and Vallejo Clear Orange from set Vallejo Basic USA Acrylic Colors Paint Set, 17ml, Assorted Colors, 0.57 Fl Oz (Pack of 16)) $40.16 [Amazon] (can purchase cheaper individually)
Other
-Black and Red Felt Tip Sharpies $5.87 from a 4 pack [Wal-Mart]
For Your Consideration:
A few extra modifications that you could do with yours to make this fig even more accurate:
-A large variety of psychic energy effects and butterflies.
-Can try recreating bendable hair.
-It might be an even better option to use the Revoltech Amazing Yamaguchi Psylocke to create your custom. It will certainly allow for an even greater range of poses.
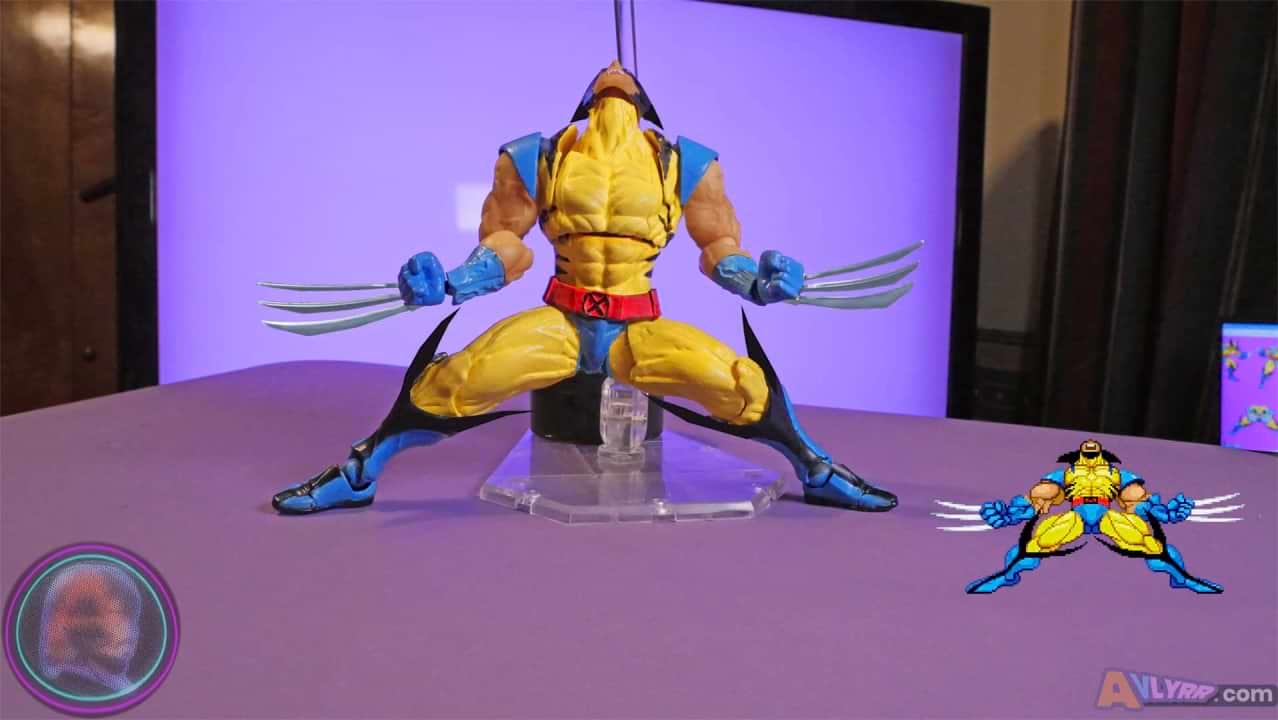
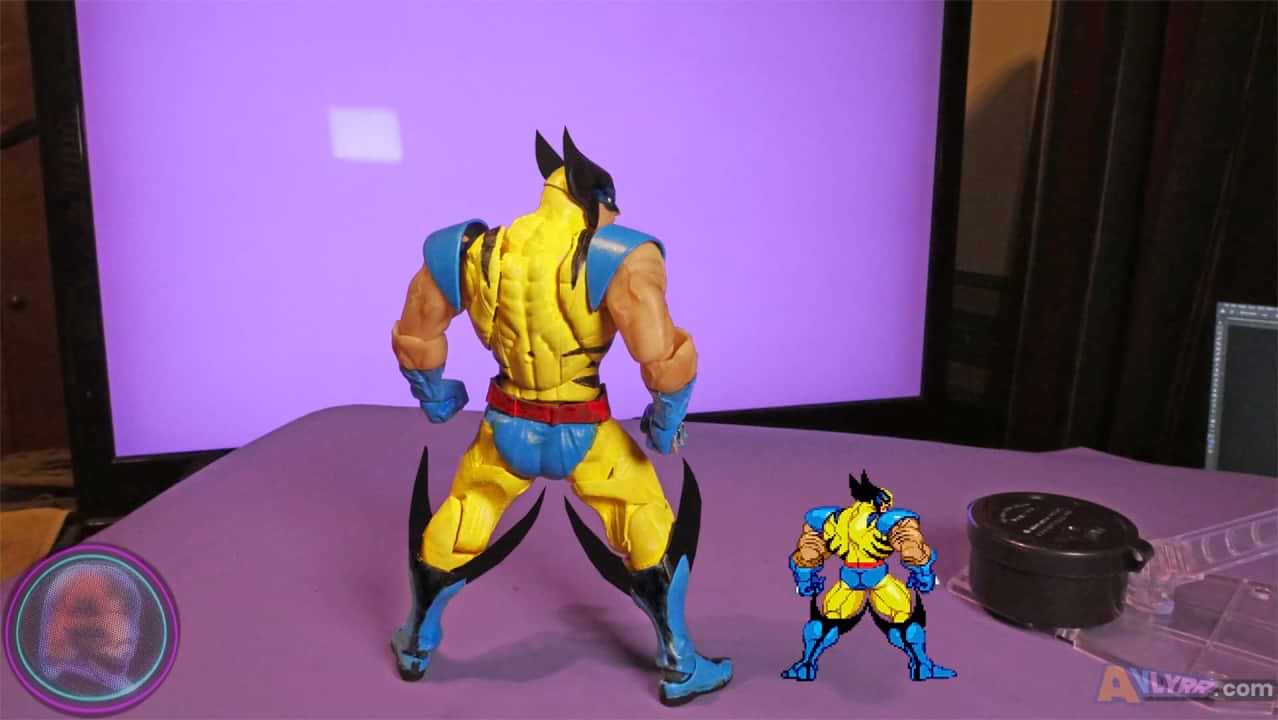
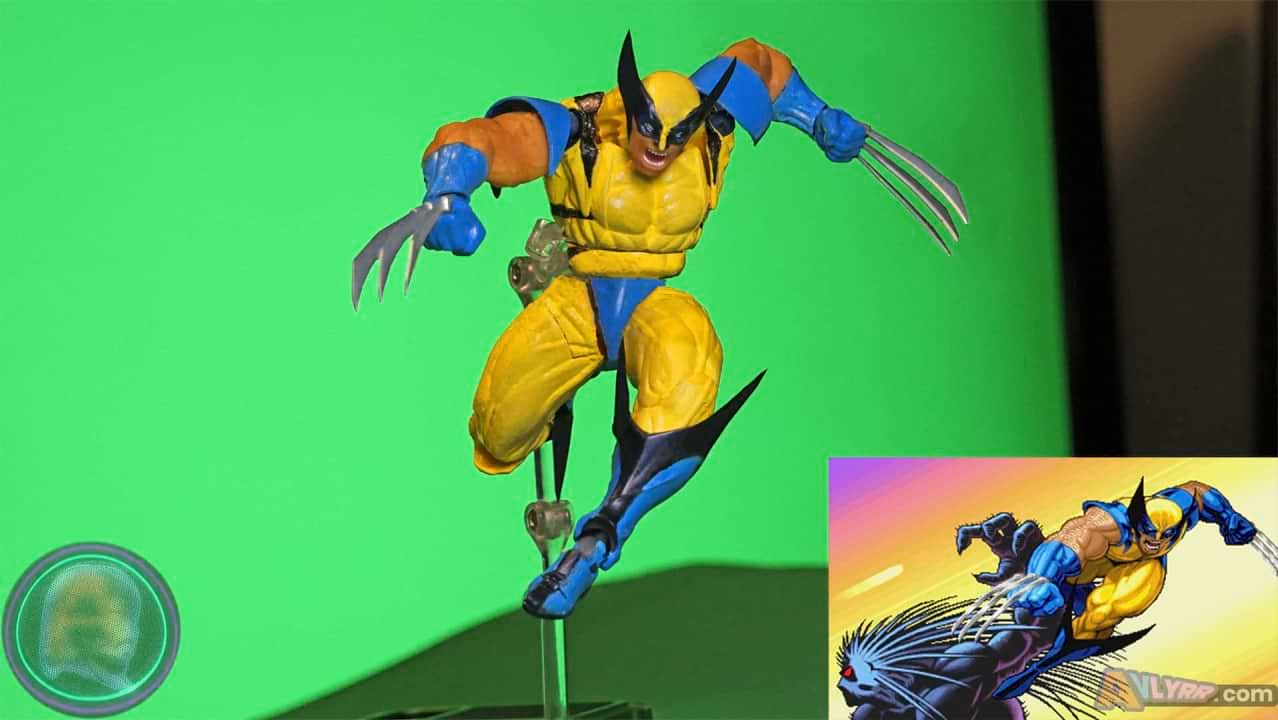
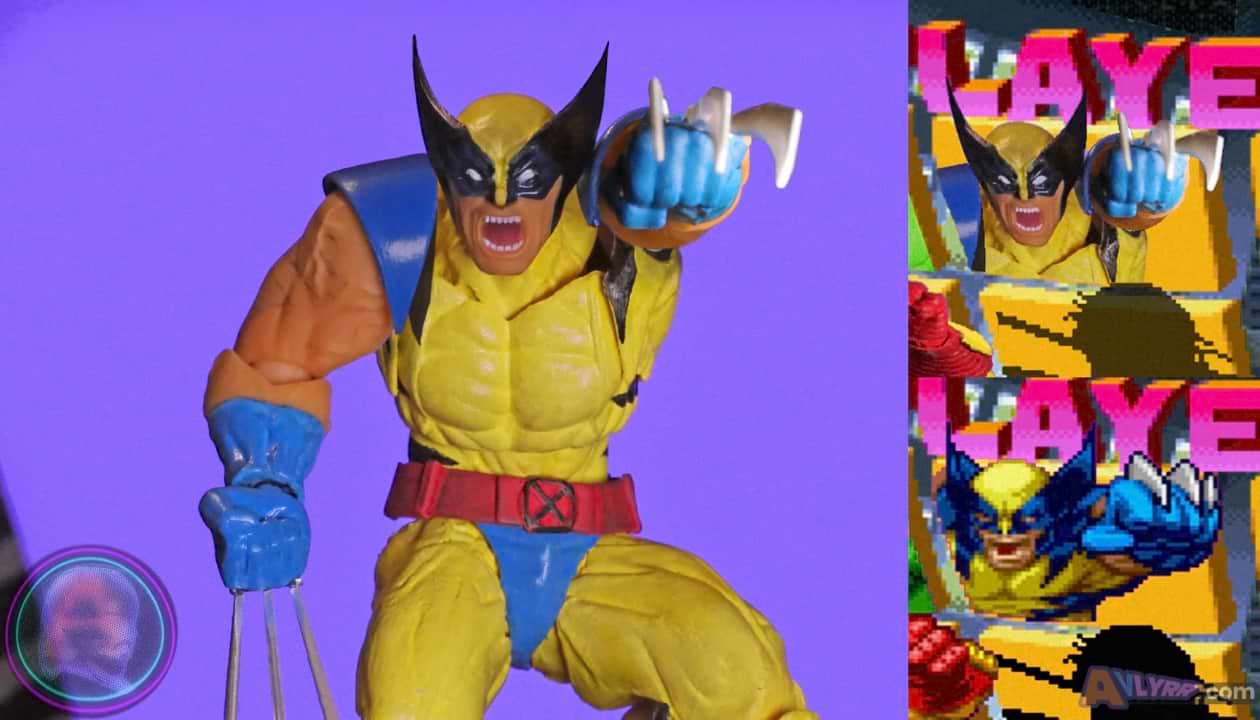
ROOKIE🍁CANUCKLEHEAD
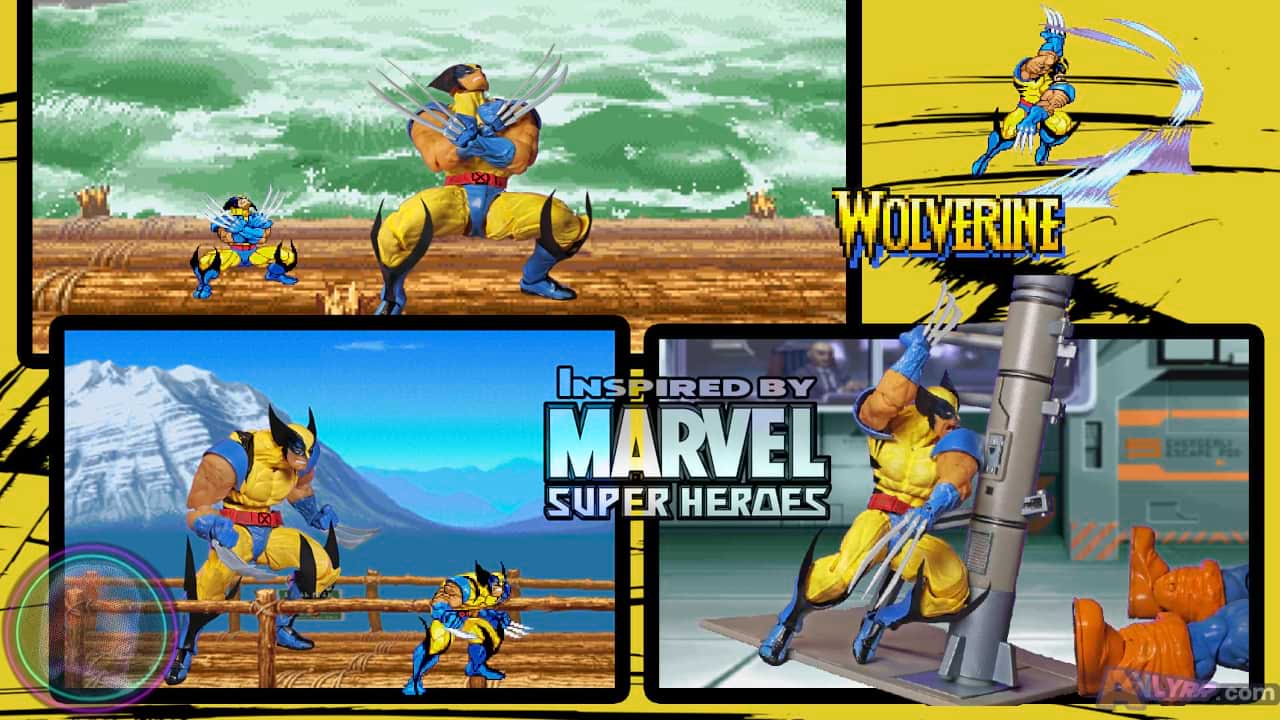
"Let's go, bub!"
Process:
Revoltech Amazing Yamaguchi Wolverine is the base.
Trimmed the belt.
Sanded figure down.
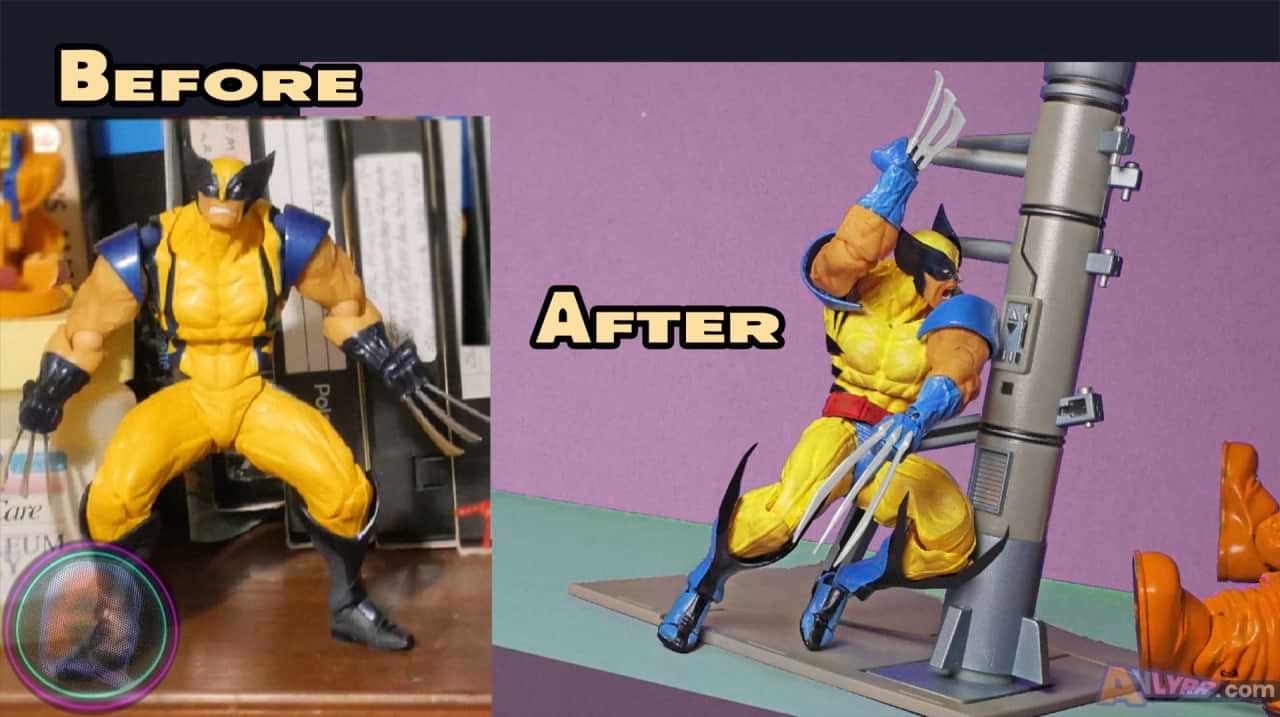
Painted 3 coats.
Cut some black art tape for the boot flaps and mask. (You can do something more permanent if you wish.This is a temporary option to trade them out and reshape them sometimes for different poses.)

Tools/Materials Used:
Brackets after the item are where they were originally purchased. This is in case you want to use anything I did and where they were found.
The initial cost as of 3/3/24 will be noted like this in USD for your consideration to weigh your options or so you can compare elswhere for better pricing.
Figure
-Revoltech Amazing Yamaguchi Wolverine No.005 $107.59 (price includes tax and shipping) [eBay] (Be wary of knockoffs in the $30-$50 range)
Tools
-Sanding Sticks DGBRSM 30pcs Black 37mm $8.88 [Amazon]
-3M 150 sand paper $2.39 [Amazon]
-Transon Artist Paint Brushes Set of 12 $12.99 [Amazon]
Materials
Black Art Project Tape $2.99 [Hobby Lobby]
Paint
-Apple Barrel Primary Blue Satin ~$1 [Wal-Mart]
-Apple Barrel White Gloss $0.97 [Wal-Mart]
-Apple Barrel White Satin $0.97 [Wal-Mart]
-Apple Barrel Real Yellow Gloss $0.97 [Amazon]
-Apple Barrel Real Red Gloss $0.97 [Amazon]
-Vallejo Silver from set Vallejo Basic USA Acrylic Colors Paint Set, 17ml, Assorted Colors, 0.57 Fl Oz (Pack of 16)) $40.16 [Amazon] (can purchase cheaper individually).
Other
-Black Sharpie for black lines on suit. ~$2 to $3 [Wal-Mart].
-Black and Blue Felt Tip Sharpies $5.87 from a 4 pack [Wal-Mart]
For Your Consideration:
A few extra modifications that you could do with yours to make this fig even more accurate:
- Add a little more sculpt to biceps and thighs.
- Trim claws slightly.
- Get more specific with skin tone and hair on arms.
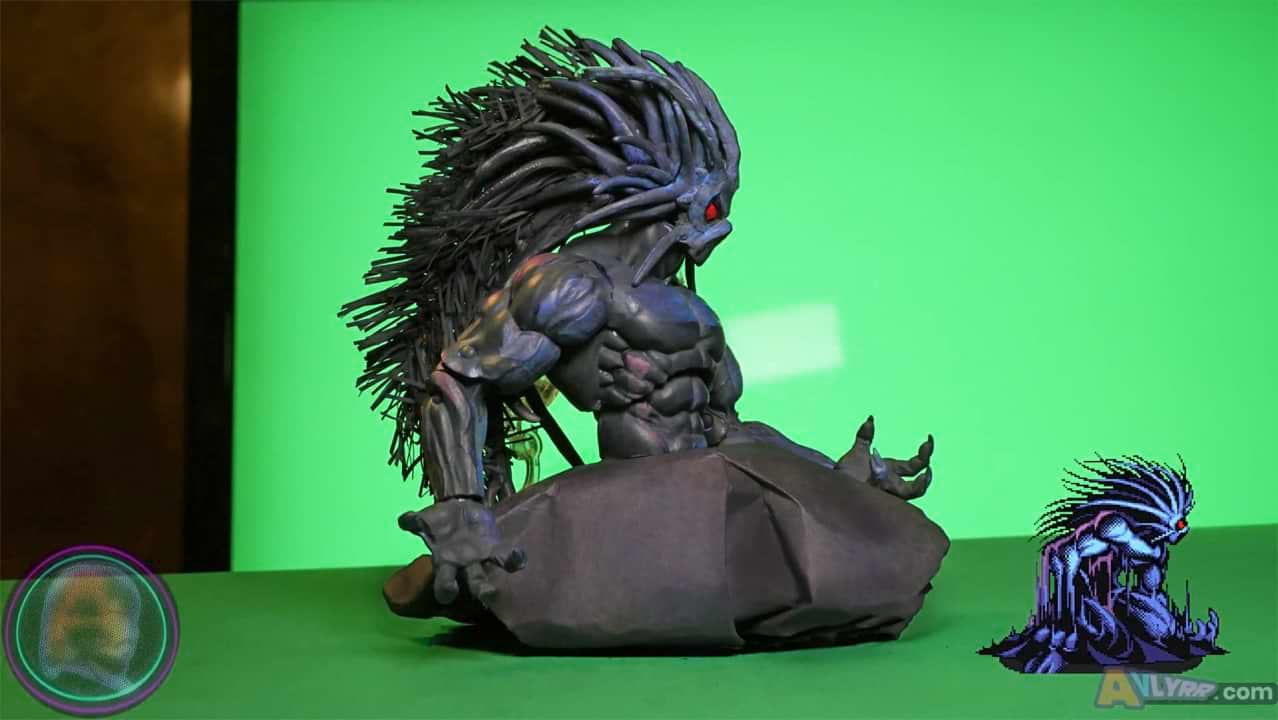
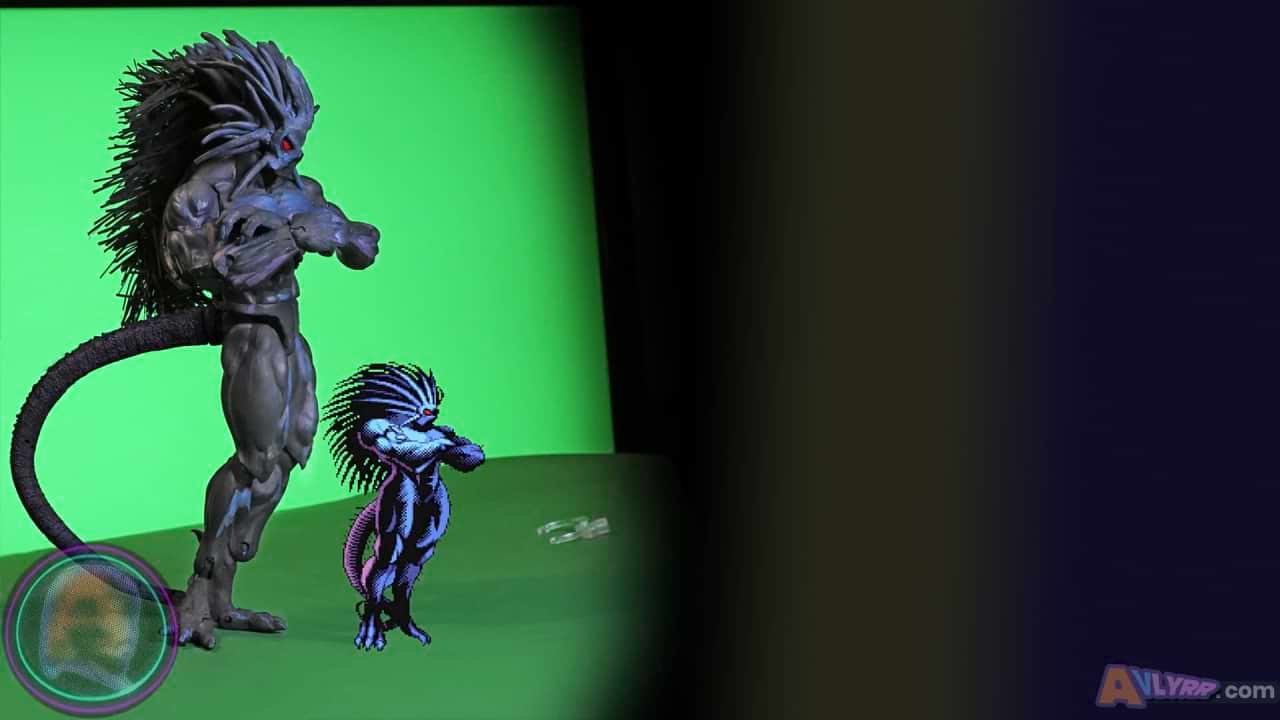
DARK👿CUSTOM
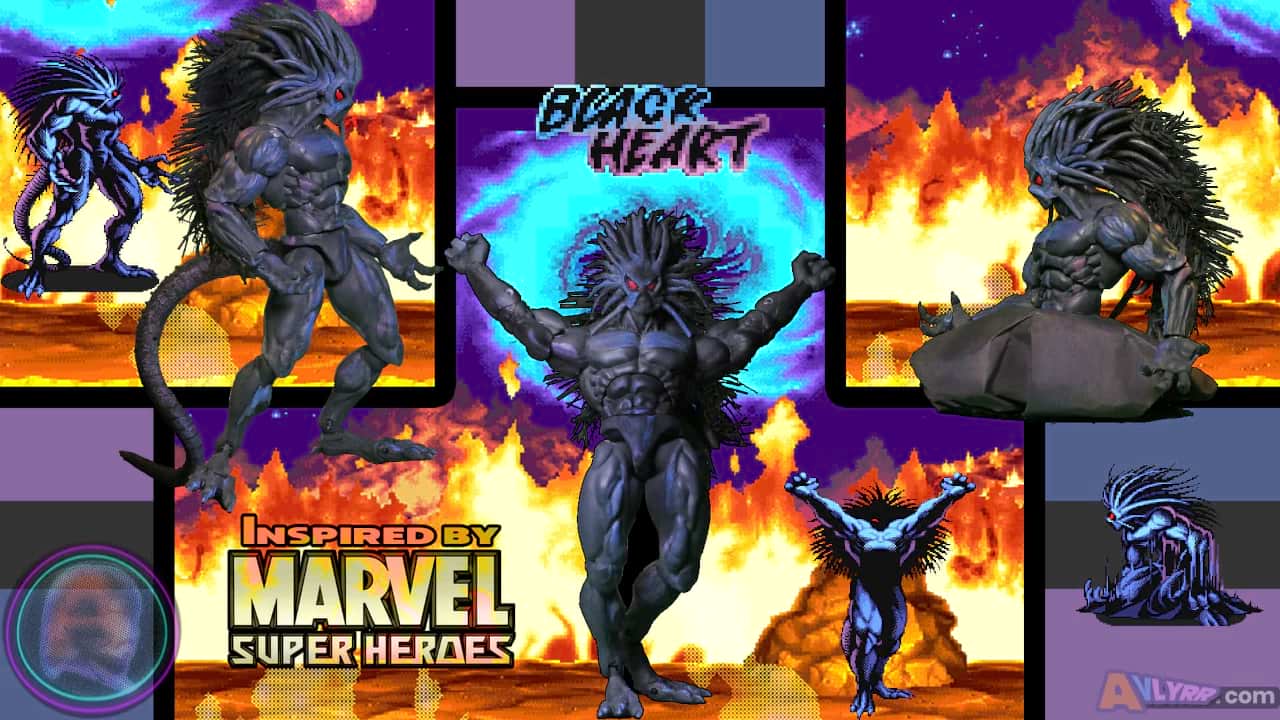
"Blackheart rises!"
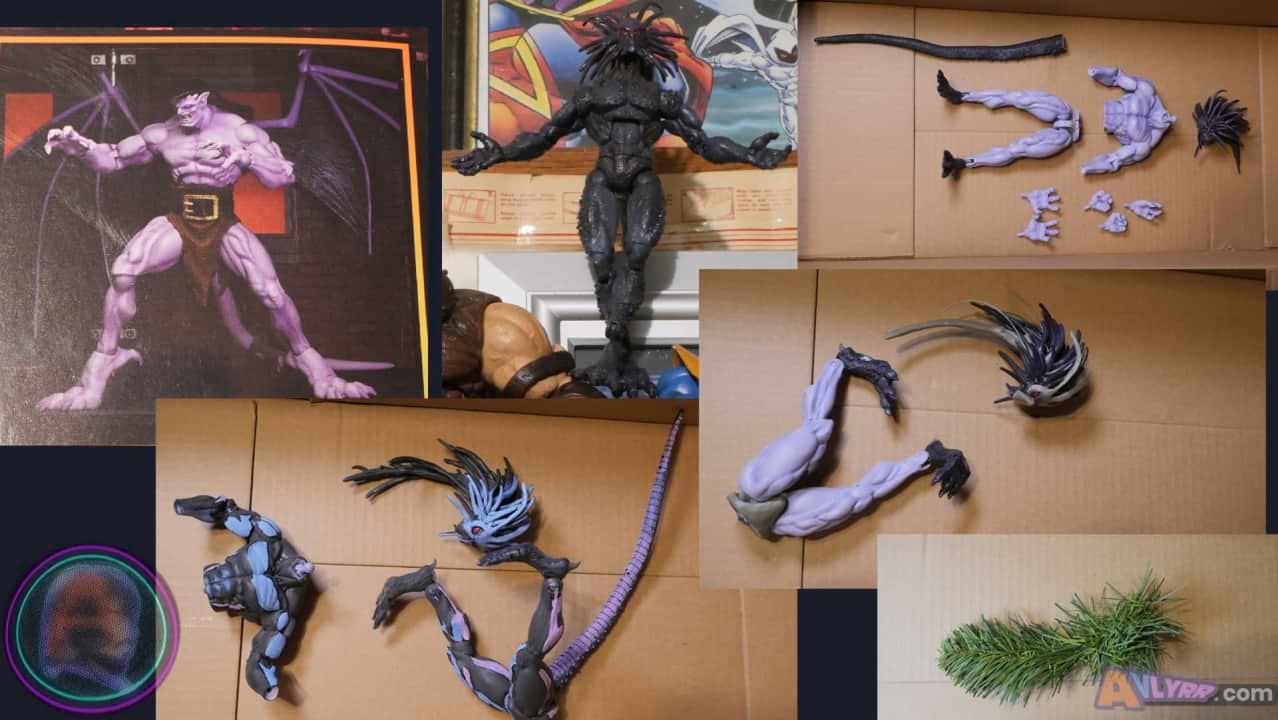
Process:
NECA Gargoyles' Goliath for the base and Marvel Legends (ML) Blackheart for head, feet, and tail.
Took the head and tail from the BH fig. (Nothing wrong with Goliath tail on other fig. That'll work just fine.)
Removed the Goliath figure's loin cloth. (You can make one cut to remove it if you want to save this for something in the future)
Sawed the figure in half at the waist. (This is for the crouch pose later. You don't have to do this if you don't want to and can instead just fill in the space left by the loin cloth with sculpt. In fact if you want to skip the process on that then look for these for your next step (**)
Shaved off the excess nub that was left on the lower portion and put a screw in the upper half with super glue on threads as it was screwed in.
Cut the head off the screw and added a lil sculpt to make a peg that would go into the lower half (This allows for easy removal of top to put on crouch base for later.)
Drilled the hole larger and a little deeper in the lower half. (Be careful not to go too deep. The leg joints inside the crotch area aren't far.)
Sanded the nub on the upper half till it fit in the lower half hole snugly. (You could probably seal the nub with some super glue if you're worried about flaking or cracking when you go to pull him apart in the future)
(**) Drilled the peg hole in the ML head a little wider and deeper to fit on Goliath fig.
Also shaved the neck thinner on Goliath and cut grooves forward and back to let the neck peg more range.
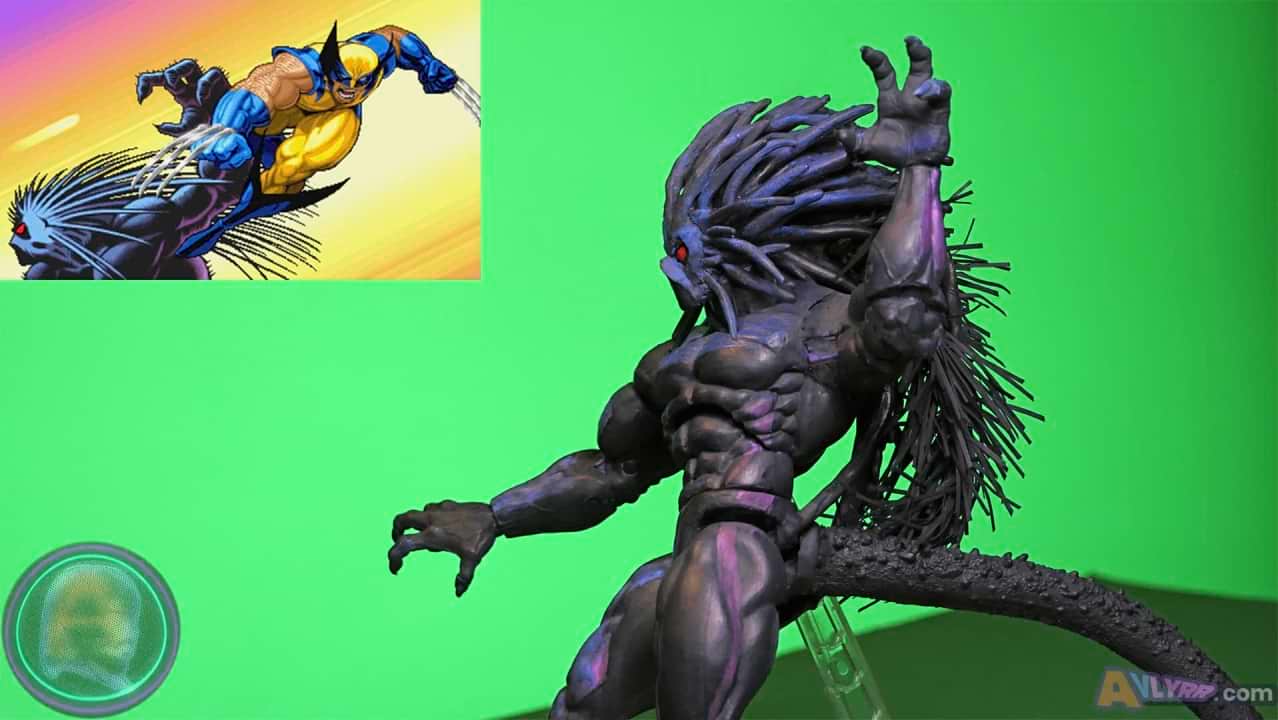
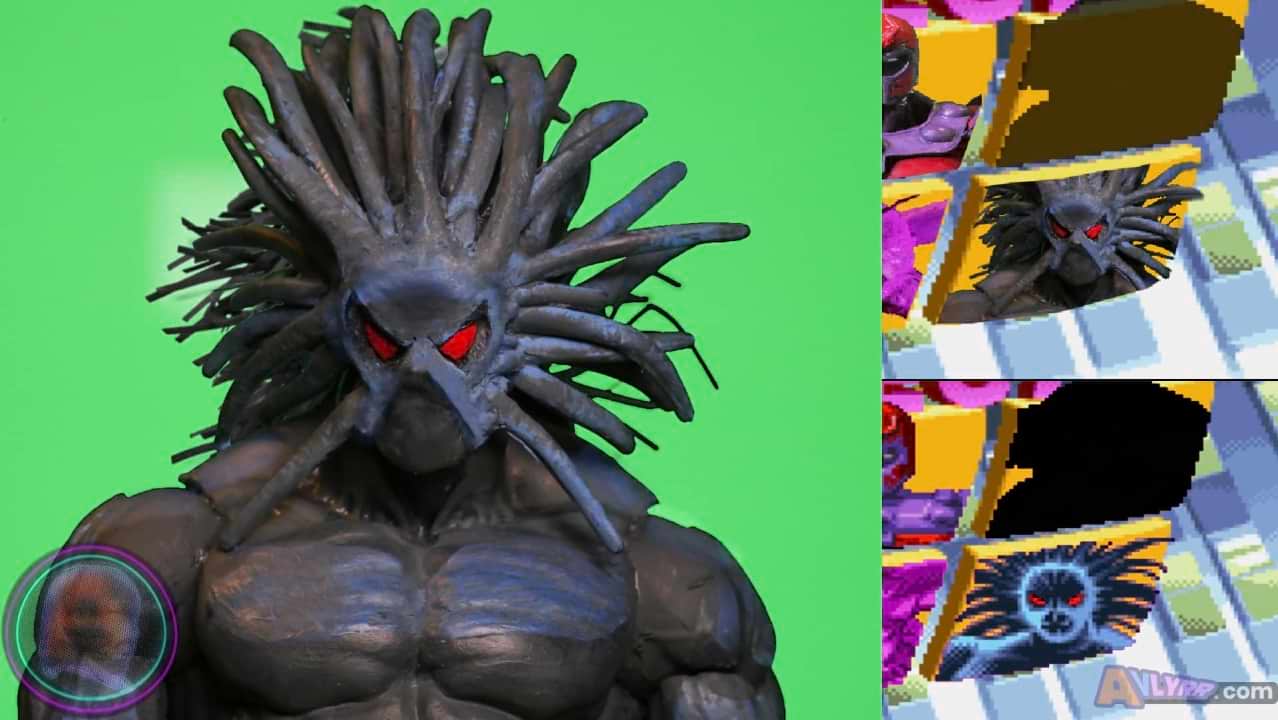
Cut some aluminum wire in lengths between 2-4 inches long and started shoving those into the rubbery plastic of the ML head.
Added sculpt to the wire in a similar shape to the existing hair crossed with the game sprite look.
Also went ahead and smoothed 3 at the top into his forehead and gave him some sculpt on his mouth/nose area. (The mouth/nose area in the game kinda reminiscent of a MK ninja or Shredder mask shape)
Trimmed off piece near pectorals to round out his chest muscles and allow for a little more range of movement.
Also shaved off his elbow spikes. (He has an elbow scythe attack in the game, so you can keep em really.)
Traded out the Goliath feet for the ML Blackheart feet because felt they were a little smaller and matched the games sprite. (Goliath's feet are just fine. If you decide to change the feet like this one be aware you will have to "fatten up" the joint that connects the feet to the Goliath fig so that it's not real loose. A little super glue and working it back n forth, so it doesn't seize up the peg, makes it pretty easy.)
Sculpted a back claw for each ML foot.
Molded sculpt around the crotch and butt area of the lower half because it looked a bit anemic.
Covered the tail hole with sculpt since was going to use the ML Blackheart tail. (If you're keeping the Goliath tail instead then you can skip the steps till you see this (***)
Drilled a hole in the Marvel Legends tail.After the sculpt got firm on the posterior firm, drilled it, and screwed it and cut the head off the screw. (Didn't peg the holes. Just screwed the tail on the threads.)
(***) Sanded everything down.
Painted everything gloss black for the first coat.
Painted the figure again using a matte very dark gray/almost black paint.
Added paints for the purple and blue highlights.
Watered down the mixture of dark gray matte and brushed it all over the fig (including highlights) twice.
Drew snake belly lines along underside of tail with a thin black marker.
Took a piece of the decorative garland and cipped about a 5 inch piece then painted it with that matte dark gray mixed with a lil more black. (Clip more than you need. You can always trim afterwards. Also careful painting something like this with a brush because the little bristles want to flick and fling tiny drops of paint in random directions. Might be better to just spray paint it fully outside.)
After garland dried, put a dab of super glue on a bare wire end and shoved it into head along the one long wire that had sculpt on it from earlier.
Put a tiny black twist-tie around it and the painted wreath piece, adding a few drops of super glue in between the bristles here and there.
Spread out, shaped, and trimmed it a little to get desired form.
Brushed a little gloss black the around eye holes and painted the eyes a bright glossy red.
Note: The attachment for his crouch base is just a piece of foam that was covered with black construction paper and dry brushed with a dark blue/purple mix for now. I imagine you can honestly come up with all sorts of things to attach him to in the future if you go wild and random with it.
Tools/Materials Used:
Brackets after the item are where they were originally purchased. This is in case you want to use anything I did and where they were found.
The initial cost as of 3/3/24 will be noted like this in USD for your consideration to weigh your options or so you can compare elswhere for better pricing.
Figure(s)
-NECA Disney Gargoyles Goliath $36.30 [eBay] and
-Marvel Legends Blackheart $32.37 [eBay] (tax and Shipping included in prices)
Tools
-Gordon Folding Lock-Back Utility Knife $5.44 [Harbor Freight]
-Sanding Sticks DGBRSM 30pcs Black 37mm $8.88 [Amazon]
-3M 150 sand paper $2.39 [Amazon]
-Transon Artist Paint Brushes Set of 12 $12.99 [Amazon]
-GJJC09B 1PC Painting Stand Base and 20PCS Alligator Clip Stick Set Modeling Tools for Airbrush Hobby Model Parts New $9.99 [Amazon] (This is used to hold painted parts while they dry)
-Honoson 5 Pieces Miniature Sculpting Tools Set Mini Stainless Steel Double-Headed Tool $11.99 [Amazon]
-Rotary Tool, 4V Cordless Mini Rotary Multi-Tool Kit with 2 Variable Speed, 31pcs Accessories Kit for Carving, Engraving and Polishing $14.99 [Amazon]
-Sargent & Co pliers/cutter (You just need a tool that can cut the head off a screw like a bolt cutter)
Materials
-Aves Apoxie Sculpt - 2 Part Modeling Compound - 1/4 Pound, Natural $21.95 [Amazon]
-HFT Super Glue 3-pack $1.49 [Harbor Freight]
- (2) 1 and 1/2 inch wood screws (Doesn't have to be these exactly. You can usually find screws pretty cheap)
-Black Construction Paper ~$4 to $5 in a pack
-Foam (This was part of a foam cupcake. Any kinda foam or similar substance. Material was used for the alternate crouch base)
-Artistic 20 Gauge Wire ~2.99 to $3.99 [Hobby Lobby]
-Piece of wreath/garland (You ought to be able to find some garland at a hobby or dollar store for a couple of bucks)
Paint
-Apple Barrel Real Red Gloss $0.97 [Amazon]
-Apple Barrel Pavement Matte $0.58 [Wal-Mart]
-Apple Barrel Black Gloss $0.97 [Amazon]
-Apple Barrel Antique Parchment Matte $0.58 [Wal-Mart]
-Apple Barrel Primary Blue Satin ~$1 [Wal-Mart]
-Vallejo Model Color Purple from set Vallejo Basic USA Acrylic Colors Paint Set, 17ml, Assorted Colors, 0.57 Fl Oz (Pack of 16)) $40.16 [Amazon] (can purchase cheaper individually).
Other
-Black Felt Tip Sharpie $5.87 from a 4 pack [Wal-Mart]
For Your Consideration:
A few extra modifications that you could do with yours to make this fig even more accurate:
-If you a painter that's good wit it you can really make the cell-shaded look pop based off of the sprite.
-Get crazy with some effect attachments with his powers! There is some really cool stuff you can make with those as a reference.
-A more pose-able tail option would not be a bad move.
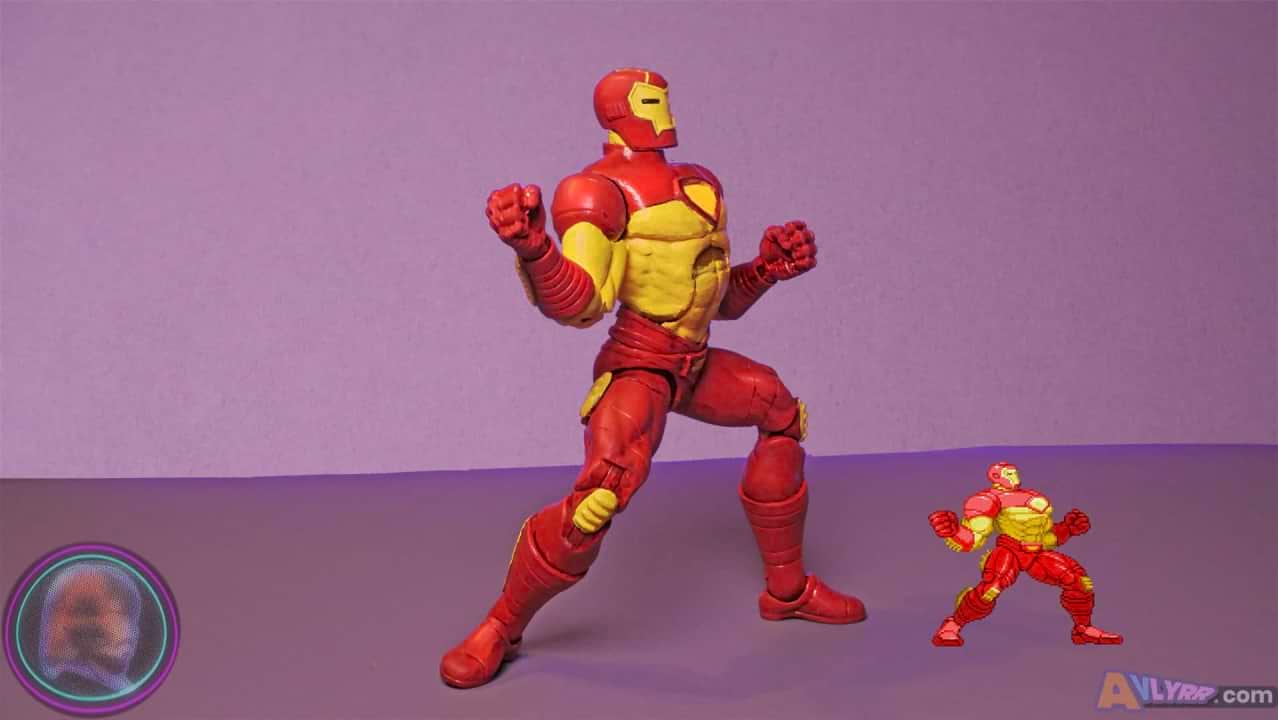
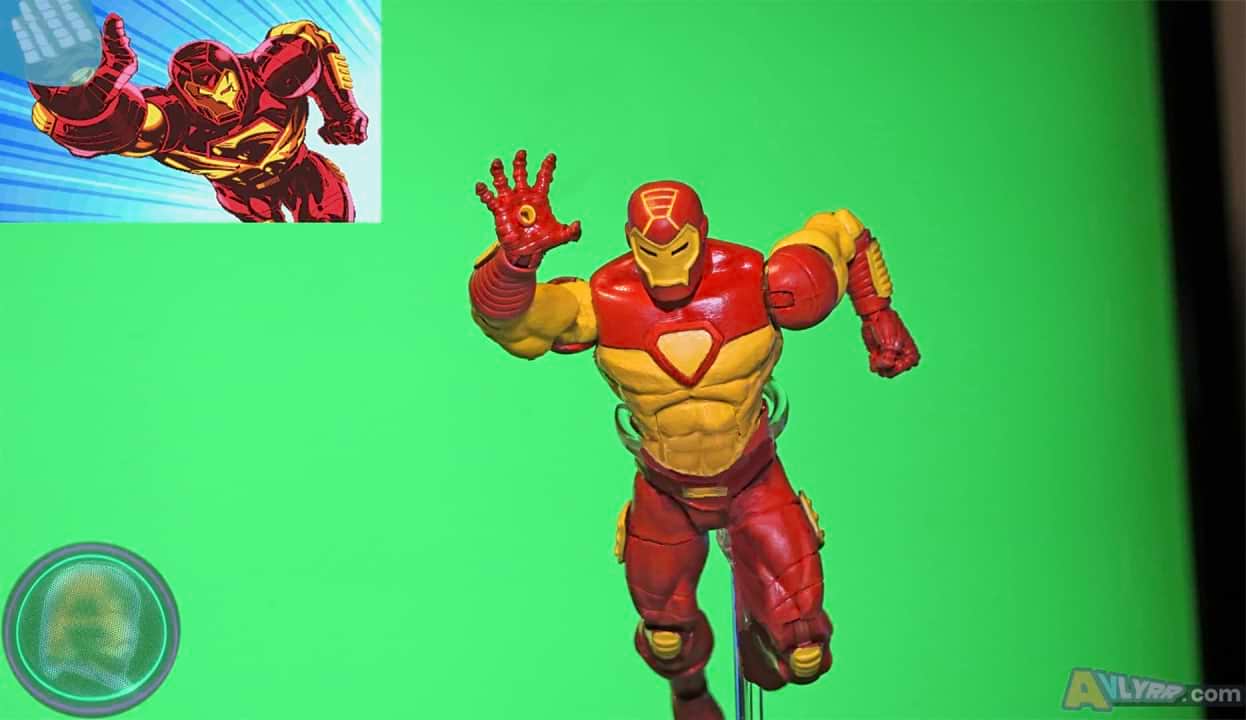
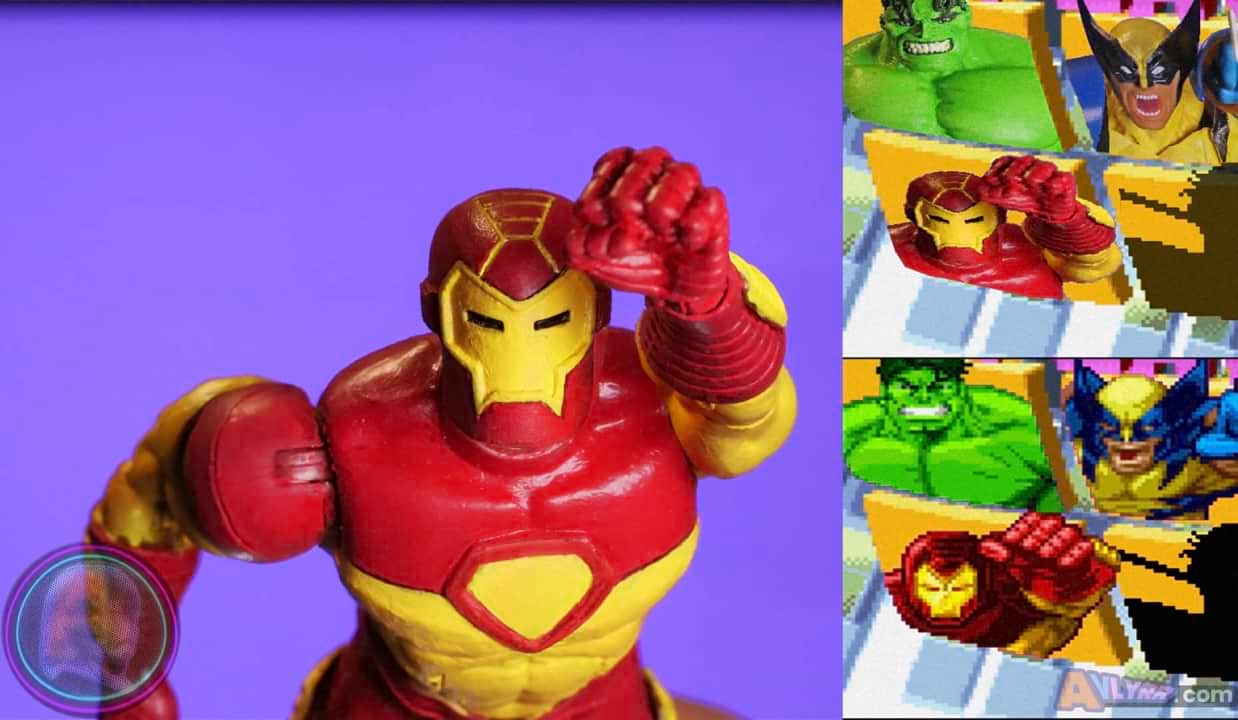
NOT SO🛑STARK CONTRAST
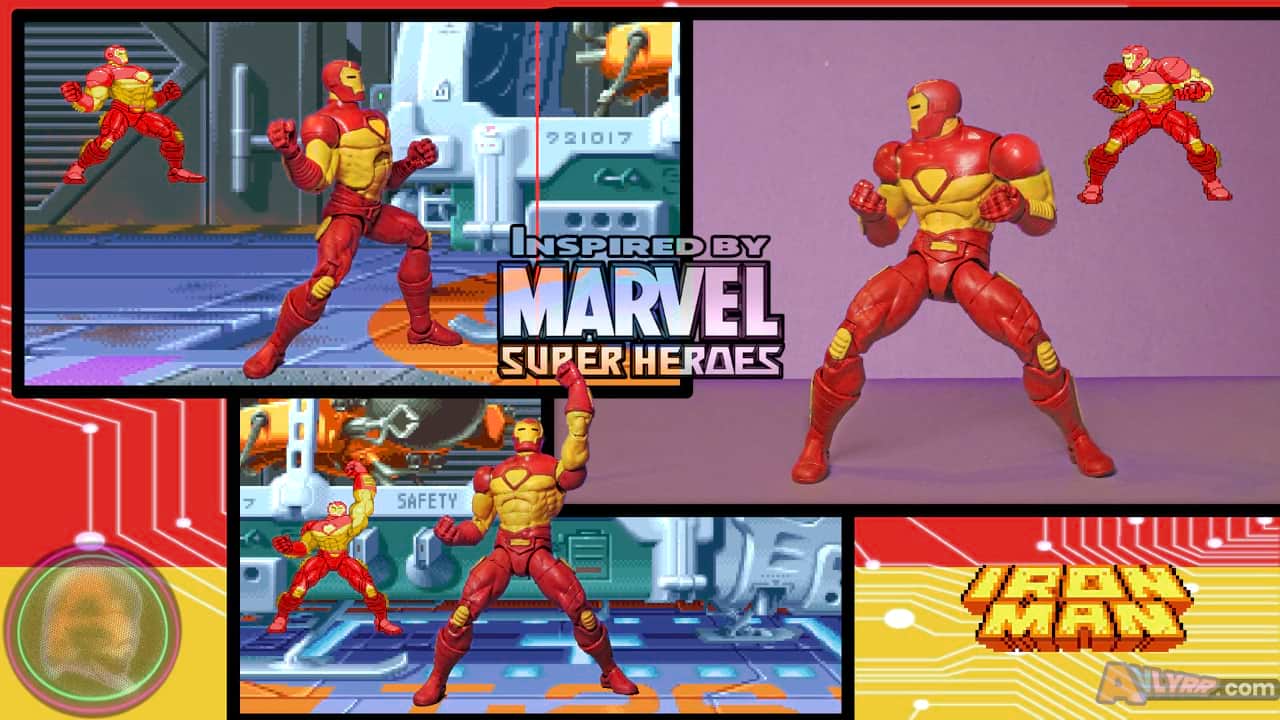
"Superior tech!"
Process:
Used Marvel Legends Modular Iron Man as the base.
Sanded the entire fig.
Painted it 2 coats.
Didn't care for proportions, so sanded it down again.
Used a small plastic welding pen in moderation to carefully remove plastic by melting it while smoothing out his helmet to make it smaller. (Be careful not to breathe in the plastic smell or touch the melted plastic with your hands. Also a light touch with the pen is good here if you decide to do this, but honestly you might be better off just finding a smaller head as a start to replace it.)
Shaved his arc reactor chest shield down a little.
Added green stuff sculpt to make a rounded chest shield.
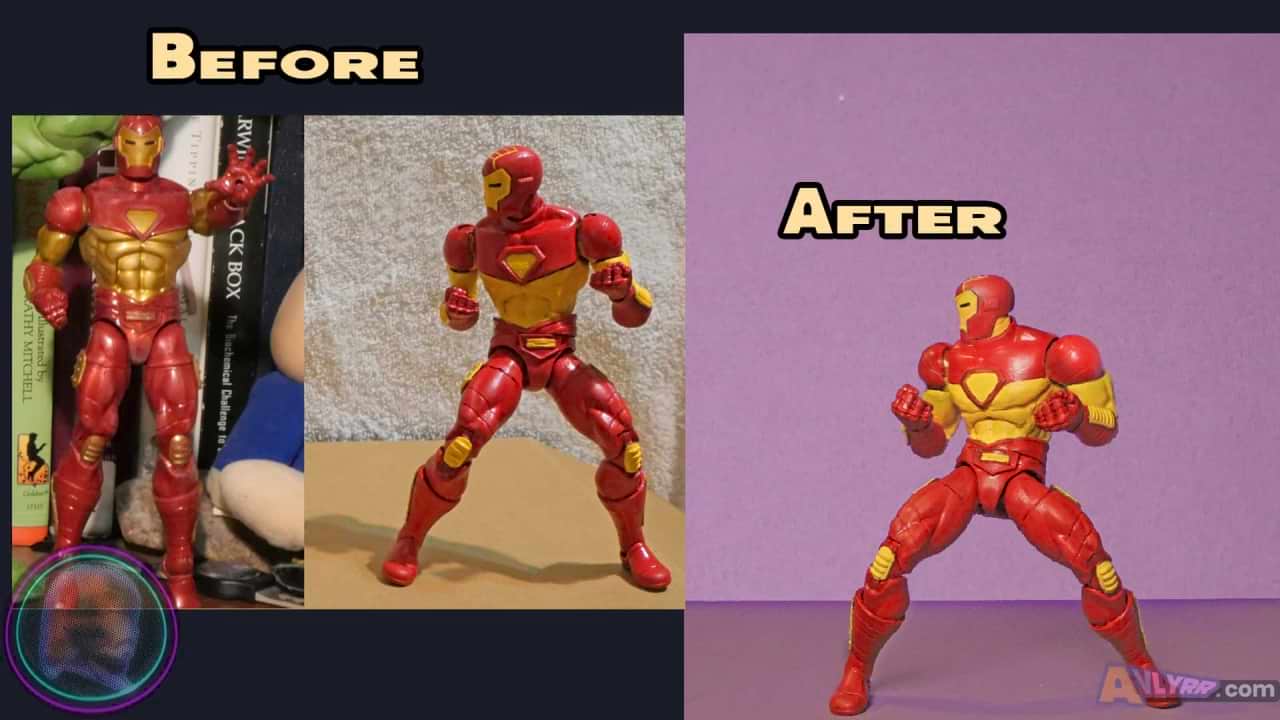
Also added more sculpt to shoulders, arms, and to hands. (Be wary how much you use because it could restrict the figure's pose-ability or you could shave away more surrounding area to give it back its range of motion. You also might consider just kitbashing slightly larger parts/hands from another fig since that will make it a less tedious process)
Sanded the set sculpt.
Re-painted the entire fig for about 3 coats.
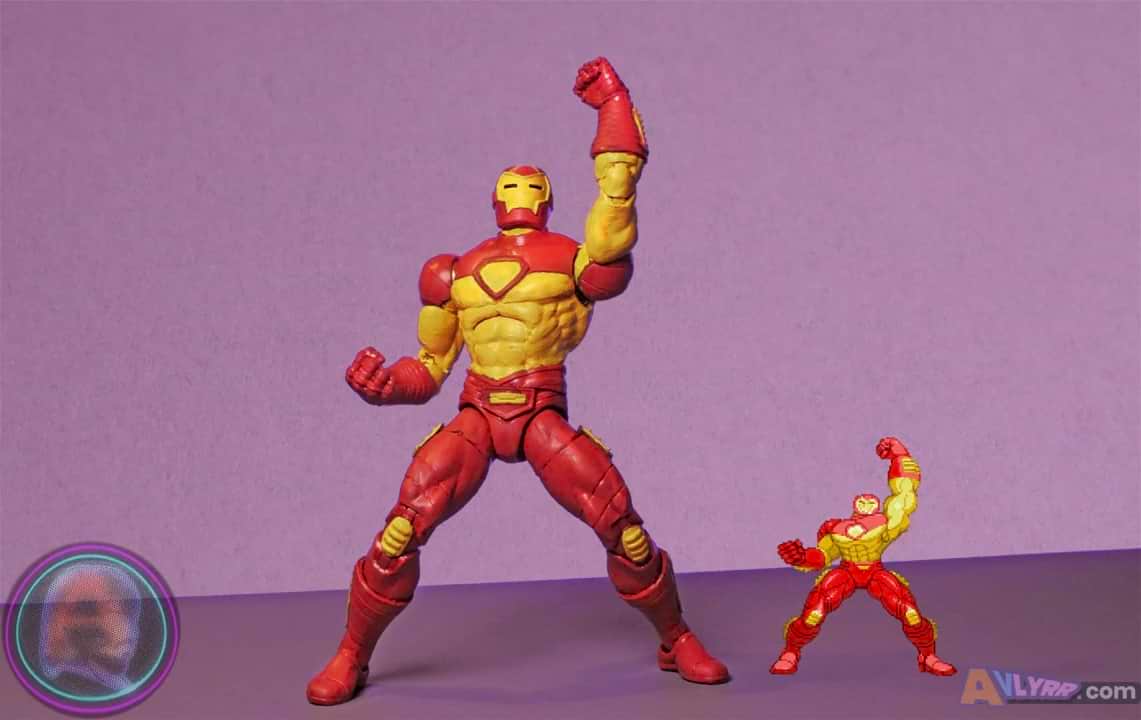
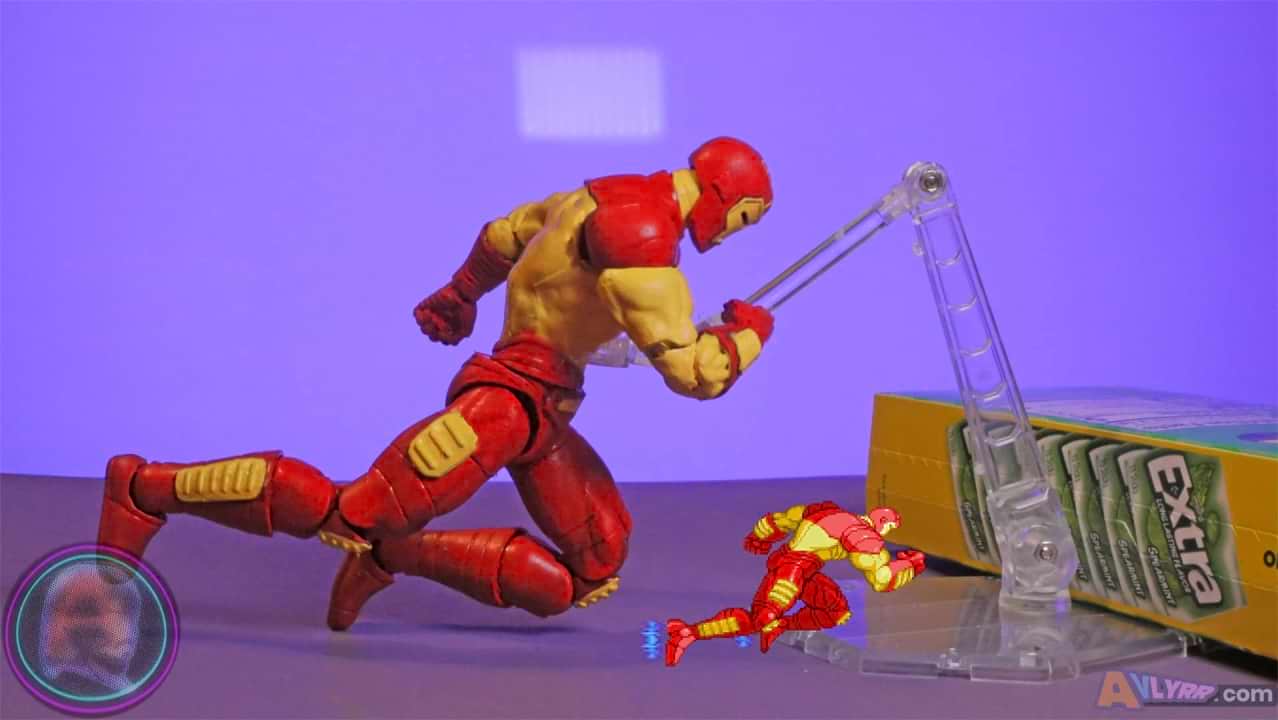
Posing the figure to eventually key out the BG.
Tools/Materials Used:
Brackets after the item are where they were originally purchased. This is in case you want to use anything I did and where they were found.
The initial cost as of 3/3/24 will be noted like this in USD for your consideration to weigh your options or so you can compare elswhere for better pricing.
Figure
Marvel Legends Modular Iron Man$21.92 (price includes tax and shipping) [eBay]
Tools
-Gordon Folding Lock-Back Utility Knife $5.44 [Harbor Freight]
-Sanding Sticks DGBRSM 30pcs Black 37mm $8.88 [Amazon]
-3M 150 sand paper $2.39 [Amazon]
-Transon Artist Paint Brushes Set of 12 $12.99 [Amazon]
-Honoson 5 Pieces Miniature Sculpting Tools Set Mini Stainless Steel Double-Headed Tool $11.99 [Amazon]
-Plastic Welding Pen $39.99 [Amazon] (or wherever you prefer/ it's the one that looks like a pen soldering iron; not the gun ones.)
Materials
-The Army Painter Green Stuff $16.10 [Amazon]
Paint
-Apple Barrel Real Red Gloss $0.97 [Amazon]
-Apple Barrel White Gloss $0.97 [Wal-Mart]
-Apple Barrel White Satin $0.97 [Wal-Mart]
-Apple Barrel Real Yellow Gloss $0.97 [Amazon]
-Apple Barrel Outrageous Orange Satin $1.07 [Amazon]
Other
-Black and Red Felt Tip Sharpies $5.87 from a 4 pack [Wal-Mart]
For Your Consideration:
A few extra modifications that you could do with yours to make this fig even more accurate:
- Reform the shoulders in more of a rounded box shape.
- Add sculpt to lower body areas (thighs & calves) and make the chest even thicker.
- Shave and repaint the waist to match the sprite better.
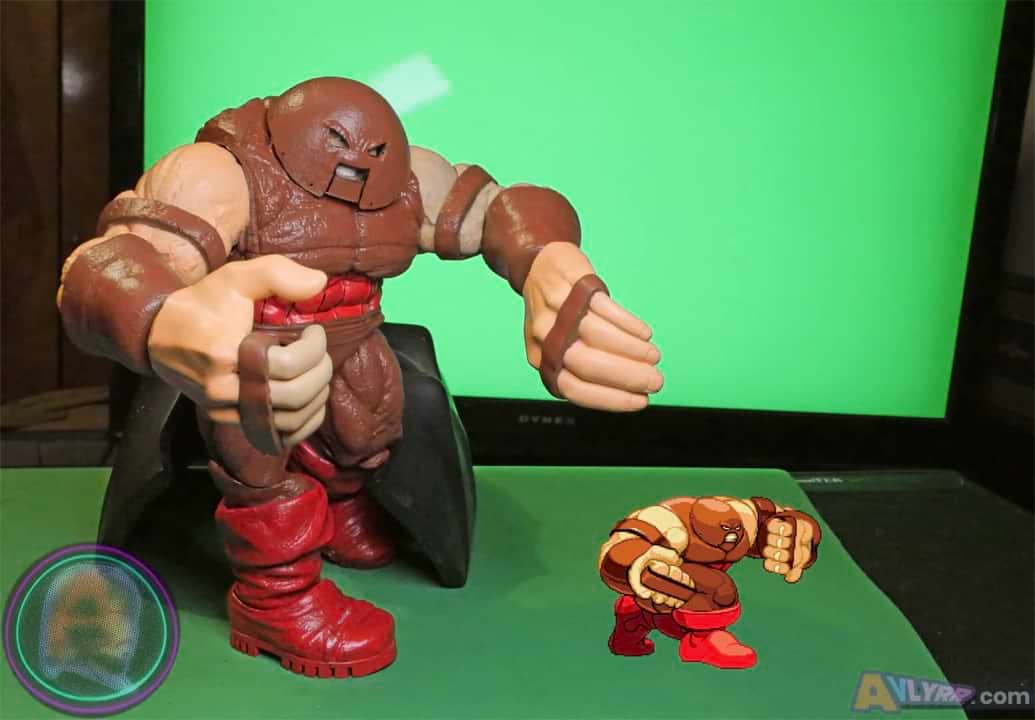
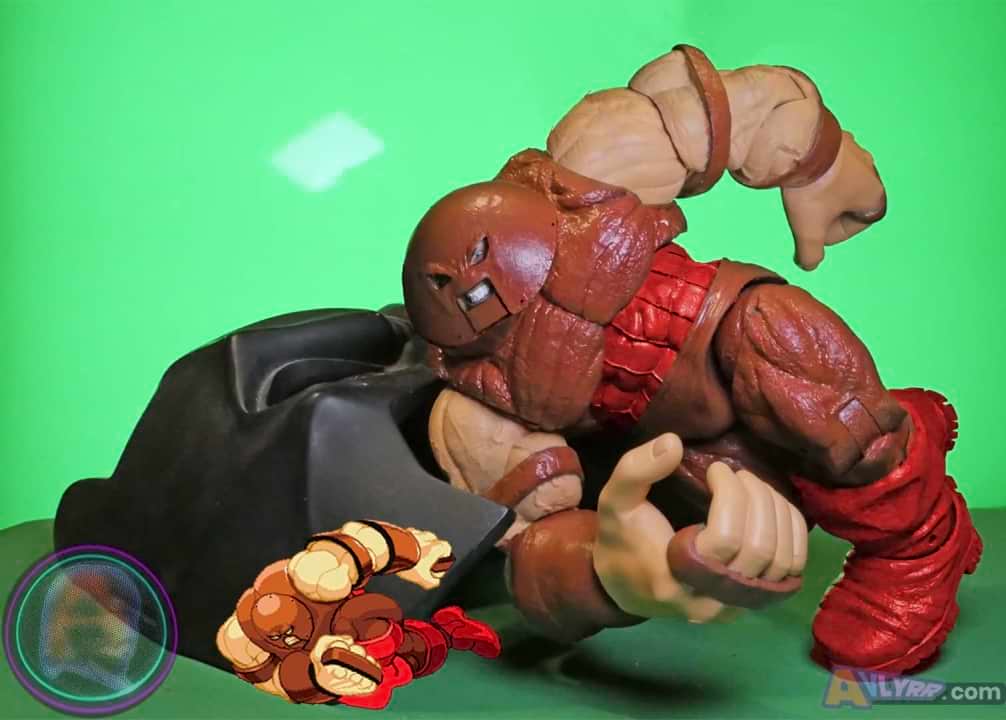
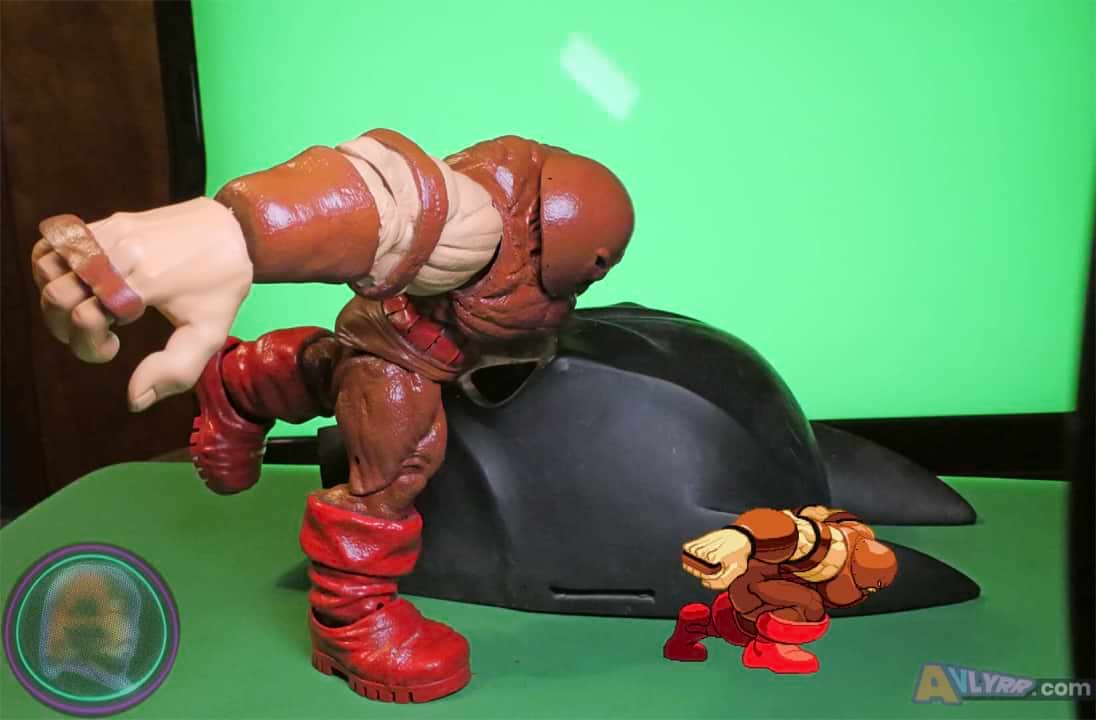
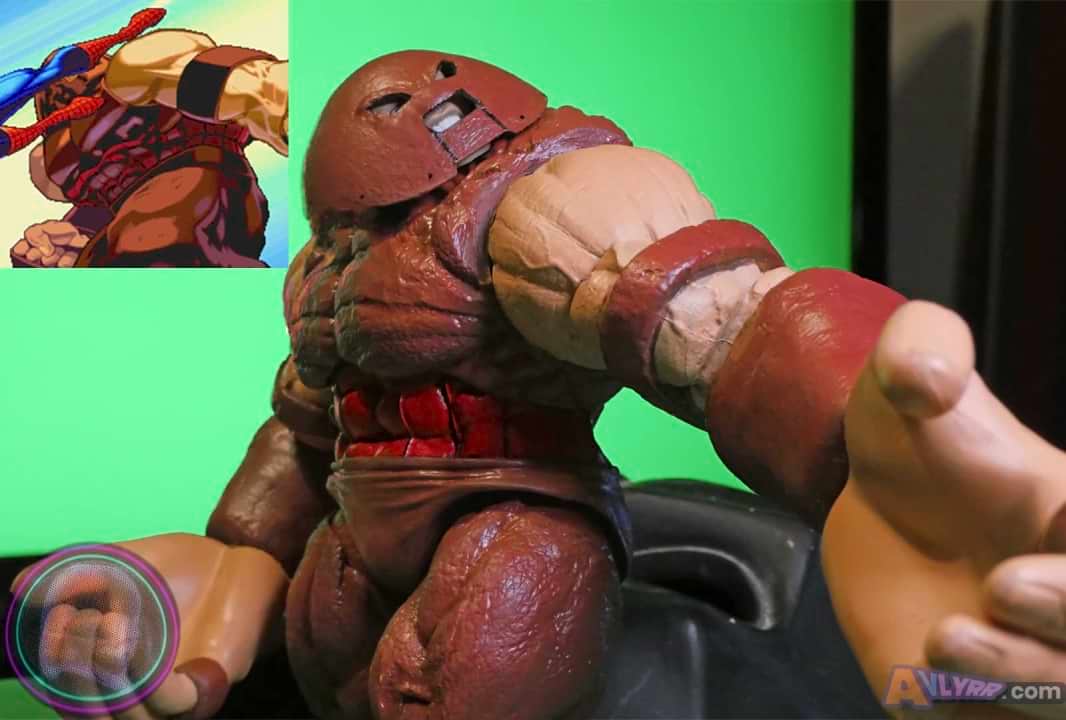
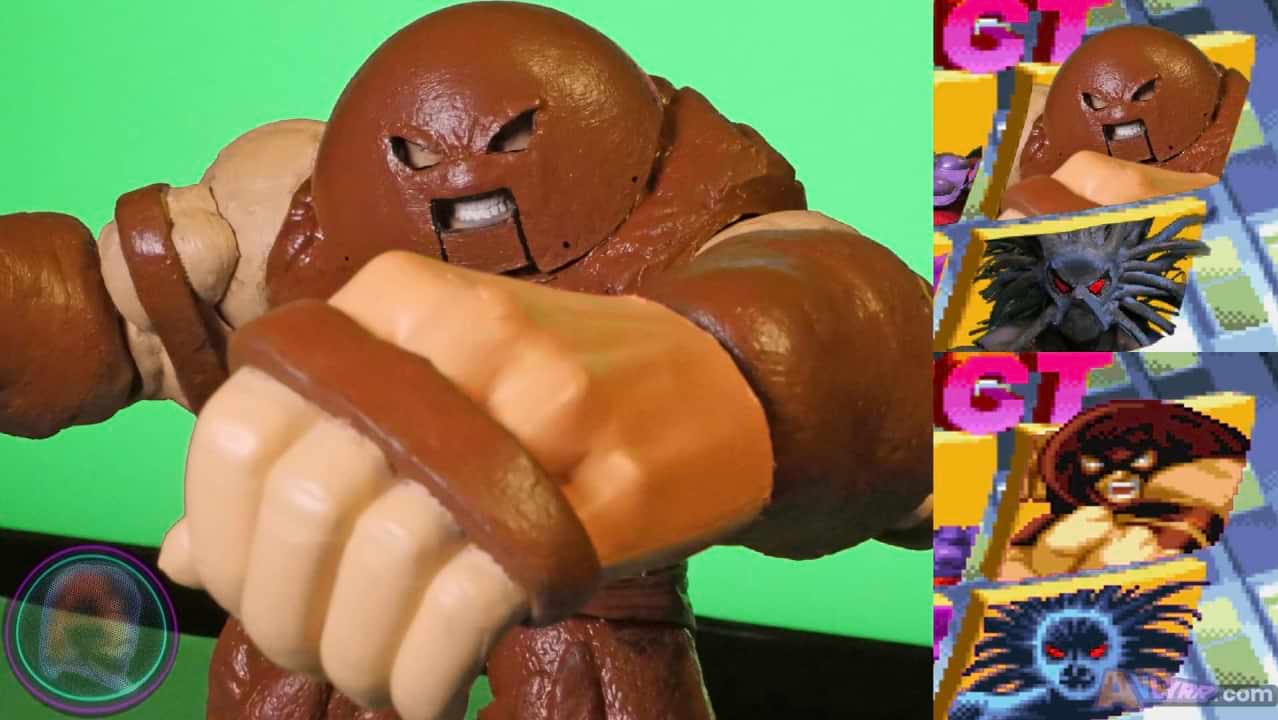
SELECT🧱UNSTOPPABLE
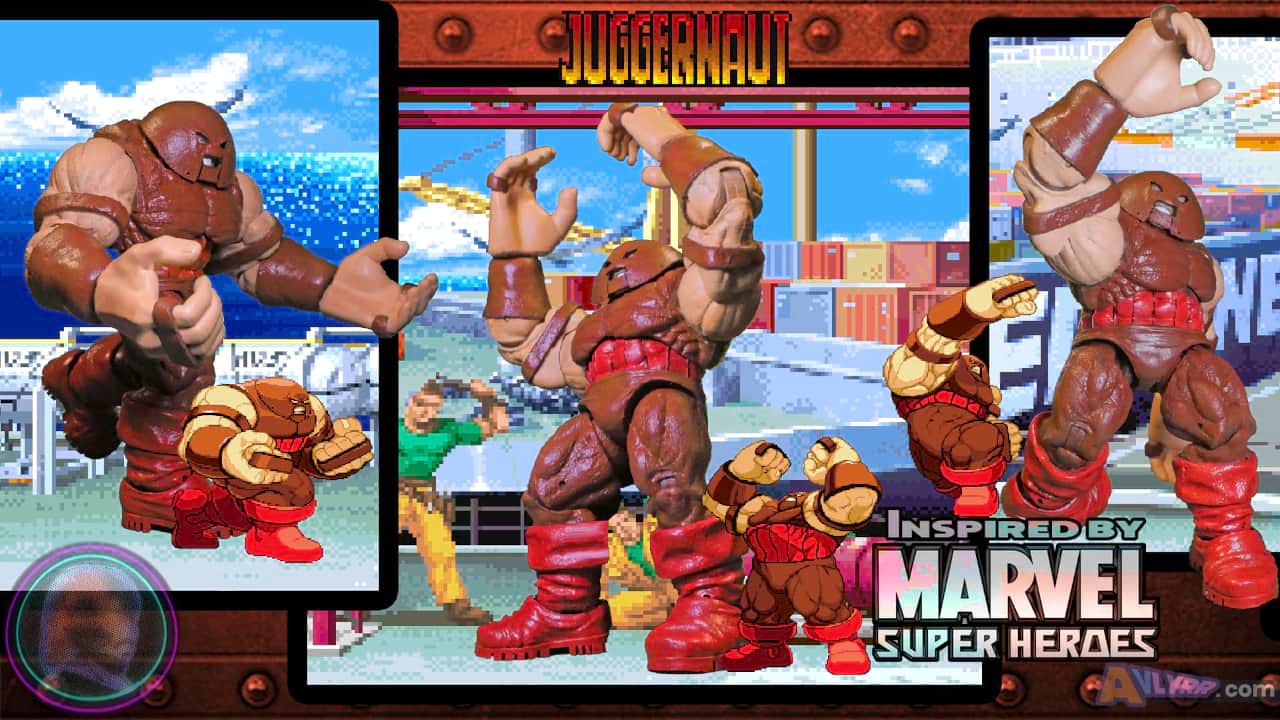
"I'm unstoppable!"
Process:
Marvel Select Juggernaut is the base.
Temporarily removed head from fig. (Used hot water to remove)
Trimmed the helmet into a smaller circle and sliced off bolt nubs.
Sanded helmeted head.
Added Green Stuff sculpt around eye holes and mouth opening to match sprites.
Trimmed the brown “shirt” area back around shoulders to allow for more higher range of motion in the arms.
Sawed off the figures hands at the wrist bend.
Removed hands from 30 inch Superman figure. (There’re screws that you can loosen/remove to get them off)
Heating a bowl of water in microwave to a boiling temp, dropped the hands in it to allow the fingers to bend easier.
After bending fingers into more a curled fist shape tightened a C-clamp on each and let them sit for about 2 days. (Ya might even want to consider putting super glue on palm before tightening down clamps if you want them more close-fisted.)
Sanded the hand-less wrists of the figure.
Added Aves Apoxie to the wrist areas of the figure where the hands were sawed off.
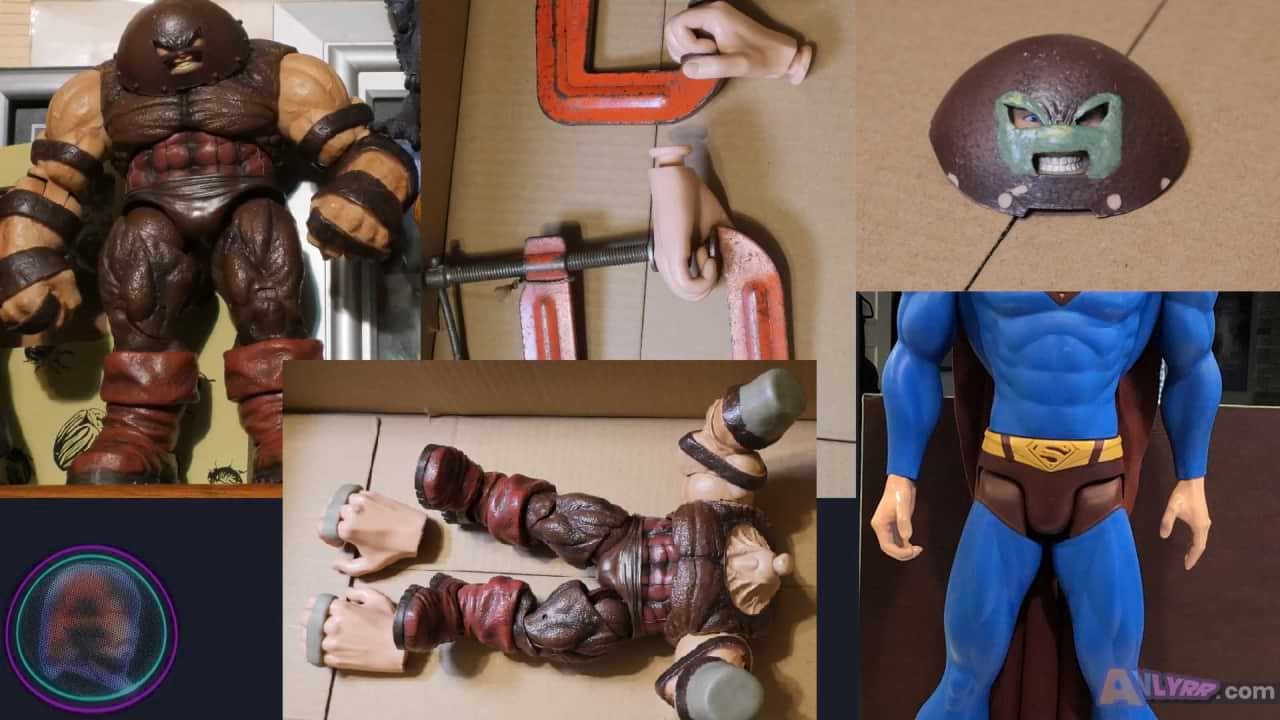
Sawed off the peg nubs that were at the bottom of the Superman hands.
Rolled out 2 lines of Aves to add to hands for the figs knuckle gaurds.
Drilled a hole in each re-sculpted wrist area and then put a screw in each with a dab of super glue in each hole.
Cut the head off of the screws.
Drilled a starter hole directly in the middle on the bottom of each hand.Screwed the hands onto the headless screws on the wrist. (You can actually give the screw heads epoxy and drill a larger hole underneath hands to make it so the hands can be popped on and off if ya want.)
Sanded the entire figure.Painted everything the appropriate color for 3 coats.
Used the black marker to add dots around the helmet where bolts would go and then outlined the eye holes with it.
Tools/Materials Used:
Brackets after the item are where they were originally purchased. This is in case you want to use anything I did and where they were found.
The initial cost as of 3/3/24 will be noted like this in USD for your consideration to weigh your options or so you can compare elswhere for better pricing.
Figure(s)
-Marvel Select Juggernaut by Diamond Select $40.99 [Amazon]
-Superman Returns 30 inch Figure for hands [was a gift] (You should be able to find this Supes pretty easy. The Man of Steel one might work even better since that ones hands already come as fists.)
Tools
-Gordon Folding Lock-Back Utility Knife $5.44 [Harbor Freight]
-Sanding Sticks DGBRSM 30pcs Black 37mm $8.88 [Amazon]
-3M 150 sand paper $2.39 [Amazon]
-Transon Artist Paint Brushes Set of 12 $12.99 [Amazon]
-Honoson 5 Pieces Miniature Sculpting Tools Set Mini Stainless Steel Double-Headed Tool $11.99 [Amazon]
-Rotary Tool, 4V Cordless Mini Rotary Multi-Tool Kit with 2 Variable Speed, 31pcs Accessories Kit for Carving, Engraving and Polishing $14.99 [Amazon]
-Pair of C-Clamps (If you want to use for holding hands closed)
-Sargent & Co pliers/cutter (You just need a tool that can cut the head off a screw like a bolt cutter)
Materials
-The Army Painter Green Stuff $16.10 [Amazon]
-Aves Apoxie Sculpt - 2 Part Modeling Compound - 1/4 Pound, Natural $21.95 [Amazon]
-HFT Super Glue 3-pack $1.49 [Harbor Freight]
-2 inch carpenter screws (any screw larger than 1 and a half inch will do that you either find or buy cheap)
Paint
-Apple Barrel Outrageous Orange Satin $1.07 [Amazon]
-Apple Barrel White Gloss $0.97 [Wal-Mart]
-Apple Barrel Real Red Gloss $0.97 [Amazon]
-Vallejo Model Color Flat Flesh and Vallejo Refractive Green from set Vallejo Basic USA Acrylic Colors Paint Set, 17ml, Assorted Colors, 0.57 Fl Oz (Pack of 16)) $40.16 [Amazon] (can purchase cheaper individually)
Note: Instead of mixing colors to produce a gloss metallic brown in this recipe (AB Gloss Red, Vallejo Metallic Green, AB Satin Orange, and a lil AB White Gloss to lighten) you may consider just buying something closer to the brown of the sprite from the start.
Other
-Black Felt Tip Sharpie $5.87 from a 4 pack [Wal-Mart]
For Your Consideration:
A few extra modifications that you could do with yours to make this fig even more accurate:
-An alternate set of hands or ones with jointed fingers
-Overall use a more pose-able figure as base.
-Really make his shoes look more like the booties he has in sprite form.
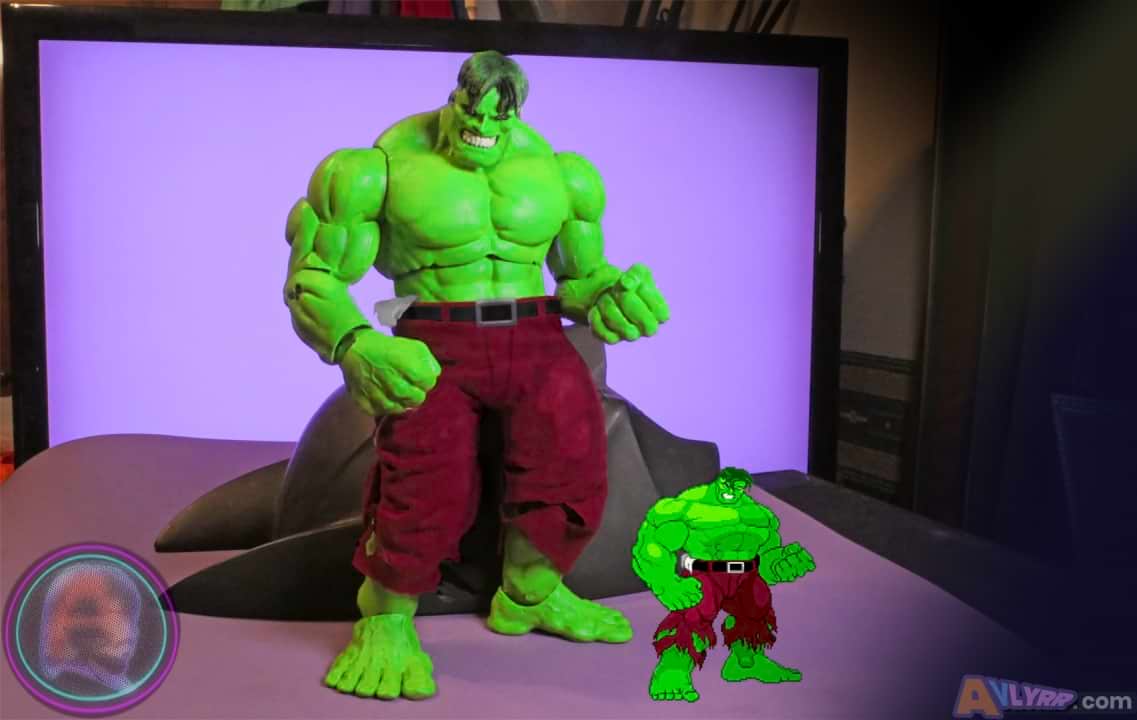
GREEN ON☢️GREEN
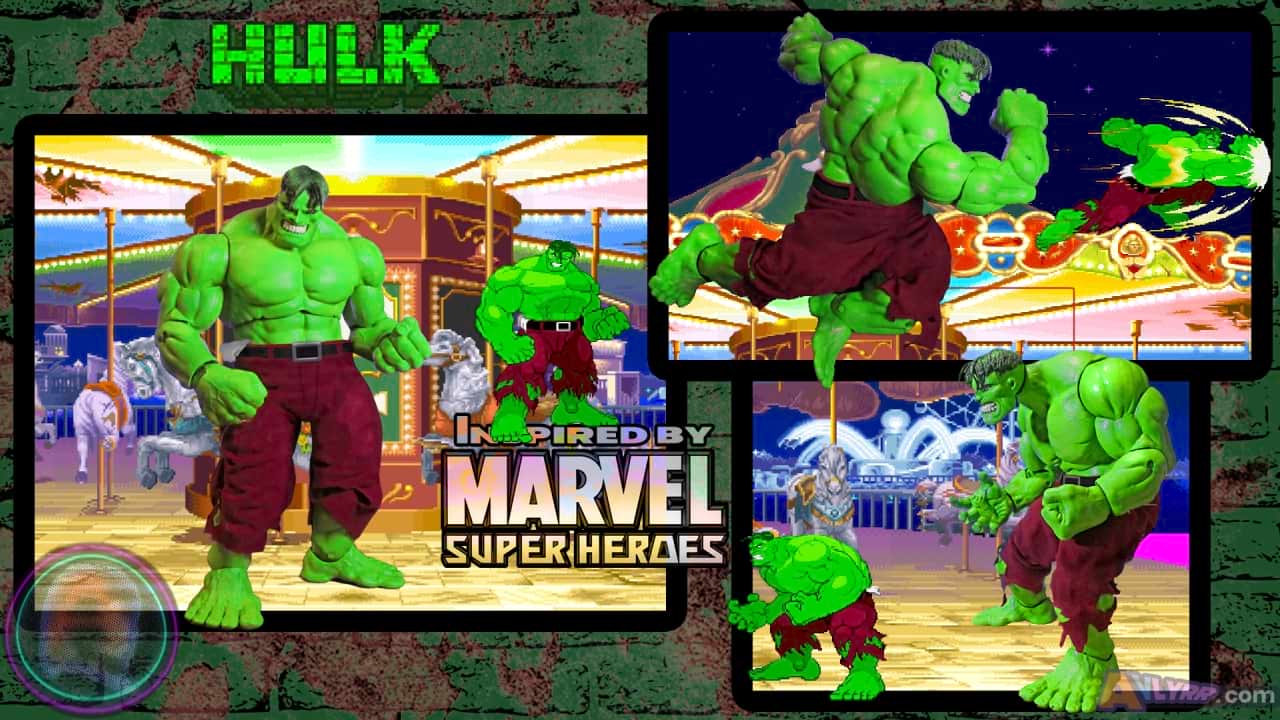
"Let's rock!"
Process:
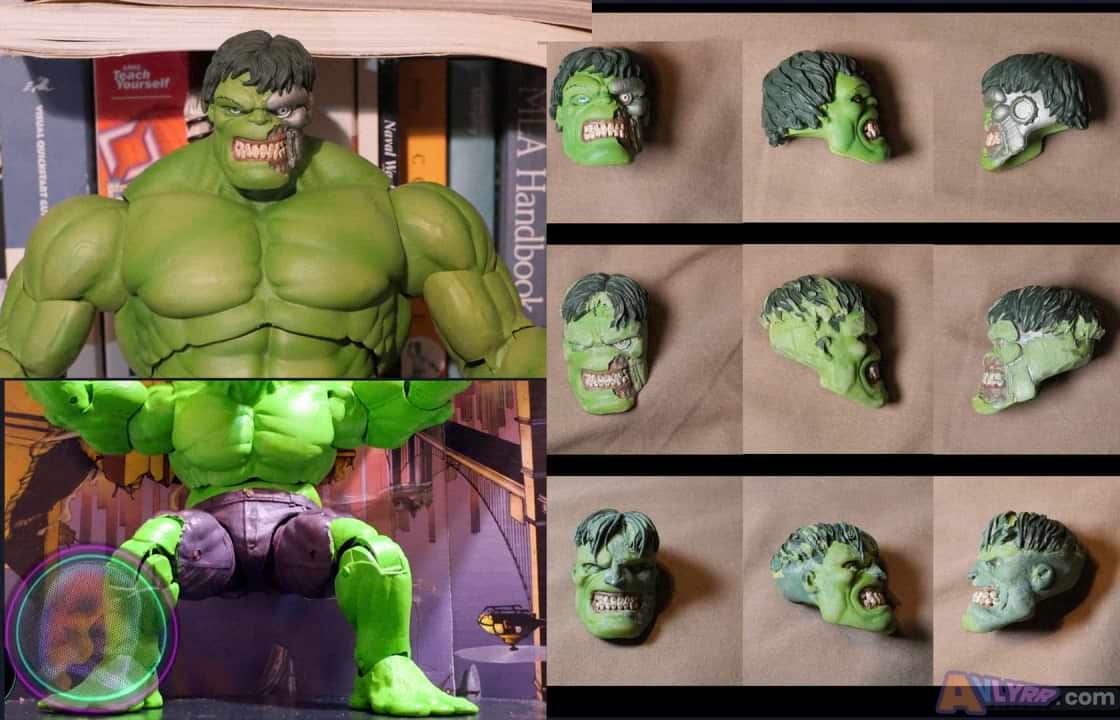
Immortal Hulk by Marvel Select is the base.
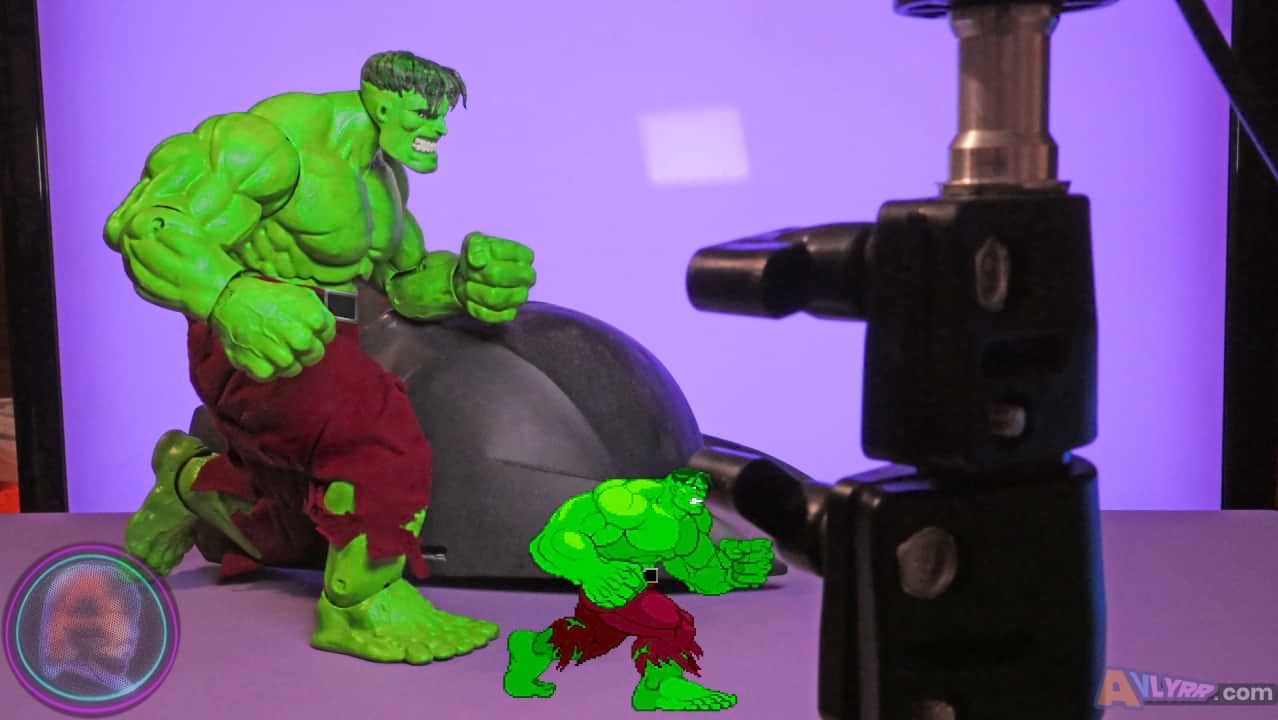
Modified the cyborg head (see example below for reference if you want to re-sculpt it yourself, but if you don't want to go through all of that, it is very easy nowadays to get someone to 3d print you a head at a reasonable price)
Also shaved/adjusted the neck and torso joint/pivot points for better range of motion.
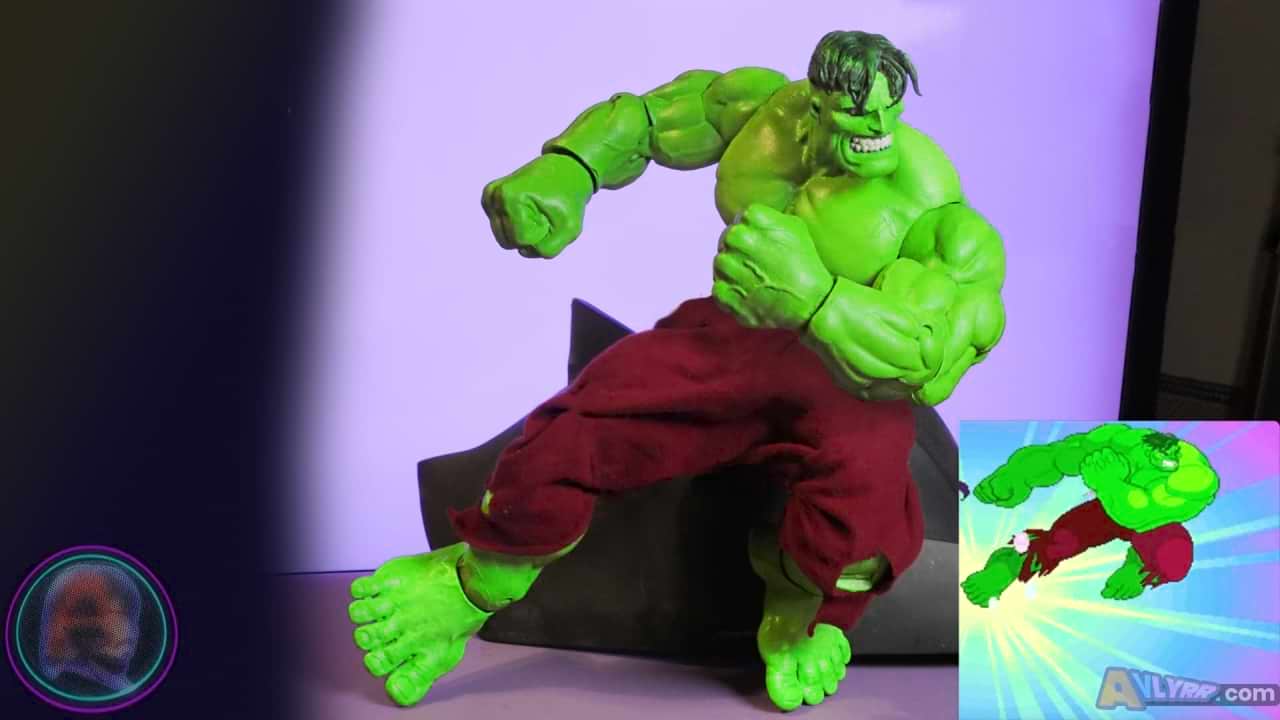
Removed torn pant pieces around calves.
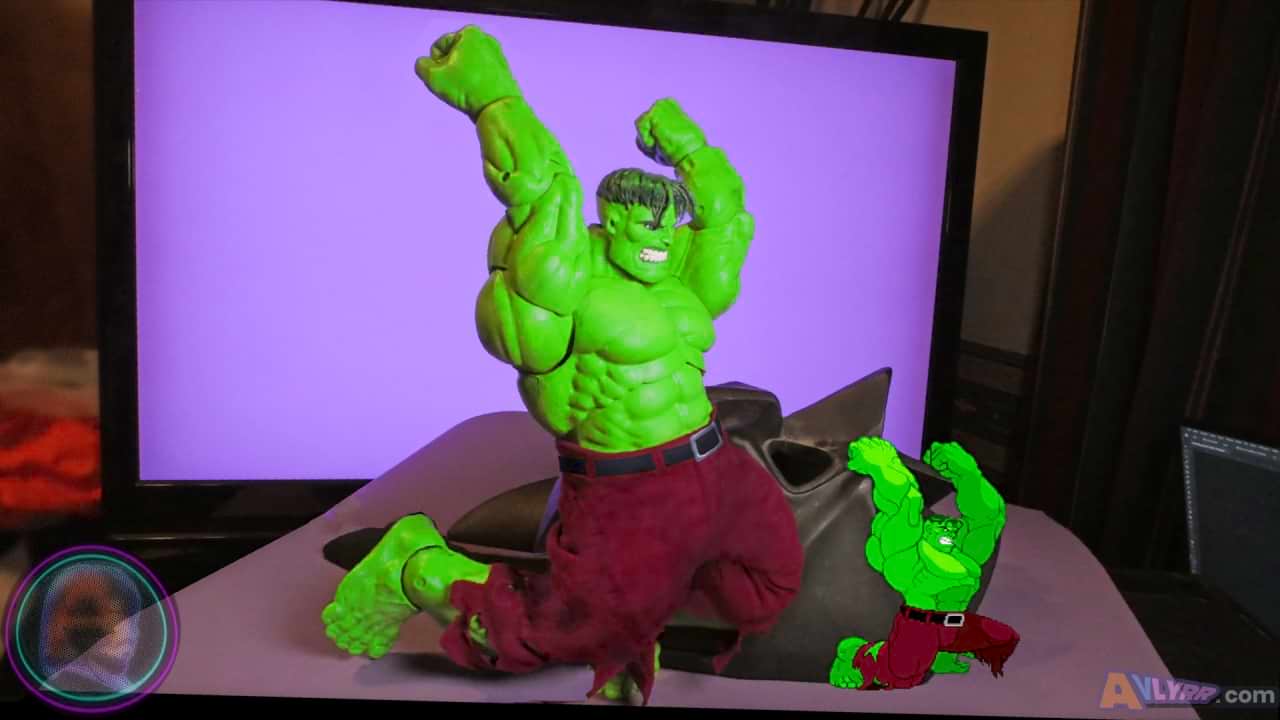
Complete repaint with acrylics. (2 full coats and another partial for blending some highlights)
Hand sewed pants from a burgundy colored shirt. (It will be easier just for you to paint over existing pants if you prefer that instead)
The belt was a strip of black tape cut in sections and buckle is just a tiny cutout piece of thin rubber painted dull silver.
A piece of white cloth was used at the waist
Tools/Materials Used:
Brackets after the item are where they were originally purchased. This is in case you want to use anything I did and where they were found.
The initial cost as of 3/3/24 will be noted like this in USD for your consideration to weigh your options or so you can compare elswhere for better pricing.
Figure
-Diamond Select Marvel Select Immortal Hulk (also has been called Rampaging Hulk) $54.97 (price included tax and shipping) [eBay]
Tools
-Gordon Folding Lock-Back Utility Knife $5.44 [Harbor Freight]
-Sanding Sticks DGBRSM 30pcs Black 37mm $8.88 [Amazon]
-3M 150 sand paper $2.39 [Amazon]
-Transon Artist Paint Brushes Set of 12 $12.99 [Amazon]
-Honoson 5 Pieces Miniature Sculpting Tools Set Mini Stainless Steel Double-Headed Tool $11.99 [Amazon]
Materials
-The Army Painter Green Stuff $16.10 [Amazon]
-HFT Super Glue 3-pack $1.49 [Harbor Freight]
-Burgundy shirt $2 [From a local thrift shop]
Paint
-Satin Lime Green (2914) FolkArt $1.47 [Amazon]
-RichArt Acryology Flourescent Green $1.25 [Dollar Tree]
-Apple Barrel White Gloss $0.97 [Wal-Mart]
-Apple Barrel White Satin $0.97 [Wal-Mart]
-Apple Barrel Lemon Satin $0.97 [Wal-Mart]
-Vallejo Black, Vallejo Flat Green, and Vallejo Silver from set Vallejo Basic USA Acrylic Colors Paint Set, 17ml, Assorted Colors, 0.57 Fl Oz (Pack of 16)) $40.16 [Amazon] (can purchase cheaper individually)
Other
-Black and Green Felt Tip Sharpies $5.87 from a 4 pack [Wal-Mart]
For Your Consideration:
A few extra modifications that you could do with yours to make this fig even more accurate:
- Get even more particular with the head sculpt and hair. Could also sculpt (or 3d print) and open-mouth expression for other poses.
- Sew a tighter fitting pair of pants or you could even just repaint the original figure's purple trousers!
- Extra accessories like a Gamma Crush boulder / Gamma Lift pieces of floor.

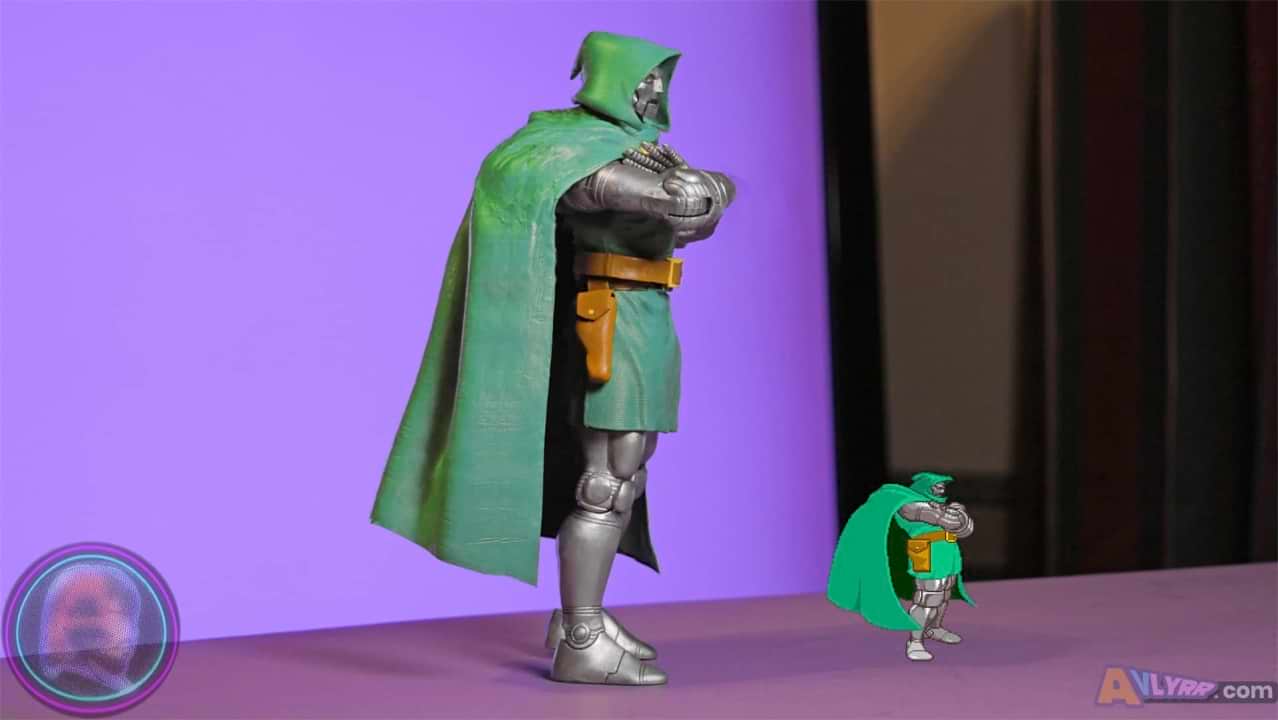
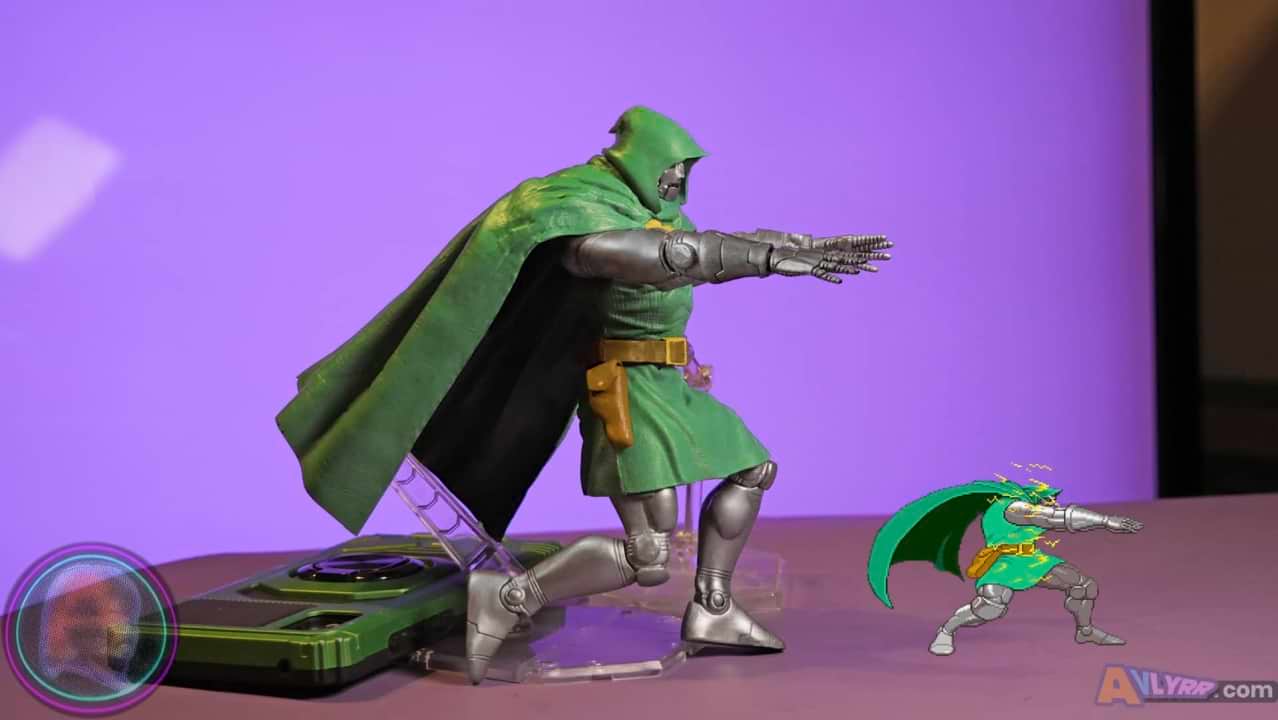
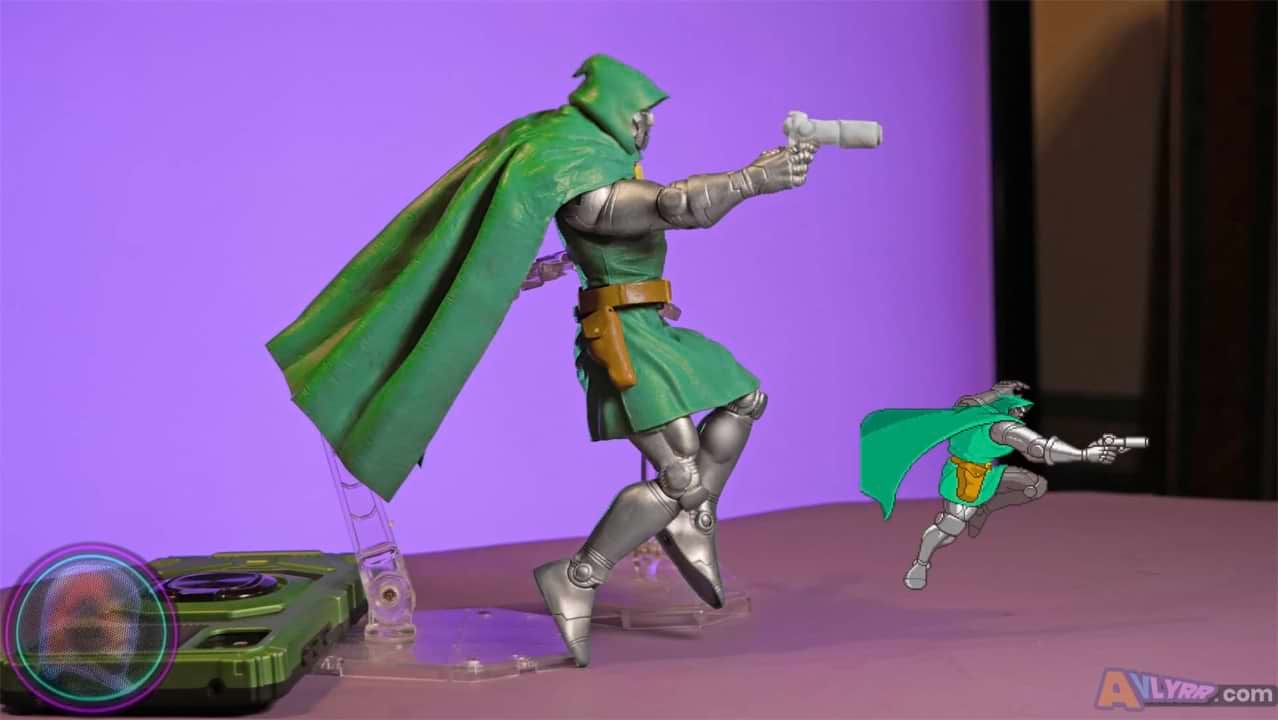
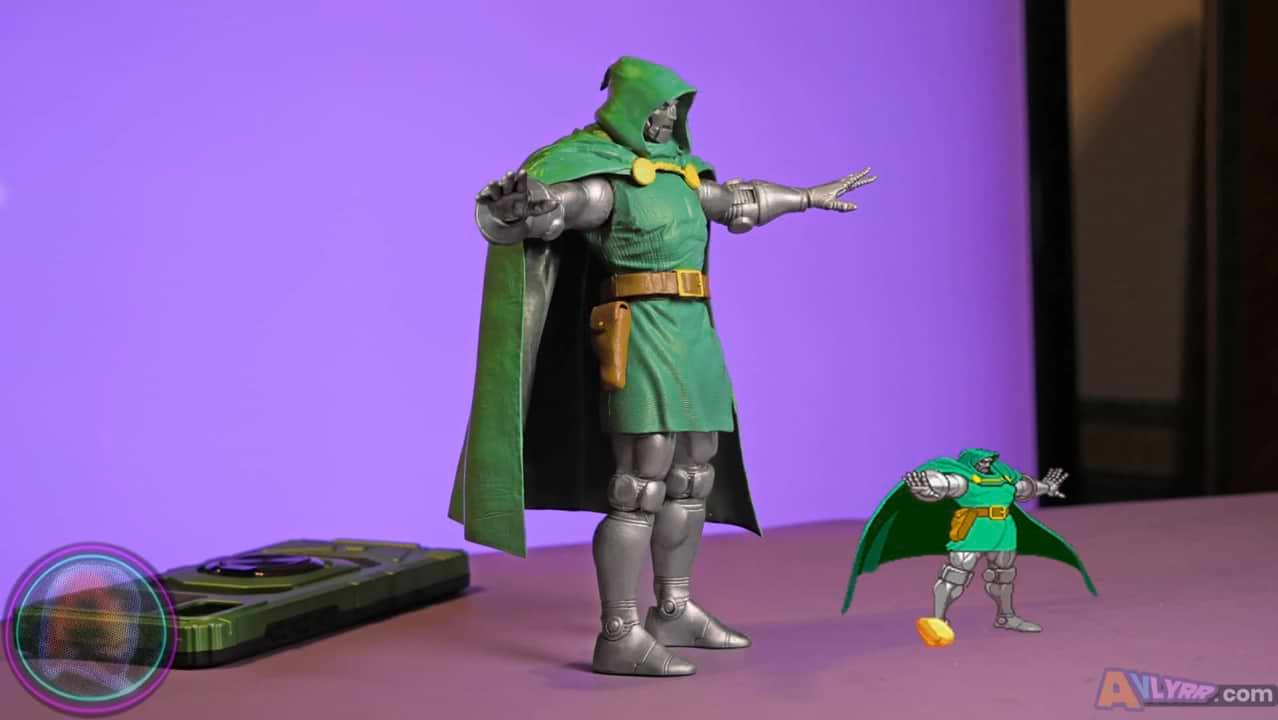
DOOM'D🦾DESPOT
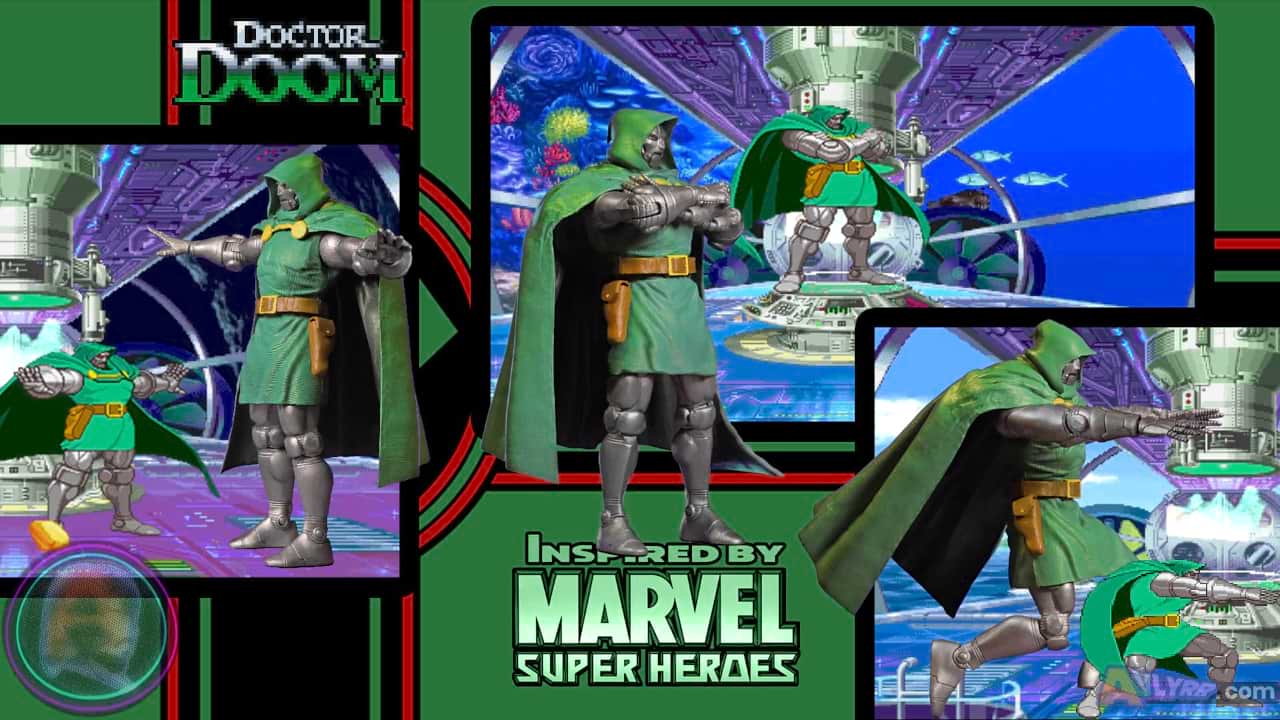
"Now you face Doom."
Process:
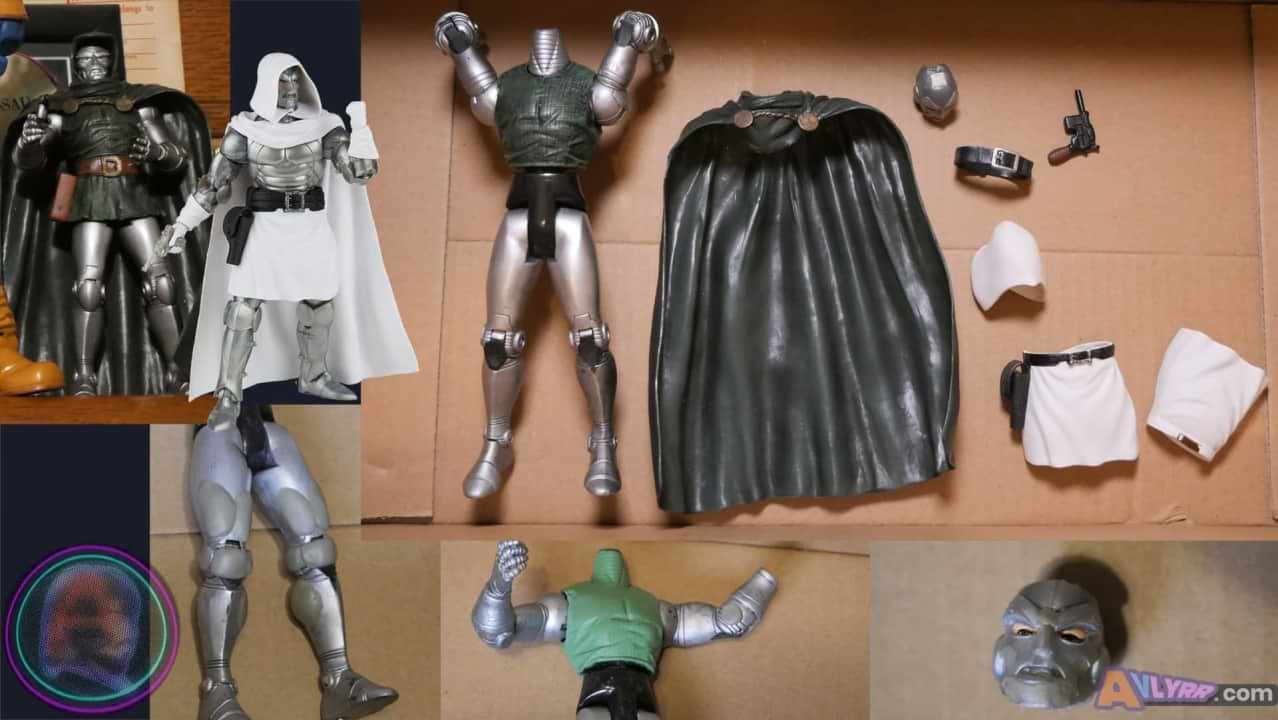
Took the Marvel Select Doctor Doom figure and removed cape with hood.
Cut off the hood of the cape.Removed belt and skirt.
Took head off the figure. (It'll just pull off. You can also use hot water if you want to make it a lil easier to do so.)
Sliced off knee pads and elbow pads.
Trimmed area where chest meets shoulder. (so arms could fold in a lil more)
Shaved the neck area on the Marvel Select figure.
Sculpted a few quad (leg) muscles on thighs that would be exposed.Also sculpted slightly larger calf muscles on the inside of the leg.
Resculpted new knee pads. (that would look closer to the sprite's shape)
Added round flat sculpt at knee and elbow hole joints.
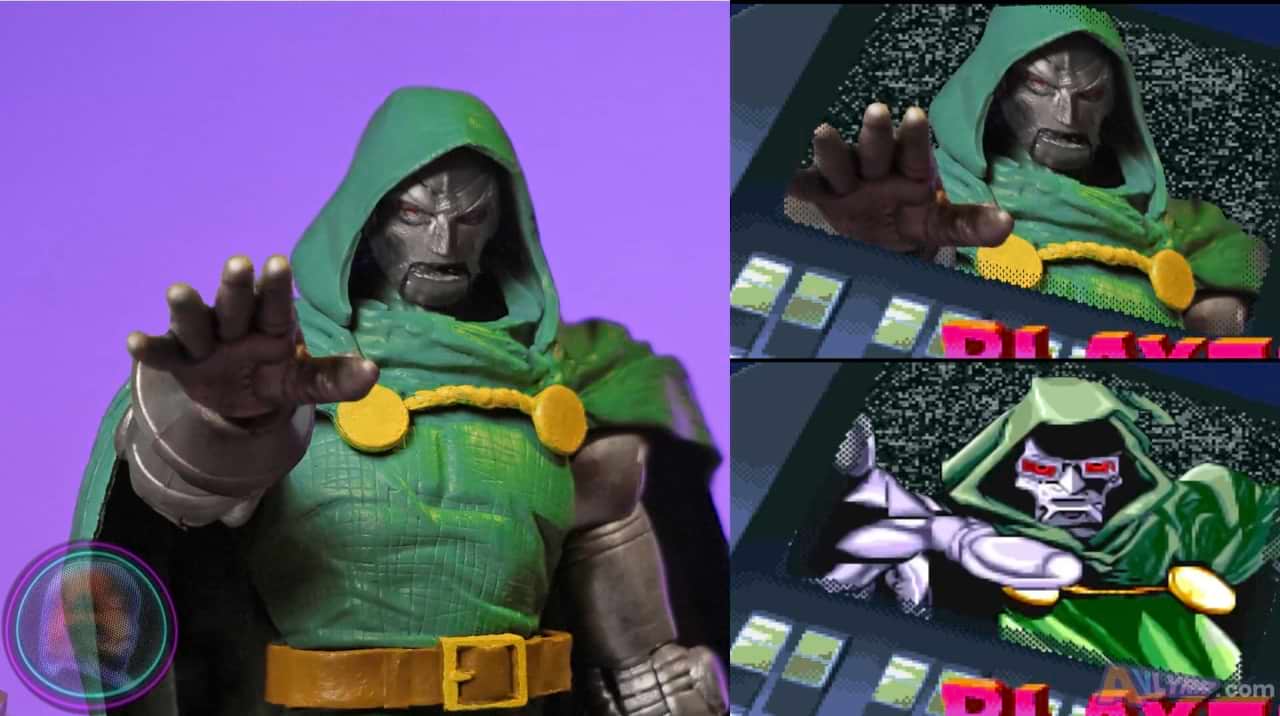
Took the Marvel Legends Doctor Doom and removed the head.
Carefully separated the hood from the head. (It is glued to the top of it. A flat screw driver or a thin scalpel-like tool might help you here.)
Added sculpt to the head's nose and cheek area.
Added some sculpt to the bottom of the ML head to give it a kind of nub to fit on the MS neck.
Removed skirt with belt and holster attached to it from the ML figure. (There's 2 parts / front and back)
Trimmed the belt in half. (height-wise)
Shaved the stylized D off the holster flap and trimmed it a lil.
Filled the hole at the bottom of the holster with a lil sculpt.
Took Marvel Legends Captain America belt and cut it opposite the buckle side.
Sanded everything down once all sculpt was dry.
Painted everything the appropriate colors.
Trimmed a lil more of the bottom of the hood material.
Sat cape on figure.
Attached head with hood. (You can add a dab of super glue on top of head so that hood stays attached if you want)
Put skirt around waist with super glue. (Careful not to glue directly to figure so it can twist at the waist still)
Took the painted Cap belt and fit around top of skirt with super glue.
As an added bonus, trimmed the Marvel Select Doom's gun and reshaped with Apoxy.
Tools/Materials Used:
Brackets after the item are where they were originally purchased. This is in case you want to use anything I did and where they were found.
The initial cost as of 3/3/24 will be noted like this in USD for your consideration to weigh your options or so you can compare elswhere for better pricing.
Figure(s)
-Marvel Select Doctor Doom by Diamond Select $21.87 [eBay] and
-Marvel Legends Doctor Doom - Xenmu BAF Edition $22.62 [eBay] (Tax and Shipping included in prices)
Tools
-Gordon Folding Lock-Back Utility Knife $5.44 [Harbor Freight]
-Sanding Sticks DGBRSM 30pcs Black 37mm $8.88 [Amazon]
-3M 150N sand paper $2.39 [Amazon]
-Transon Artist Paint Brushes Set of 12 $12.99 [Amazon]
-GJJC09B 1PC Painting Stand Base and 20PCS Alligator Clip Stick Set Modeling Tools for Airbrush Hobby Model Parts New $9.99 [Amazon] (This is used to hold painted parts while they dry)
-Honoson 5 Pieces Miniature Sculpting Tools Set Mini Stainless Steel Double-Headed Tool $11.99 [Amazon]
Materials
-Aves Apoxie Sculpt - 2 Part Modeling Compound - 1/4 Pound, Natural $21.95 [Amazon]
-HFT Super Glue 3-pack $1.49 [Harbor Freight]
-Marvel Legends Infinite Series belt $22.27 (This is the full price of the fig with tax & ship included that would normally go under the figure section, but if you can just find the belt it'll save you $$)
Paint
-Apple Barrel Black Gloss $0.97 [Amazon]
-Satin Lime Green (2914) FolkArt $1.47 [Amazon]
-Apple Barrel Real Yellow Gloss $0.97 [Amazon]
-Apple Barrel Yellow Matte $0.58 [Wal-Mart]
-Vallejo Flat Green, White, Vallejo Flat Brown, Vallejo Azure, and Vallejo Silver from set Vallejo Basic USA Acrylic Colors Paint Set, 17ml, Assorted Colors, 0.57 Fl Oz (Pack of 16)) $40.16 [Amazon] (can purchase cheaper individually)
Other
-Black and Red Felt Tip Sharpies $5.87 from a 4 pack [Wal-Mart]
For Your Consideration:
A few extra modifications that you could do with yours to make this fig even more accurate:
-Provide more articulation by modifying limbs & joints or use a base figure that has more points at the start. (Possibly one that can bend at torso)
-Interchangeable alternate hands.
-A variety of effect accessories you can make to add to the figure including his thrown and doom bots if you want.
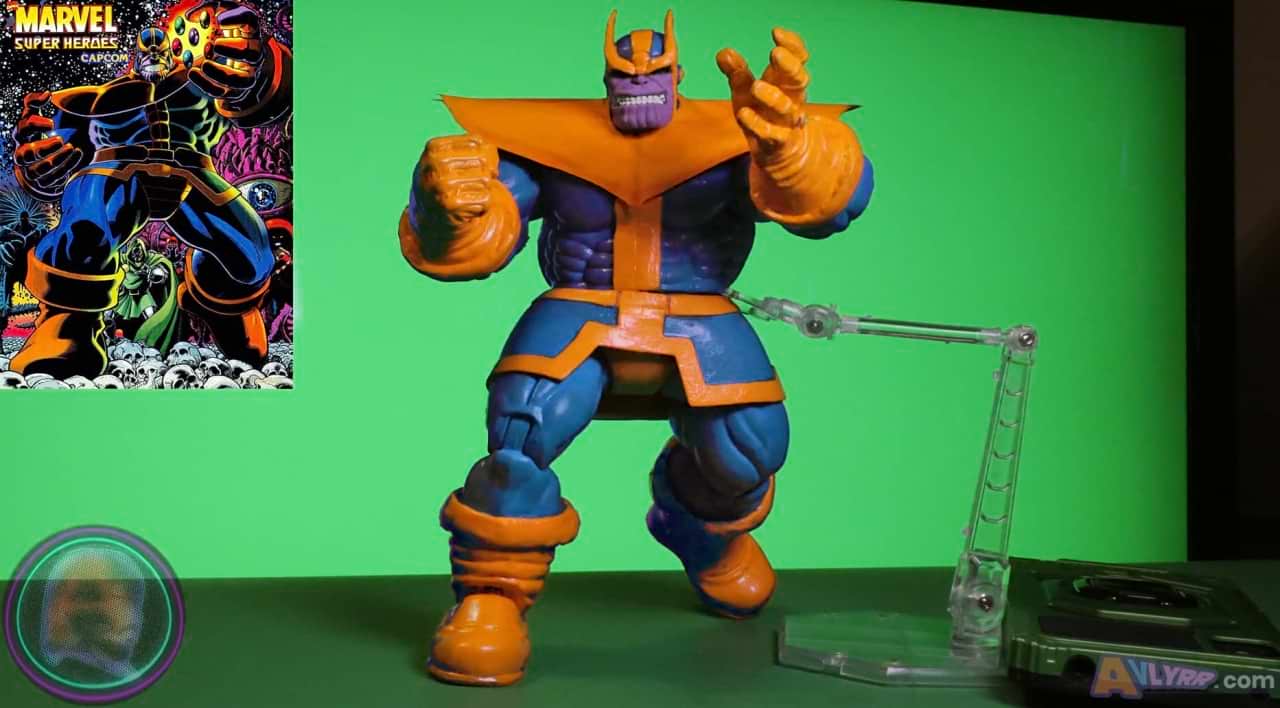
THE MOD💀TITAN
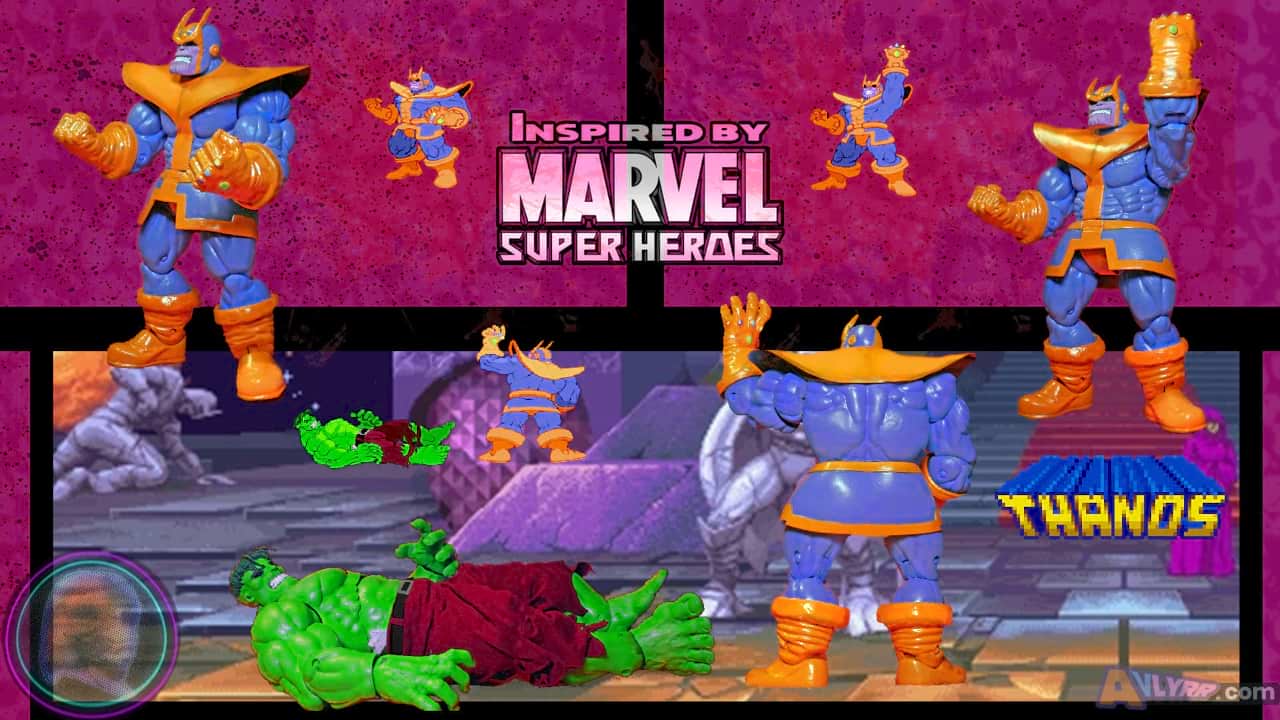
"Thanos reigns!"
Process:
Started with the Marvel Select Thanos figure by Diamond Select.
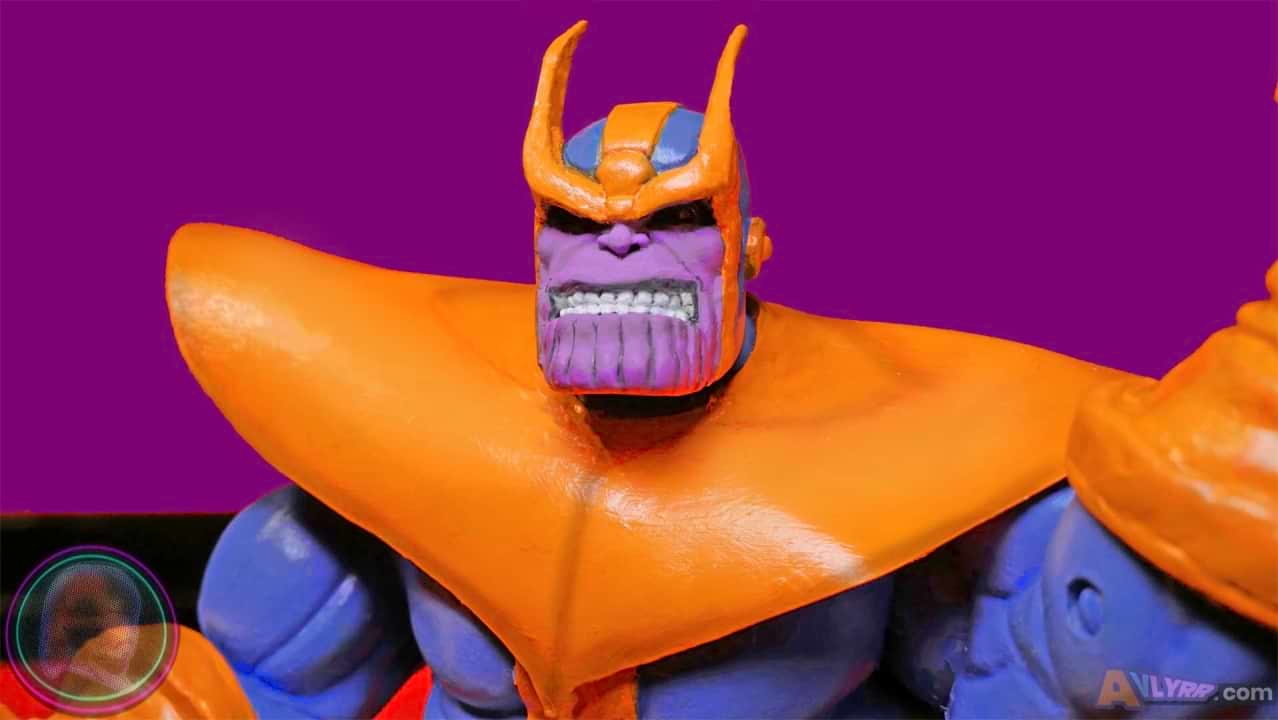
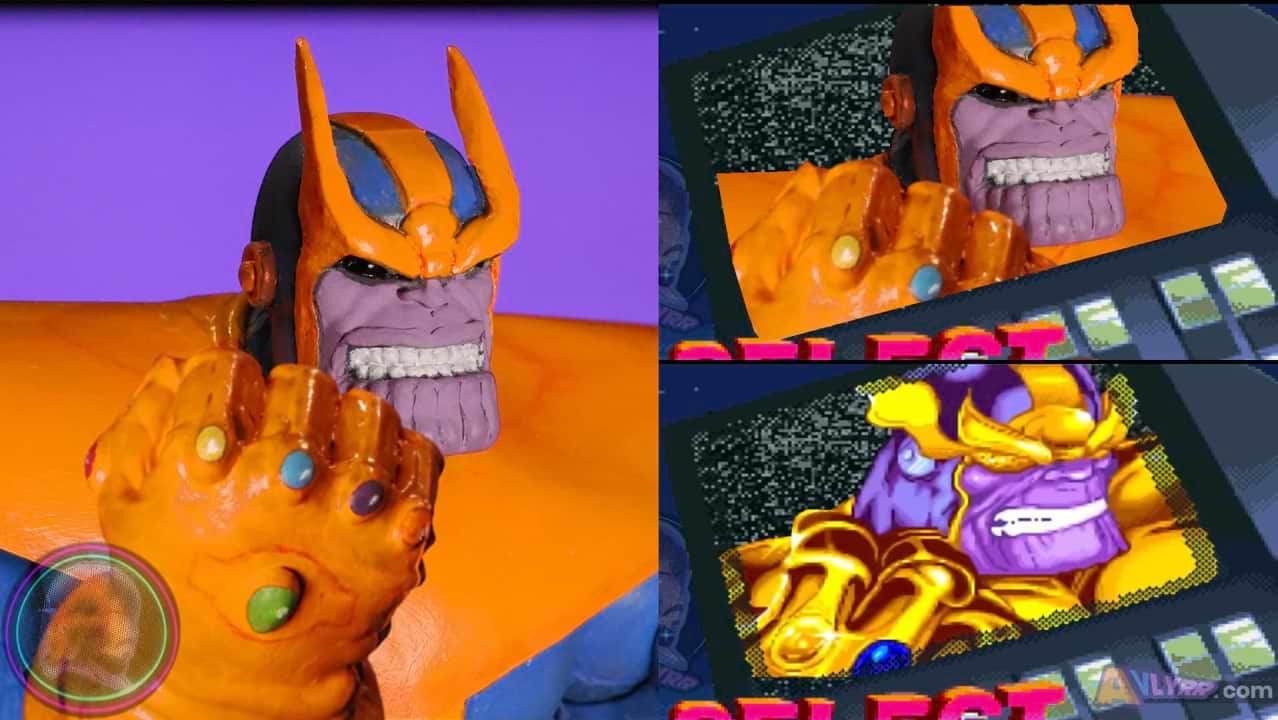
Sanded the entire fig.Using Green Stuff, sculpted the longer eyebrows, around the eyes, and down the side of his jaw
Added sculpt to the bands around the gloves and boots.
Tiny bit of sculpt added to the upper lip to give the appearance of a smiling sneer.
The shoulder pad piece was cut from a clear orange plastic binder divider.
Important Note: If you decide to make one yourself like this, do yourself a favor and opt for an opaque black one instead. It will save you from having to paint black on the underside and you shouldn't have to put as many coats of orange on it.
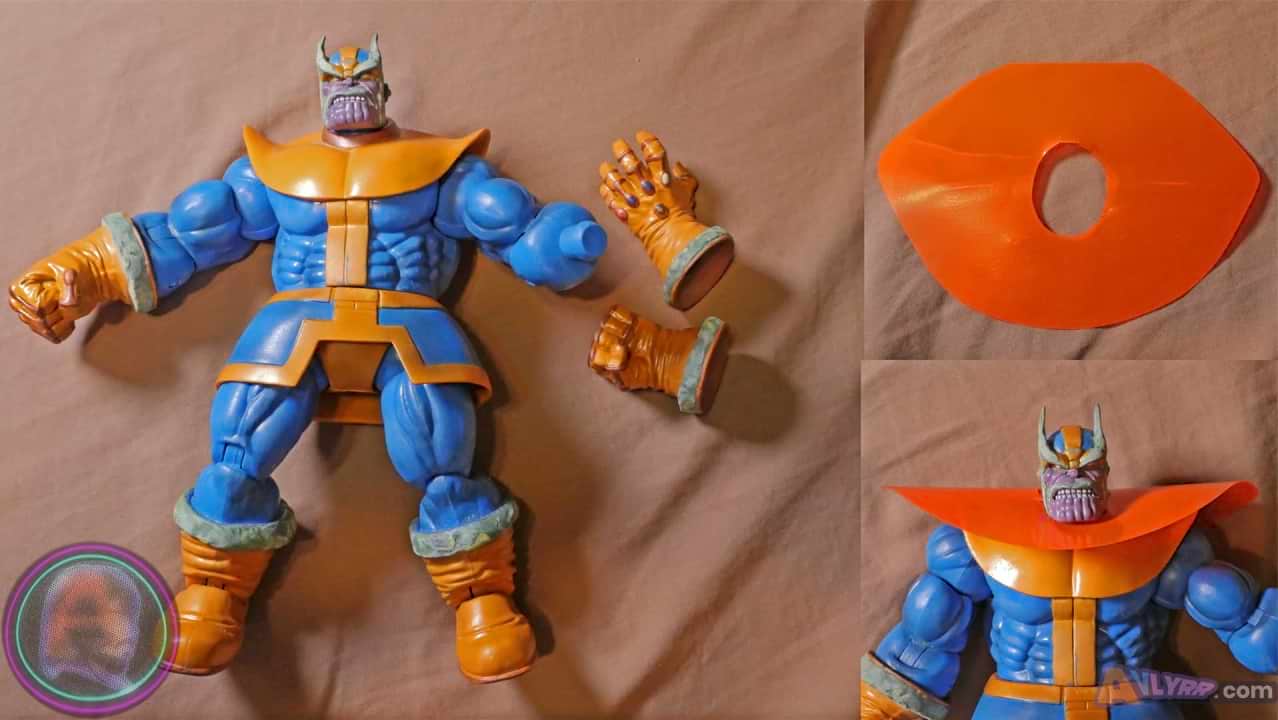
Shaped shoulder piece a little by hand before super gluing it to the figure.
Trimmed shoulder plastic slightly and formed it further into desired curve. (You can shoot it with a low heat hair dryer to help it along)
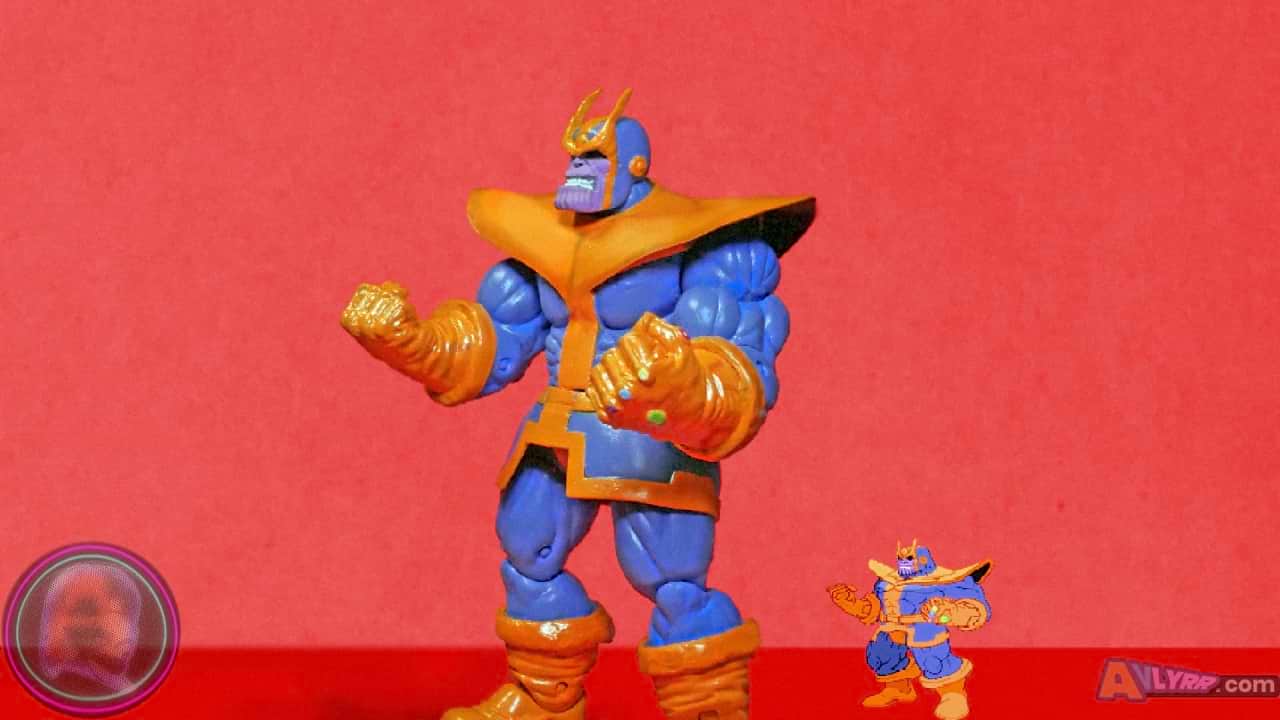
Complete repaint with acrylics. 4 full coats. (2 for fig and an additional 2 more for the orange because of the shoulder piece)
A partial coat was later applied for some highlights.
Extra lines were done by felt tip pens and smudged slightly with a tissue to blend.
Tools/Materials Used:
Brackets after the item are where they were originally purchased. This is in case you want to use anything I did and where they were found.
The initial cost as of 3/3/24 will be noted like this in USD for your consideration to weigh your options or so you can compare elswhere for better pricing.
Figure
-Diamond Select Marvel Select Thanos $29.95 (Not including tax) [Amazon] (Sometimes can find it loose on eBay for less)
Tools
-Gordon Folding Lock-Back Utility Knife $5.44 [Harbor Freight]
-Sanding Sticks DGBRSM 30pcs Black 37mm $8.88 [Amazon]
-3M 150 sand paper $2.39 [Amazon]
-Transon Artist Paint Brushes Set of 12 $12.99 [Amazon]
-Honoson 5 Pieces Miniature Sculpting Tools Set Mini Stainless Steel Double-Headed Tool $11.99 [Amazon]
Materials
-The Army Painter Green Stuff $16.10 [Amazon]
-HFT Super Glue 3-pack $1.49 [Harbor Freight]
-An Orange Pen+Gear 5-Tab Insert Divider 8.5in x 11in ~$3 to $4 [Wal-Mart] (As a warning, this pack with the orange DID NOT come with an opaque black divider, but if you find this one at the store you should be able to find one close by that does. Examples)
Paint
-Apple Barrel Outrageous Orange Satin $1.07 [Amazon]
-Apple Barrel Real Yellow Gloss $0.97 [Amazon]
-Apple Barrel Primary Blue Satin ~$1 [Wal-Mart]
-Apple Barrel White Gloss $0.97 [Wal-Mart]
-Vallejo Purple from set Vallejo Basic USA Acrylic Colors Paint Set, 17ml, Assorted Colors, 0.57 Fl Oz (Pack of 16)) $40.16 [Amazon] (can purchase cheaper individually)
-Apple Barrel Antique Parchment Matte $0.58 [Wal-Mart]
-Apple Barrel Black Gloss $0.97 [Amazon]
Other
-Black and Red Felt Tip Sharpies $5.87 from a 4 pack [Wal-Mart]
For Your Consideration:
A few extra modifications that you could do with yours to make this fig even more accurate:
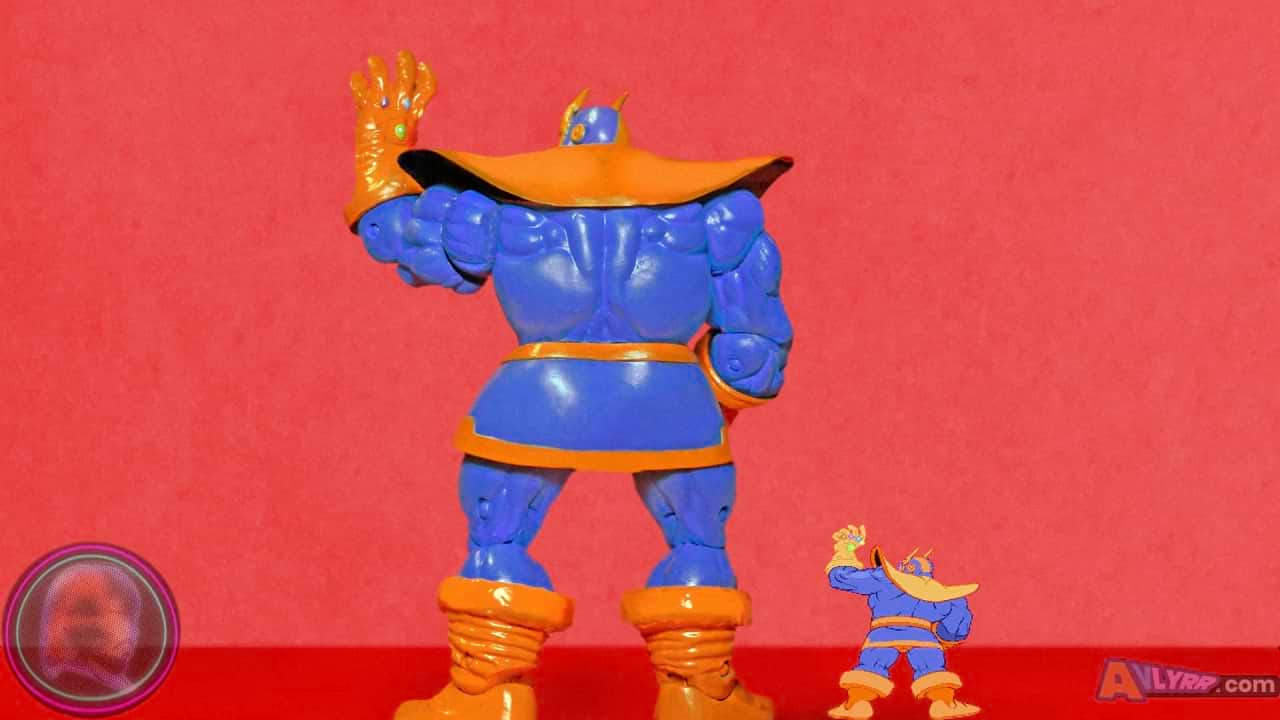
- Modify the torso of the figure so that he has less of a slouch.
- Actually mold or 3d print a proper chest piece with the beveled trim.
-All kinds of effect accessories for attacks.
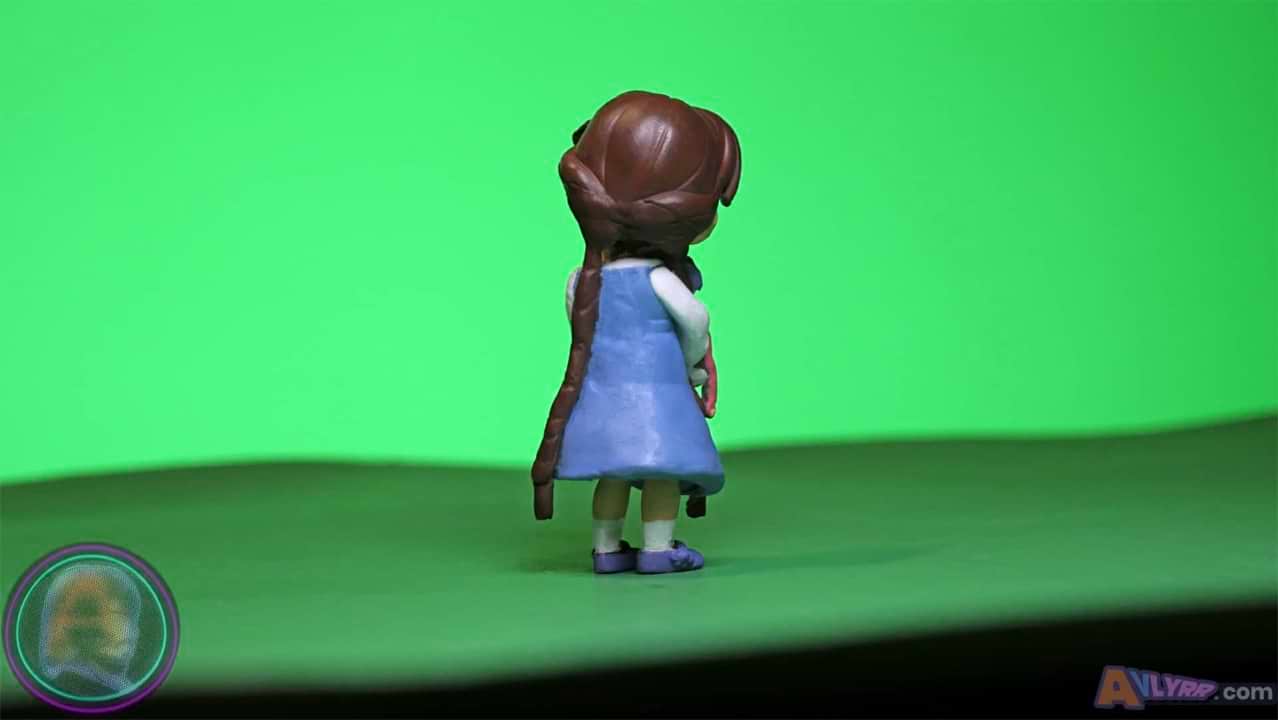
SECRET🎀OMEGA
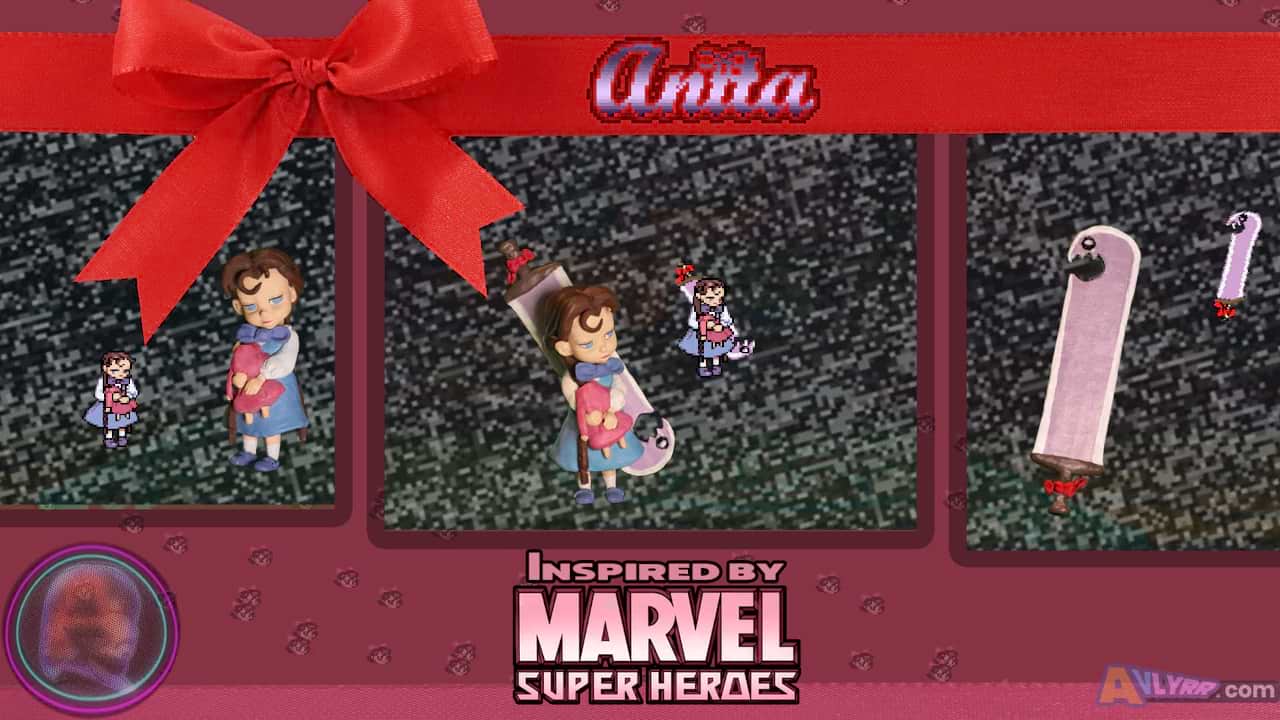
"..."
Process:
Took the basket off of the Belle figure.
Cut off the ribbon and the ponytail.
Separated ribbon from ponytail.Shaved Belle's original curl down on her forehead.
Removed circle base from feet.
Cut off her right hand to reposition later.
Added sculpt to bangs, a new curl on forehead, and around dress.
Sculpted long pigtails.
Added a larger right ear with sculpt.
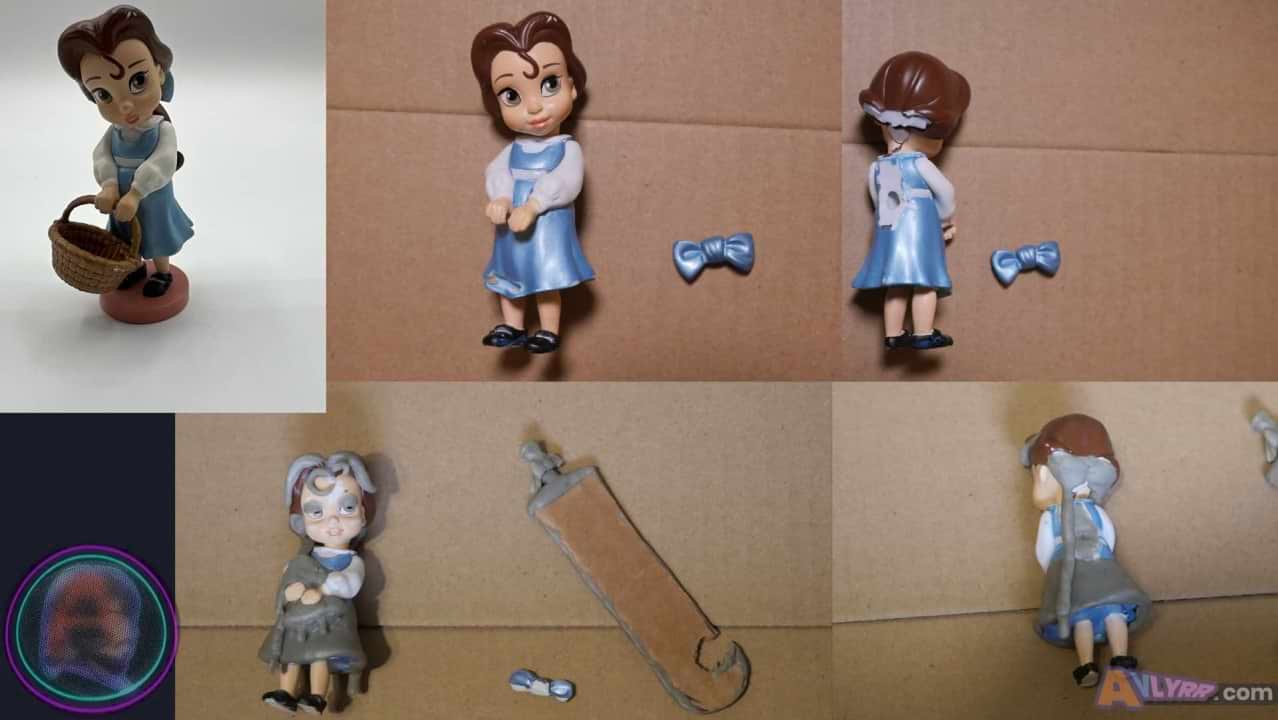
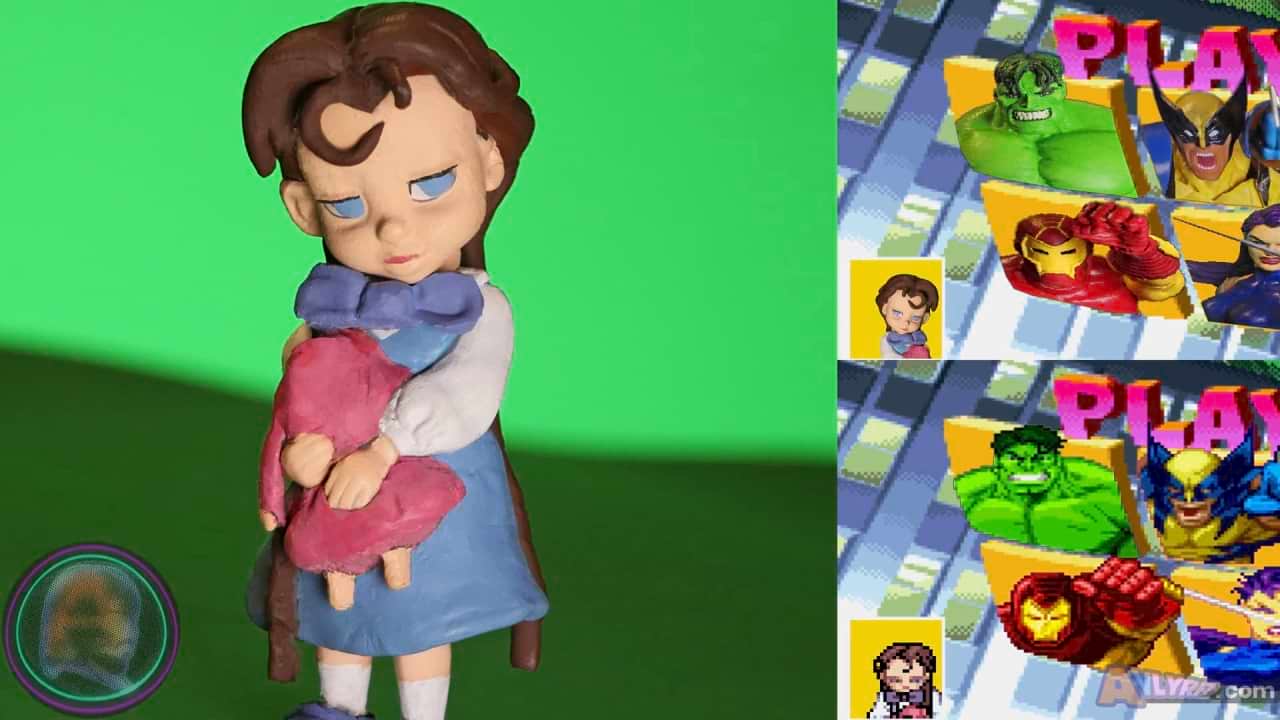
Sculpted the headless doll between arms while positioning the right hand appropriately.
Trimmed the bow a lil so that it will eventually sit under her chin.
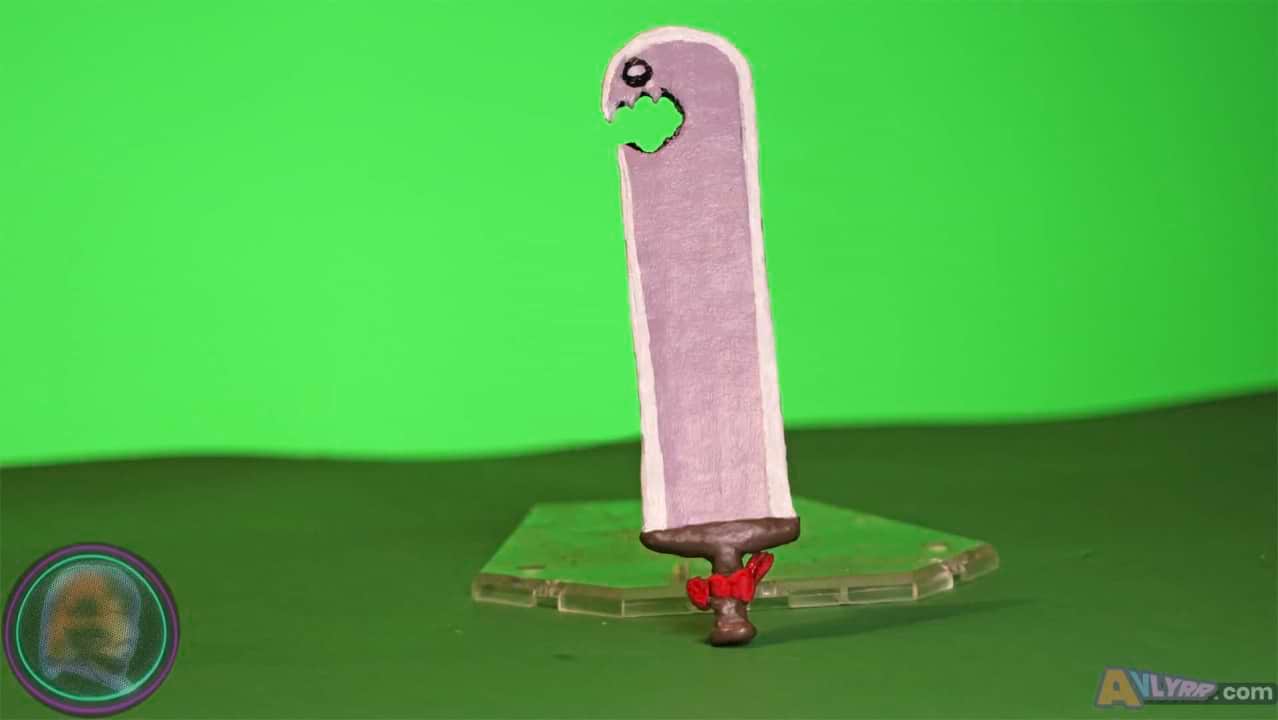
Cut a piece of cardboard in the shape of Dhylec (sword), added sculpt to edge. and some for the hilt/handle.
Sculpted a bow to the handle.
After all the sculpt had set then sanded everything smooth. (Sanded her mouth area down a lil more so she didn't have as much of a smile)
Painted everything the appropriate color.
Super glued the painted bow under her chin.
Drew eyes and around teeth on Dhylec with fine tip black marker.
Tools/Materials Used:
Brackets after the item are where they were originally purchased. This is in case you want to use anything I did and where they were found.
The initial cost as of 3/3/24 will be noted like this in USD for your consideration to weigh your options or so you can compare elswhere for better pricing.
Figure
-Disney Animators Collection Princess Belle Cake Topper $8.80 (tax and shipping included in price)
Tools
-Gordon Folding Lock-Back Utility Knife $5.44 [Harbor Freight]
-Sanding Sticks DGBRSM 30pcs Black 37mm $8.88 [Amazon]
-3M 150 sand paper $2.39 [Amazon]
-Transon Artist Paint Brushes Set of 12 $12.99 [Amazon]
-Honoson 5 Pieces Miniature Sculpting Tools Set Mini Stainless Steel Double-Headed Tool $11.99 [Amazon]
Materials
-Aves Apoxie Sculpt - 2 Part Modeling Compound - 1/4 Pound, Natural $21.95 [Amazon]
-HFT Super Glue 3-pack $1.49 [Harbor Freight]
-Cardboard [From a random box]
Paint
-Vallejo Model Color Flat Flesh, White, Vallejo Flat Brown, Black, Vallejo Azure, and Purple from set Vallejo Basic USA Acrylic Colors Paint Set, 17ml, Assorted Colors, 0.57 Fl Oz (Pack of 16)) $40.16 [Amazon] (can purchase cheaper individually)
Other
-Black Felt Tip Sharpie $5.87 from a 4 pack [Wal-Mart]
For Your Consideration:
A few extra modifications that you could do with yours to make this fig even more accurate:
-Make alternate arm that you can use for her pointing pose or use a different base fig where the arms move.
-An alternate color Dhylec sword or even paint one side the default color with the other the orange (or red color) it sometimes turns into.
-Can go all in with her summons and create a bunch of doll heads to imitate her Super.
SHOWCASE


